wolverine
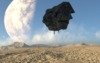
Well even the teaser looks really good! Was gonna say though the UNSC Infinity would look better in the shot. Can't wait to see the final product!
wolverine
I love the Infinity, but well, the first problem is: The Infinity is super-large which makes the proper scaling more difficult... The ship you add to the photo and the photo must match each other somehow... The second problem is to find a render of any ship in the angle you would like to show it. The most renders show the ships exactly from the side or slightly from above, which means any figures in the shot need to stand higher than the ground level. The most natural way is the upper area of a canyon... And now, you have to fit the chosen ship in that canyon, which means it should not be too large... The Infinity is 5,6 km (around 18600 ft) long, 0,8 km (around 2700 ft) wide and 1 km (around 3416 ft) high. That's harder to add than one of the smaller frigates...Well even the teaser looks really good! Was gonna say though the UNSC Infinity would look better in the shot. Can't wait to see the final product!
")

Chernobyl
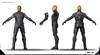
Holy crap this is amazing. What I've done for my undersuit is I've bought a high res pattern from Gun Head Design and sent it off to a printing/sewing place where it's on spandex. But the problem is I couldn't change the color.
It is just the normal grey and black. Butttt I am sure with your Photoshopping skills and whatnot you could find a way to change the colors before you send it off to get printed. Also I got mine custom tailored and I got a lot of extra custom stuff on it. Zentai Zone is where I got it actually. But yeah that might work?
Sent from my iPhone using Tapatalk
...I am sure with your Photoshopping skills and whatnot you could find a way to change the colors before you send it off to get printed.
At the moment, the plan is to build a kind of muscle suit, that follows the undersuit patterns as good as possible, paint it afterwords (for adding details and colors) and add some more detail using foam, right the way CommanderPalmer did it (http://www.405th.com/showthread.php?t=46294&page=10). But right now, it's just an idea. I will see in the future, if the muscle-suit-thing will work out properly. Your approach sounds good as well - I'm looking forward to see some photos of your finished undersuit.
Ok man, I see you really, really want the Infinity in this shot. So what...?!!!?!!Will this work?
New plan, new scribble. Let's try to look it less than Halo 4. How about this?

Managed to find a battery-driven LED-stripe - like those you can stick to the inside of your customized gaming pc, but with batteries... Wasn't expensive, so ordered it yesterday evening and will give a try next weekend. If this works, I'll avoid lots of wiring and considering how to do the energy supply - which would be nice, as I'm no electrician-guy...Something you may want to consider is small OLED screens. Pretty much paper thin, low energy consumption. You would have to buy a kit, but they are out there. I'm looking into making a working OLED display for my helmet, but that's a little ways down the road.
Small OLED-screens sound like a really nice idea in terms of brightness and color-adjustability, but well... I'm no electrician-guy. But anyway: Thanks for the good idea... 


 For this the, guys of ArtemSFX where very inspirational:

 But the next step after the lighting tests will have to be the dummy - and what can I say... It's summer, it's quite warm and I'm not looking forward wrapping me in duct tape. But well, what has to be done, has to be done...
 Otherwise, I'll do basically the same, but with a more basic shape and some filler to close the small gaps...