3D Printable Halo 4 Files (WIP)

Status
Not open for further replies.

harican89

Well-Known Member
Hi guys,

since ive bought a new 3D printer (which has some issues lately, but iam working on it) i want to get my whole armor out of the printer (my old ODST armor breaks apart because of some problems with the resin and fiberglas thickness).

the first file iam printing is the h4 battle rifle:

h4_br_prog8.jpg


the file is great and contains several diffrent objects which collapse in the inside. some 3d slicer programms can cause some errors. i highly recommend to fix those files with NetFab Cloud service. So you will avoid some some holes in the inside.

here are the updates. if you are interesed in the sliced parts let me know. i can upload them (they are optimized for 3d printing beds with a sice of 225x15x15mm). btw. ive edited some parts (like the bolts at the grip and so on).

RIS Mounting Bar
Barrel
Front Side
Trigger

the rest will come next week.


Since i want to create my whole suit with the 3D printer, ive to edit most of the pepakura files and adding some details, smoothing the surface and so on. iam using blender, but iam still a noob so this process will take a while.

Major steps for every Pepakura File:
  1. Adding Missing Details
  2. Carving some missing details out of the surface
  3. Adding Thickness with Solidify Modifier
  4. Split the files into segments which are wearable
  5. implementing an optional interlocking system
  6. smoothing the surface
  7. Release the file!


Halo 4 Recuit Shin:

the last 3 days ive edited the h4 recruit shin modeled by Fat-Hi555, who gave me the permission to edit those files for my own purpose (actually he created the files for me and with my ref images :) he is a really nice guy).

here are some of the results for the smoothing process and details. you will notice, that ive to redo the smoothing after ive edited the details. but i will release the file within the next days:

The Original Pepakura File:
8498401581_296ddf9014_b.jpg


Refs:
Back Front Left Side Right Side Overview


Smoothing Example:

Smoothing_zps41f3f18d.png


Details:

Details_Bolts_Holes_01_zps0198e8f7.png


Image Details 02
Image Details 03
Image Details 04

Details_Bolts_Holes_zps9418298c.png


The next steps will be the Splitting, Adding Thickness, Smoothing and Locking System.


The next files ive in mind are the Warmaster Shoulder, Recruit Thighs, Recruit Boots, Recon or CIO Chest, Air Assault or Recon Helmet.

Hope you like this and there are some users around who wants these files :)


DOWNLOAD:

Dropbox Folder with all files i've to offer).

https://www.dropbox.com/sh/n79kzrexl2laf75/AAB0rOh7PtOLk3d1qJANfoHFa

Format:
STL and Blend for any further attempts to improve the files.

8498401581_296ddf9014_b.jpg


Smoothing_zps41f3f18d.png


Details_Bolts_Holes_01_zps0198e8f7.png


Details_Bolts_Holes_zps9418298c.png
 
Last edited by a moderator:
Okay,
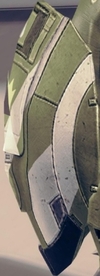
the shin is nearly complete. ive started to work on the warmaster shoulder as well and it turns out pretty good.
ive extruded some of the curved faces near the edge to get the depth details right.

25e3056f-60e5-44cc-be39-0d8e0c6218dc_zpsda9cd796.png
cff8cebb-cfbb-40c3-9793-ab4cbb89ee55_zps94acd1ad.png


Refs:
Shoulder-Top_zps5756ea85.jpg
Shoulder-Side_zps89d234d1.jpg
Shoulder-BottomDetails_zpsb9545616.jpg


As you can see, there are still some details missing. for example the tiny breackets at the rim. or the square hole at the belt at the bottom. i will add these details tomorrow.

what ive to do with both files is the add the interlocking system for any undersuit connection.
ive some trianglular shape in mind with a screw thread in the center.
 

Attachments

  • Shoulder-Top_zps5756ea85.jpg
    Shoulder-Top_zps5756ea85.jpg
    109.9 KB · Views: 401
  • cff8cebb-cfbb-40c3-9793-ab4cbb89ee55_zps94acd1ad.png
    cff8cebb-cfbb-40c3-9793-ab4cbb89ee55_zps94acd1ad.png
    66.9 KB · Views: 400
  • 25e3056f-60e5-44cc-be39-0d8e0c6218dc_zpsda9cd796.png
    25e3056f-60e5-44cc-be39-0d8e0c6218dc_zpsda9cd796.png
    86.9 KB · Views: 453
  • Shoulder-BottomDetails_zpsb9545616.jpg
    Shoulder-BottomDetails_zpsb9545616.jpg
    85.3 KB · Views: 397
  • Shoulder-Side_zps89d234d1.jpg
    Shoulder-Side_zps89d234d1.jpg
    47 KB · Views: 327
update guys:
befor i will finish the shin and shoulder piece (because of the lack of idea for an interlocking system) i will try to finish the M6H Magnum.
i used the ripped magnum file from the game. clean most of the edges and faces, adding the missing details and seperate each component of the weapon (like the grip, slide and so on).

here is a preview. i finished up the laser, the sight and most of the slide. after that iam working on the grip and trigger.

My Ref Base Image:
486ee4af-bfa7-4a46-b982-7137ec339bb9_zps08db05c1.png


The Original Game Rip File:
f995e75c-494e-4c85-8454-56d986cfc8a8_zpsdddfd864.png


The latest update:
2211bf6e-e5b8-4728-8a6f-522245ebe856_zps1515bb63.png
 

Attachments

  • 486ee4af-bfa7-4a46-b982-7137ec339bb9_zps08db05c1.png
    486ee4af-bfa7-4a46-b982-7137ec339bb9_zps08db05c1.png
    252.4 KB · Views: 437
  • f995e75c-494e-4c85-8454-56d986cfc8a8_zpsdddfd864.png
    f995e75c-494e-4c85-8454-56d986cfc8a8_zpsdddfd864.png
    33.4 KB · Views: 424
  • 2211bf6e-e5b8-4728-8a6f-522245ebe856_zps1515bb63.png
    2211bf6e-e5b8-4728-8a6f-522245ebe856_zps1515bb63.png
    35.8 KB · Views: 335
Not sure how I missed the start of this thread, but fantastic work!! It should be interesting to see a full suit entirely 3d printed.

-Matt
 
I'm not sure how I missed this either! I love the idea of 3d printing.
Which printer did you get. I'm going to purchase one in the future I just don't know which one yet. I may save up for the Makerbot z18. It isn't out yet but it's the biggest one and you could feasibly print out a whole helmet in it. But it's like $6500.
 
Ive heard that makerbot printers break extremely easily, a friend had one but it broke within a month and was a pain to fix
 
Pretty much all home printers break, it's just a fact of the engineering right now.
The advantage of MB printers is that you've got a warranty and the support of one of the largest industrial printer co's, Stratsys.
The disadvantage on the other hand is that one cannot simply replace the parts without voiding the warranty, also Stratsys is being pretty dodgy with lawsuits against smaller companies.

Tis why I stick with Open-source printer tech, easy to fix and even easier to find parts for.
 
iam glad there are any interests.
i get the makerbot replicator clone (brand is chinese CTC) but its complete the same layout like the replicator or flashforge.

actually ive got some major problems with warping near the edges of long and slim parts. they bend over and the seam gets corrupted. iam currently searching for a fix or the reason for this issue. hope there isnt any complications with the heating bed because my reseller is pretty aggressive in terms and condition about a replacement... what ever. this will continue and i believe in 3D printing for home purpose.

i will keep you updated next monday. ;-)
 
i think the problem may be that the slider rail isnt alligned perefectly, because the larger the piece gets, the more room for error there is.
 
If we don't have one, it may be worth you (and some others, maybe) starting up a dedicated 3D Printer thread to be stickied, and help people out with questions.

I'll certainly need the input, I'm considering a printer myself after my move.
 
actually ive got some major problems with warping near the edges of long and slim parts. they bend over and the seam gets corrupted. iam currently searching for a fix or the reason for this issue. hope there isnt any complications with the heating bed because my reseller is pretty aggressive in terms and condition about a replacement... what ever. this will continue and i believe in 3D printing for home purpose.

The part is cooling unevenly. Upgrading your printer with a plexi-glass window to help "trap" in the heat in and keep cool breezes out can help.

If we don't have one, it may be worth you (and some others, maybe) starting up a dedicated 3D Printer thread to be stickied, and help people out with questions.

I'll certainly need the input, I'm considering a printer myself after my move.

I've got a video for 3D printing armor. It's kind of hard to follow, was made on my laptop, and I didn't follow a lesson plan. But I plan to make an entire series explaining everything, that way you can jump to the video lesson you'll need. I've been trying to plan the videos out to make it easy to follow. Hopefully, I'll have something small printed as an example during the process.
 
If we don't have one, it may be worth you (and some others, maybe) starting up a dedicated 3D Printer thread to be stickied, and help people out with questions.

I'll certainly need the input, I'm considering a printer myself after my move.

I'd be happy to help out where applicable.
I've probably got too much troubleshooting under my belt at this point >.<
 
Update:
for my own build iam currently working on the XV-27 Shifting Arm, which is pretty nice and after removing most of the triangles its nearly easy to work with the original file.

here is the ref images iam working with:
640px-H4_XV-27_Shifting_Arme.jpg


and the 3D render after 1,5h of working time:
d2117759-f0cd-446e-98c5-5ec03160bf1d_zpsd77d40de.png


hope this will get finished soon enough. i want to print this first. the 3d printing starting next monday / thuesday, because i need some replacements for the extruder.
 

Attachments

  • 640px-H4_XV-27_Shifting_Arme.jpg
    640px-H4_XV-27_Shifting_Arme.jpg
    62.7 KB · Views: 412
  • d2117759-f0cd-446e-98c5-5ec03160bf1d_zpsd77d40de.png
    d2117759-f0cd-446e-98c5-5ec03160bf1d_zpsd77d40de.png
    85.7 KB · Views: 391
You're going to have to teach me how to do this whole business. I'm in need of some love poring on some files and I think you're the man for the job.
 
You're going to have to teach me how to do this whole business. I'm in need of some love poring on some files and I think you're the man for the job.

actually iam currently creating a tutorial for the german 405th wiki iam working on. there are all information about preparing a pepakura or basic 3d file for 3d printing.
iam willing to upload the the tutorial in english also in the english 405th wiki as well. they look the same (hosted on wikia.com), but the english writer hasnt spent a lot of time recently.

i will keep you updated ;-)
 
Update:
the XV-27 Arm is going on. here are most of the details i noticed and copy out of the ref images i could find. ive no images ripped out of the game (currently no xbox 360 available).
so i want to get this done by monday (with the interlocking system).

e3d16c57-8cfe-4f9e-9a53-3c4e15902f3a_zps70ae6dbc.png
 

Attachments

  • e3d16c57-8cfe-4f9e-9a53-3c4e15902f3a_zps70ae6dbc.png
    e3d16c57-8cfe-4f9e-9a53-3c4e15902f3a_zps70ae6dbc.png
    102.1 KB · Views: 405
sadly my printer need still some replacement parts... but here is an other update:

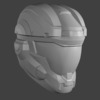
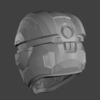
The H4 Air Assault Helmet. i couldnt find very detailed references, so i had to guess which details i should add and the way how to add those.
here are the first results:

8d4ccdc5-a4da-4696-8e63-97ce1c440bf4_zps6dad7c5d.png
fae2b28c-a750-4b9d-8dbe-bda23c2fbdb3_zps40e4d9dc.png


i hope this will get ready soon (maybe an other 2 days).
hope you like the result.
 

Attachments

  • fae2b28c-a750-4b9d-8dbe-bda23c2fbdb3_zps40e4d9dc.png
    fae2b28c-a750-4b9d-8dbe-bda23c2fbdb3_zps40e4d9dc.png
    94.3 KB · Views: 642
  • 8d4ccdc5-a4da-4696-8e63-97ce1c440bf4_zps6dad7c5d.png
    8d4ccdc5-a4da-4696-8e63-97ce1c440bf4_zps6dad7c5d.png
    85.3 KB · Views: 679
since i got the time for 3d editing and the replacement parts for the printer have arrived, ive managed to work on the 3d m6h again.
its now nearly complete. maybe i will edit some spots in the future but this will work.

ive edited the slide to get it moveable and the slot for the magazin is now working.

render_m6h_05_zps577bccf6.png
Screenshot2014-06-21014600_zpsb768f087.png


i will now get this ready for print (slicing)
 

Attachments

  • render_m6h_05_zps577bccf6.png
    render_m6h_05_zps577bccf6.png
    100 KB · Views: 332
  • Screenshot2014-06-21014600_zpsb768f087.png
    Screenshot2014-06-21014600_zpsb768f087.png
    298.2 KB · Views: 469
Status
Not open for further replies.
Back
Top