Halo 1
Active Member
Well Marines, after almost a year + after receiving all 9 Set Kits from Sean [Thanks Bro!] and working on almost everyone's suit/helping out a few others with advice and ideas, cept mine, I finally got mine done.
Although it took awhile to finish, I guess the initial work done on the earlier suits, have helped me finish mine a little differently, put together a little better and a bit more personal.
While almost all 9 Suits are basically using the same DIY assembly method, the same vest base as well as the accessories needed to complete the look, cosmetic differences and personal artwork allowed each ODST to be unique in it's user's own special way.
Mine, using Sean's instructions as a base guide and the workshop materials I had on hand, coupled with my previous armor build experience, and a little real world Military geardo experience/knowledge thrown in, I came up with this.

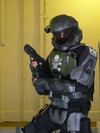
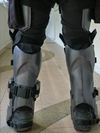
All armor parts were reinforced with fiberglass, cept for the thigh pieces, which I felt needed to be more flexible to wrap around my thighs. Cause of the sizing, I had to trimmed a few parts down so as to conform to my body size, namely the back plate, thigh pieces and gauntlets. I also had to remove the hip plates as they were interfering with my thigh set up. I'm still deciding if I can work it in.
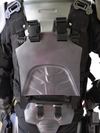
Point to note, my ab pieces are removable and will allow me to use MOLLE pouches to give me a completely different look/loadout. The RAV MOLLE sides are also exposed and that will allow me more flexibility in adding pouches if I need em [especially for our comms, FYI, we're using OEM Kenwood walkies with throat mikes.].
I've also opted to go with an RAV vest as a base for the armor to be affixed on, with the CIRAS deltoids used for the shoulder/bicep armor parts.
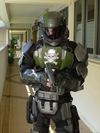
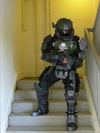
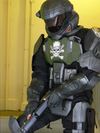
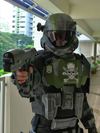
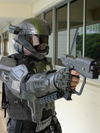
My shoulder straps are from the H-Harness by Blackhawk Industries. I have an 870 Remington Side Saddle on my right gauntlet, as well as a holster and ammo pouch set up on both my thigh pieces. Quite a bit of detail work and research was done on every bit of armor so I'll just let the pictures speak for themselves. If you have any questions, feel free to ask.
I would also like to take the opportunity to thank Sean B. [Bro, we need them backpacks ASAP!] for the awesome kit, Xtreme tactics for the cool chest piece, Rube for the awesome WETA Helmet [Although I'm wearing Sean's for this photo test shoot], Dave [Ithica] for the Magnum [I hope you're taking care of yourself over there bro.], and every finished ODST I've seen here that has given me fantastic ideas to play around with to complete my suit.
That said, I present my ODST suit [short of weathering and some detailing] for your perusal...


'Check!, Loading!'


Thanks for looking...
Stay safe,
Tim.
Although it took awhile to finish, I guess the initial work done on the earlier suits, have helped me finish mine a little differently, put together a little better and a bit more personal.
While almost all 9 Suits are basically using the same DIY assembly method, the same vest base as well as the accessories needed to complete the look, cosmetic differences and personal artwork allowed each ODST to be unique in it's user's own special way.
Mine, using Sean's instructions as a base guide and the workshop materials I had on hand, coupled with my previous armor build experience, and a little real world Military geardo experience/knowledge thrown in, I came up with this.
All armor parts were reinforced with fiberglass, cept for the thigh pieces, which I felt needed to be more flexible to wrap around my thighs. Cause of the sizing, I had to trimmed a few parts down so as to conform to my body size, namely the back plate, thigh pieces and gauntlets. I also had to remove the hip plates as they were interfering with my thigh set up. I'm still deciding if I can work it in.
Point to note, my ab pieces are removable and will allow me to use MOLLE pouches to give me a completely different look/loadout. The RAV MOLLE sides are also exposed and that will allow me more flexibility in adding pouches if I need em [especially for our comms, FYI, we're using OEM Kenwood walkies with throat mikes.].
I've also opted to go with an RAV vest as a base for the armor to be affixed on, with the CIRAS deltoids used for the shoulder/bicep armor parts.
My shoulder straps are from the H-Harness by Blackhawk Industries. I have an 870 Remington Side Saddle on my right gauntlet, as well as a holster and ammo pouch set up on both my thigh pieces. Quite a bit of detail work and research was done on every bit of armor so I'll just let the pictures speak for themselves. If you have any questions, feel free to ask.
I would also like to take the opportunity to thank Sean B. [Bro, we need them backpacks ASAP!] for the awesome kit, Xtreme tactics for the cool chest piece, Rube for the awesome WETA Helmet [Although I'm wearing Sean's for this photo test shoot], Dave [Ithica] for the Magnum [I hope you're taking care of yourself over there bro.], and every finished ODST I've seen here that has given me fantastic ideas to play around with to complete my suit.
That said, I present my ODST suit [short of weathering and some detailing] for your perusal...
'Check!, Loading!'
Thanks for looking...
Stay safe,
Tim.
Attachments
-
 P1000019.jpg99 KB · Views: 6,358
 -
 P1000053.jpg76 KB · Views: 908
 -
 P1000028.jpg67.5 KB · Views: 477
 -
 P1000033.jpg84.6 KB · Views: 621
 -
 P1000031.jpg73.7 KB · Views: 526
 -
 P1000052.jpg77.4 KB · Views: 595
 -
 P1000049.jpg73.6 KB · Views: 1,109
 -
 P1000051.jpg106.8 KB · Views: 569
 -
 P1000054.jpg95.4 KB · Views: 1,145
 -
 P1000055.jpg91.5 KB · Views: 805

