Snooty
New Member
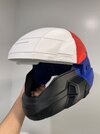
I have been slowly printing out the pieces of my first ODST helmet for the past few days and now the last piece at 0412 on a Saturday morning finished printing.
I now bask in its amazingness wearing the quickly assembled pieces while i lay in bed.
My question is where do i go from here?
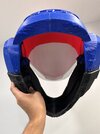
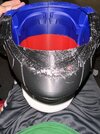
I know i need to sand prime and paint and all that but i need some advice on how i should deal with the bottom side of the helm.
Also is it recommended to do post process every piece separately or as a glued together whole?
I think its just me but the helm does look a bit big for my head but any smaller and it wouldnt be wearable
I now bask in its amazingness wearing the quickly assembled pieces while i lay in bed.
My question is where do i go from here?
I know i need to sand prime and paint and all that but i need some advice on how i should deal with the bottom side of the helm.
Also is it recommended to do post process every piece separately or as a glued together whole?
I think its just me but the helm does look a bit big for my head but any smaller and it wouldnt be wearable


") It's a great opportunity to work with a bunch of different mediums and not too hard to come out with a unique, expressive, and awesome costume! Is this the titlewave infinite model? Or from a diffferent source?
It's a great opportunity to work with a bunch of different mediums and not too hard to come out with a unique, expressive, and awesome costume! Is this the titlewave infinite model? Or from a diffferent source?