ARGUS GEN2 - Linda-058

Status
Not open for further replies.
Bit of a struggle to get started, but the result of the first test print is a tiny M6H2! IMG_20221226_170811.jpg

Took only about three minutes for this. We're on our way.
 
IMG_20230118_171113.jpg

After making the spool and mounting up, I decided it was time to test print the M6H2. After some fiddling with the Ankermake software, I fired up an overnight print and woke up to this disaster.
IMG_20230119_050047.jpg


Yeesh. After some troubleshooting with the discord, switching to the Prusa slicer for custom support structures, failing a couple more times and lowering the print temp to its minimum, (205c) I managed to get far enough that I'm comfortable with leaving it to print again. Should be done in about five more hours.
 
View attachment 327150
After making the spool and mounting up, I decided it was time to test print the M6H2. After some fiddling with the Ankermake software, I fired up an overnight print and woke up to this disaster. View attachment 327149

Yeesh. After some troubleshooting with the discord, switching to the Prusa slicer for custom support structures, failing a couple more times and lowering the print temp to its minimum, (205c) I managed to get far enough that I'm comfortable with leaving it to print again. Should be done in about five more hours.
dang, sorry to see. looking forward to following your build! argus has been a favorite of mine for a while, so your take on it will be pretty cool to see!
 
Tried another print as I mentioned above and results were going smooth enough to make one coherent piece. View attachment 327158 And then maybe a bit after I just left this... View attachment 327159 I think the model got knocked off the bed or something. After going with the crafting channel abit, I decided to buy Aguilar's parts instead of trying to print one entire gun. This time I'm making the Fumos watch. View attachment 327160
You may want to put the printer up on a desk, the carpet will only further the wobble that's affecting the prints. If not, maybe some anti-vibration feet, but not sure what the Ankermake has yet. Worth a look! Also, where did you get 14 kg of PLA? I'm dying to get some of that bulk deal!
 
Past few days have been rather messy. Once when I was set to go to print a receiver, it started off, I went to bed and then about an hour later checked my printer to find this:
IMG_20230119_211558.jpg


With that gore I needed to clean, I started performing surgery in front of a live audience. Took most of the kit apart and then heated the head up to peel away the buildup, only to have a couple of the leads to the head break. Rats. Strangely, Anker included a spare head assembly with my printer, so I slapped that in and off we were. After troubleshooting some slicer issues with supports, I was back at it again to get the receiver done. After a slower and longer start, we had that part done.
IMG_20230120_163657.jpg


The next print was the smartlink and flashlight attachments, which went off well. While it was going on, I sat down making clips of the game and how it reacts to try figuring out where the cuts in the weapon will be so I can have a slide/magazine/handguard/etc. Maybe if I go down some of this slicing route I can also have a setup for a gunfighter (no smart link or handguard). Though after printing, the scale is weird, as there's probably no way to fit a 12.7x42mm cartridge up through the magazine, let alone have the mag have 12 cartridges in the first place. The closest thing to this is the .500 S&W, a giant revolver cartridge, which isn't the style of what this thing uses. We will see what I can do with it. For now, I need to wait for the weather to get a bit nicer so I can do some sanding/assembly. Anyone have suggestions for glue/adhesive and magnets for stuff?
 
Past few days have been rather messy. Once when I was set to go to print a receiver, it started off, I went to bed and then about an hour later checked my printer to find this: View attachment 327182

With that gore I needed to clean, I started performing surgery in front of a live audience. Took most of the kit apart and then heated the head up to peel away the buildup, only to have a couple of the leads to the head break. Rats. Strangely, Anker included a spare head assembly with my printer, so I slapped that in and off we were. After troubleshooting some slicer issues with supports, I was back at it again to get the receiver done. After a slower and longer start, we had that part done. View attachment 327184

The next print was the smartlink and flashlight attachments, which went off well. While it was going on, I sat down making clips of the game and how it reacts to try figuring out where the cuts in the weapon will be so I can have a slide/magazine/handguard/etc. Maybe if I go down some of this slicing route I can also have a setup for a gunfighter (no smart link or handguard). Though after printing, the scale is weird, as there's probably no way to fit a 12.7x42mm cartridge up through the magazine, let alone have the mag have 12 cartridges in the first place. The closest thing to this is the .500 S&W, a giant revolver cartridge, which isn't the style of what this thing uses. We will see what I can do with it. For now, I need to wait for the weather to get a bit nicer so I can do some sanding/assembly. Anyone have suggestions for glue/adhesive and magnets for stuff?
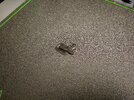
Omg that happened to me before, it's no fun for sure!! That happened to me when I tried to do PETG the first time (albeit, I didn't realize it was PETG instead of PLA+) and didn't have the novel temperature high enough for the prolonged printing.

Not sure I'm.following your mag statement. Did the files not come separated to have a separate magazine chamber, magazine and slide already and your trying to add those now in post processing?
 
Ah that makes sense.
I meet some members last week who had a magnum 3d printed that is "operational", likely the way your looking for Instead of a single file full print.

If you want I can find out where they got them and link you the source.

Let me know. Out with family at a hockey game so will post as soon as I can
 
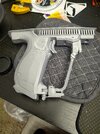
So after the gore and quite a bit of (re)prints, I finally had enough decent quality parts to produce something that looks like a gun.
IMG_20230123_182830.jpg


With the things I've learned, I'm using a different model from Oddworks to include the internals and give it a more animated look. With this one and its state, I'll try out how I want to paint this, and continue to draw on it with a sharpie for ideas. Bring it on.
 
Status
Not open for further replies.
Back
Top