1st Build First armor build

Berzzi

New Member
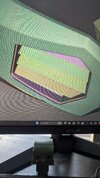
I decided to start documenting my armor build journey. The plan is to build a suit based on my in game Infinite armor (shown in image).
1000001813.jpg
1000001814.jpg
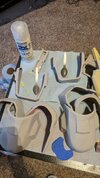
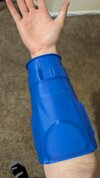
I've decided I'm gonna do a Reach build with the EVA helmet. The chest in the first image, the shoulders swapped sides in the second, and maybe mount that wrist screen but have it fit my phone. It's going to be 3d printed PLA+ for armor and some mixture of foam for the under suit parts.i plan to have it done by Dragon Con in August 2024. The grind has already begun.
 
I started in March by buying a 3d printer. I got an Elegoo Neptune 4 Max. The first thing I printed was a reach Magnum. After dealing with initial printer calibrations that caused this:
1000001870.jpg
i finally ended up with this:
1000001874.jpg
1000001918.jpg
not pictured are the slide and magazine that are moveable.
 
Next I decided I wanted to work on the armor from the feet up so that as I learn how to post process, the parts of the build that will be looked at the most will look the best.
First, I found shoes that give me a 4in boost on clearance for ~$50
1000001886.jpg

Then I printed slices of the boot armor too check the scale and landed on 110%
1000001896.jpg

I ended up using a deburring tool to remove most of the lip on the bottom of the heel to allow it to snug up better to the shoe.
 
Since the left foot, I've printed the left shin, knee, and both hand guards.
1000001960.jpg
1000001959.jpg
i found gloves that I felt very closely resembled the reach gloves. Since they already kinda had their own hand guard I Dremeled the under side out some and filled it with wood filler so that they lay better.
1000001913.jpg
1000002030.jpg
1000001919.jpg
1000001917.jpg
I'm currently working on getting the right for printed since I forgot to scale up two parts when i first printed it.

I've also got a pair of jogger/leggings and a stretchy cotton shirt with a turtle neck to wear underneath.
 
Next I decided I wanted to work on the armor from the feet up so that as I learn how to post process, the parts of the build that will be looked at the most will look the best.
First, I found shoes that give me a 4in boost on clearance for ~$50
View attachment 346212
Then I printed slices of the boot armor too check the scale and landed on 110%
View attachment 346213
I ended up using a deburring tool to remove most of the lip on the bottom of the heel to allow it to snug up better to the shoe.
You'll love the tall shoes! I think I have that exact same pair. The extra 4" gives a very nice height boost, but also a huge confidence boost! You really do feel like a Spartan when wearing them! Also, those shoes are quite comfy. After a full day of wearing them at a con, I find my regular street shoes to be less comfortable than the tall shoes! haha
 
You'll love the tall shoes! I think I have that exact same pair. The extra 4" gives a very nice height boost, but also a huge confidence boost! You really do feel like a Spartan when wearing them! Also, those shoes are quite comfy. After a full day of wearing them at a con, I find my regular street shoes to be less comfortable than the tall shoes! haha
Oh I'm glad you found them comfy, I tried them on and the sole felt like a thin piece of fabric attached to a block of wood so I was gonna get thin dr.scholls. but I agree the height is great. I'm 5'9" so being 6'1" feels great
 
Can I get a hook up on those gloves? haha. They look almost perfect
I bought some shoes that raise my height by 6" but they're too big for my boot armor so I went with Calto's as well, 4.5" that do fit.
Also, how are you going to do the fire shoulders? :p
 
Can I get a hook up on those gloves? haha. They look almost perfect
I bought some shoes that raise my height by 6" but they're too big for my boot armor so I went with Calto's as well, 4.5" that do fit.
Also, how are you going to do the fire shoulders? :p
The gloves are zune lotoo
 
Small update:
My hands are pissed from sanding, and I'm hoping to get back to printing now that I have a filament dryer.
I've welded the left foot pieces that I had originally sliced and printed in two. And I've sanded, applied Bondo, sanded, filler primed, sanded, and reprimed the parts I do have and just need to wet sand them.
1000002066.jpg
1000002065.jpg

I've been trying to find colors I like. So far I haven't found a metal color that would work for the magnum or for paint chips. They either look like aluminum or have a bunch of glitter in them that makes it look bad. I'm gonna try a gunmetal called Lead Belcher and a deep slate that was recommended. Im currently thinking some kinda blue for the main armor, and faded orange trim/highlights.
I got a charcoal grey for unpainted areas, but I'm gonna check out the chalked version of it since those parts of the armor in other pictures seem much less glossy.
1000002053.jpg
1000002056.jpg
1000002057.jpg
1000002064.jpg
 
Status update, I've been printing like crazy and not have the wrists, shins, a knife and some accessories, and I'm currently printing the last helmet piece
1000002082.jpg
1000002089.jpg
1000002090.jpg
i also got all the foot pieces ready to be wet sanded so I could set them aside.
1000002086.jpg
I've also got the shins attached by soldering the inside seam, and then two part epoxy on the outside and sanded it down.
1000002112.jpg
tonight I painted on bondo to the wrists and was forcefully reminded you can't put acetone in a solo cup.
1000002117.jpg

I also decided I wanted to make the vents on the helmet chin functional, so that I'm easier to hear, and I can blow fans out of it too prevent visor fog.
1000002094.jpg
1000002113.jpg
1000002116.jpg
i also think I've settled on a metal color. So I took my top two choices and put them on a scrap piece to practice the chipping weathering
1000002107.jpg
i also have two grey colors I'm torn between for the non colorful armor parts
1000002119.jpg
 

Attachments

  • 1000002095.jpg
    1000002095.jpg
    3.7 MB · Views: 0
  • 1000002086.jpg
    1000002086.jpg
    2.3 MB · Views: 1
  • 1000002089.jpg
    1000002089.jpg
    1.2 MB · Views: 0
  • 1000002090.jpg
    1000002090.jpg
    1.5 MB · Views: 0
  • 1000002112.jpg
    1000002112.jpg
    2.2 MB · Views: 0
  • 1000002090.jpg
    1000002090.jpg
    1.5 MB · Views: 0
  • 1000002112.jpg
    1000002112.jpg
    2.2 MB · Views: 0
  • 1000002116.jpg
    1000002116.jpg
    5.8 MB · Views: 0
  • 1000002117.jpg
    1000002117.jpg
    2.7 MB · Views: 0

Your message may be considered spam for the following reasons:

If you wish to reply despite these issues, check the box below before replying.
Be aware that malicious compliance may result in more severe penalties.
Back
Top