Pepakura First timer's Reach armor

Status
Not open for further replies.

Chromosome

New Member
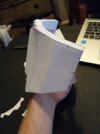
Hello all, new to the forums and new to pepakura, trying to make my armor from Halo Reach just like the OP says.


The build is going to be:

Helmet- Operator

Left And Right Shoulder- Recon

Chest- UA/Breacher

Along with some kitbashed accessories from both Reach and Infinite.


I decided to start with the shoulders since their size seemed more palatable than something really small or really large.

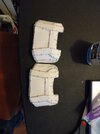
I feel like for my first pepakura build it could have turned out worse, but I'm not really satisfied with it.

I learned a lot from the process and I'm going to apply it to make the other shoulder, and then I might even remake this one.


When I was cutting these pieces out I tried to stay just outside of the line, figuring the extra space would be helpful but I feel like it crowded some of the more intricate pieces, and I was a bit heavy handed with my glue, warping the cardstock in a few spots.

Aside from those changes I'm also going to start using a ruler to get my folds sharper and straighter.


But here's to attempt #1 with many more to go.
 

Attachments

  • 20231006_003229.jpg
    20231006_003229.jpg
    1.7 MB · Views: 142
  • 20231006_113009.jpg
    20231006_113009.jpg
    1.5 MB · Views: 125
  • 20231006_230024.jpg
    20231006_230024.jpg
    4.2 MB · Views: 116
Aside from those changes I'm also going to start using a ruler to get my folds sharper and straighter.
I always got the best results using a metal ruler with my Pepakura pieces. I was also a fan of the ball point pen method, where you used two different colors ball point pens, red and blue in my preference, one color for mountain folds, one color for valley folds, and traced over the lines with the respective color. This both let you know easily which way to bend the paper and also lightly sored or indented the line, making it easier to fold. I know some other folks who would use an Exacto to lightly score the lines for ease of folds, but I was always afraid I would press too hard and cut through the cardstock, so I just stuck to pens.
 
Hey! Another pep builder! Not much of that going on these days. Back when I had time to make progress on my armor, I would use an exacto for scoring. I had 2 blades, one that was pretty dull and one that was sharp. I would use the dull one for scoring and the sharp one for cutting, always using a metal ruler to make sure the lines are perfect(ish).

The shoulder piece looks good tho! A little bit of paper warping is easily corrected in the hardening and Bondo stages. A paper craft piece (especially one with big "flat" sides) will usually have a little warping when done being assembled. You are doing great keep rolling along!
 
I always got the best results using a metal ruler with my Pepakura pieces. I was also a fan of the ball point pen method, where you used two different colors ball point pens, red and blue in my preference, one color for mountain folds, one color for valley folds, and traced over the lines with the respective color. This both let you know easily which way to bend the paper and also lightly sored or indented the line, making it easier to fold. I know some other folks who would use an Exacto to lightly score the lines for ease of folds, but I was always afraid I would press too hard and cut through the cardstock, so I just stuck to pens.
Sadly my local place only had plastic rulers, but it helped a whole lot still, but I can see how a sharper edge would be a huge benefit, I'm gonna order a metal one along after I get paid next for sure
Hey! Another pep builder! Not much of that going on these days. Back when I had time to make progress on my armor, I would use an exacto for scoring. I had 2 blades, one that was pretty dull and one that was sharp. I would use the dull one for scoring and the sharp one for cutting, always using a metal ruler to make sure the lines are perfect(ish).

The shoulder piece looks good tho! A little bit of paper warping is easily corrected in the hardening and Bondo stages. A paper craft piece (especially one with big "flat" sides) will usually have a little warping when done being assembled. You are doing great keep rolling along!
Yeah, I really wanted to do a lot of cosplay stuff when I was younger and it is what everyone was doing back then, and I had all the tools I needed, so I figured I'd dive in


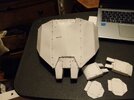
I got the second shoulder done, and it is a whole lot cleaner looking. (It's the one on the left in the close-up)
I'm putting off doing the little buckle looking things that attach to the outside for now, because I've misplaced my box cutters and I don't think I could cut the interior lines very easily with scissors without bending the paper too much.
But either way, onto the next piece, I'm gonna start the bicep plates.
 

Attachments

  • 20231007_222535.jpg
    20231007_222535.jpg
    1.7 MB · Views: 124
  • 20231007_222911.jpg
    20231007_222911.jpg
    3.9 MB · Views: 113
i haven't seen a new pep build thread in a while, im gona learn from this thread. i may ask questions
 
Looking great so far! Pep method might be older but it sure still works, can’t wait to see where this goes!
 
20231019_114607.jpg
20231019_114615.jpg
20231019_114622.jpg
20231019_114635.jpg

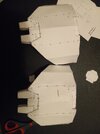
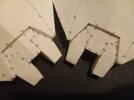
After some issues with printing, and then having to start over because I made it too small, I finally finished one of the bicep pieces.
That was a real mountain compared to the shoulder pads, and it shows in my quality, I feel like this is a bit sloppy, hopefully some of the other pieces are a bit easier.
I did the hand plates as a pallette cleanser, and they were a lot easier, like only a few hours from printing to being completed, so that was nice.
Time to try the other bicep now that I'm a bit more fresh.
 

Attachments

  • 20231019_114538.jpg
    20231019_114538.jpg
    1.9 MB · Views: 102
It took me a while to realize that 'printer issues' was referring to a regular paper printer, not a 3d printer XD
I was like "how is this guy having printer issues? it's pepakura?" :p
 
Hello all, new to the forums and new to pepakura, trying to make my armor from Halo Reach just like the OP says.


The build is going to be:

Helmet- Operator

Left And Right Shoulder- Recon

Chest- UA/Breacher

Along with some kitbashed accessories from both Reach and Infinite.


I decided to start with the shoulders since their size seemed more palatable than something really small or really large.

I feel like for my first pepakura build it could have turned out worse, but I'm not really satisfied with it.

I learned a lot from the process and I'm going to apply it to make the other shoulder, and then I might even remake this one.


When I was cutting these pieces out I tried to stay just outside of the line, figuring the extra space would be helpful but I feel like it crowded some of the more intricate pieces, and I was a bit heavy handed with my glue, warping the cardstock in a few spots.

Aside from those changes I'm also going to start using a ruler to get my folds sharper and straighter.


But here's to attempt #1 with many more to go.
Can't wait to see this build! Us Operators gotta stick together. ;)
 
Status
Not open for further replies.
Back
Top