Props H3 Fuel Rod Cannon build log / Large 3D Printed Prop Support Questions

Status
Not open for further replies.

S225

Active Member
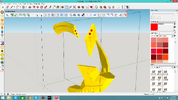
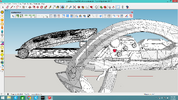
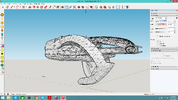
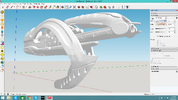
I'd like to get some feedback on internal supports for larger 3D printed prop. I've resumed getting a Halo 3 Fuel Rod Cannon ready for printing and while I have a good plan for the body of it, the forward arches are becoming an issue.
Screenshot (96).png

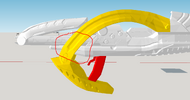
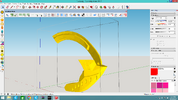
The hand guard and arch are only connected to the body by the handle and the connection on the top right just behind where the ammunition is loaded. Seeing as this is a shoulder mounted launcher most of its mass should be supported while on the shoulder. My worry are the highlighted bits, the arch itself will be under 2cm wide at its thinnest with some additional bulk on the backside where I plan to add support pegs.
Screenshot (97).pngScreenshot (98).png
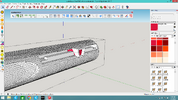
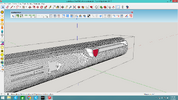
The pegs will be about 12mm in diameter and around 25-30mm long depending on the part. This method of pegged supports and super glue has worked well on my carbine but this build will be much more intricate.

Ideally I don't want too much of a load on this area and would prefer to beef up internal supports from the handle to the rest of the prop. I'd also like to keep everything 3D printed to avoid a run to the hardware store for PVC or something similar so I'm open to ideas and feedback on how to best keep this monster from snapping.
 
This might be a moot point based on what it looks like from the front, but are you able to connect the 3D print in this area? May require adding some geometry here, but then you'd have it connected to the main body sooner.
 

Attachments

  • FR_support.PNG
    FR_support.PNG
    114.4 KB · Views: 111
This might be a moot point based on what it looks like from the front, but are you able to connect the 3D print in this area? May require adding some geometry here, but then you'd have it connected to the main body sooner.
That's an idea on the table right now. There's not to much space there and it wouldn't take away from the look of the model too much if I filled that little void between the grip and body.
 
Screenshot (99).png

Slowly getting parts exported after detailing and subdividing to make everything smooth. The carbine is for reference so I can see how big this thing will be compared to something I've already printed. Both are scaled to 80% from the dimensions listed on the wiki. I'm happy with this scale though as in game this is closer to what the size looks like compared to some Marines who were kind enough to hold one while I took photos.

1ad942aa-23aa-474e-b53d-3a5ecf1ef2d7.png

Printing has started on the less complicated parts as I work to get room for lights/ electronics in place and mess with ways to get the barrel to collapse in and out.
Screenshot (100).png

Hopefully a simple curved notch that meets with the trigger will be enough to hold it in place and release it when the trigger is pulled. I'd need the spring pulling the trigger to the rear to be stronger than the spring pushing the barrel forward for this to work so not too much of a challenge on paper. The hood of the barrel will be another hurdle seeing as it will need to rotate up when the barrel is retracted. The solution will likely be a simple set of bearings where it attaches to the front with maybe magnets or a spring to keep it from flopping around.

For the lights I want to try to have them activate when the ammunition is loaded by having the rounds lock into place and depress a button to activate them or make it so the rounds complete a circuit when loaded so everything turn on from there.
Really excited to be working on this again!
 
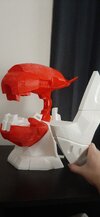
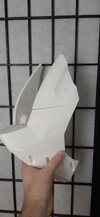
First few parts are off the printer and ready for a guick temp assembly.

20230905_003251.jpg20230905_003521.jpg
Last round of details are almost wrapped up at this point. Everything has locations for internal support pegs/blocks cut out and I've come up with a solution to get the barrel to extend and collapse! I should be able to draw up an example soon but it's going to be a simplified button on the side that interfaces internally with the barrel. Button gets pressed, moves out of the barrels way, spring does springy things and bam. The button will also lock back in once the barrel is out to keep everything in place.
 
First few parts are off the printer and ready for a guick temp assembly.

View attachment 335551View attachment 335552
Last round of details are almost wrapped up at this point. Everything has locations for internal support pegs/blocks cut out and I've come up with a solution to get the barrel to extend and collapse! I should be able to draw up an example soon but it's going to be a simplified button on the side that interfaces internally with the barrel. Button gets pressed, moves out of the barrels way, spring does springy things and bam. The button will also lock back in once the barrel is out to keep everything in place.
This is looking great so far! If you feel so inclined, you should consider posting the files somewhere once your build is finished! I'd love to get my hands on a Fuel Rod (y)
 
This is looking great so far! If you feel so inclined, you should consider posting the files somewhere once your build is finished! I'd love to get my hands on a Fuel Rod (y)
Absolutely. Once I'm happy with everything I'll definitely post them. Most everything seems to be around 12-18 hour prints with under 40 parts total so not terrible for a prop over a meter long. The arches are printing with their mirror part to save a little time.
 
Initial draft for this barrel button
Screenshot (104).pngScreenshot (105).pngScreenshot (106).png
There's room for a spring inside this little mechanism that will reset everything and lock into place along the channel cut out of the barrel. This should work well as a release and prevent the barrel from rotating on its long axis, something I absolutely would have forgotten to implement before I printed it...
What I lack in forward thinking I make up for in problem solving :D

Edit: I see now as well if I allow the button to be removable I can take the barrel out for storage!
 
PVC or threaded zinc rods are a common method of reinforcing prints. I know you stated you'd like to avoid doing a hardware store run but it will help the rigidity and durability of your prop in the long run.
 
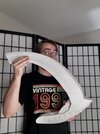
The last pieces to the arch are finishing tomorrow! Still need another 2 weeks or so to finish printing the rest but for now...

View attachment 335669View attachment 335670View attachment 335671
Seeing that this is as tall as it'll be, it's gonna be big. And here I thought 80% scale was too small.
Dude, this looks so cool!! I'm already researching gold paint for this.
Side note: ya never realize how big Halo weapons are until you see someone making them. Like, fuel rod ain't playin around.
 
Lookin good so far with that fuel rod !!! I also have some ideas for paint like Ofive...
Whats that plasma rifle though ? Are you painting & finishing that as well ?
 
Lookin good so far with that fuel rod !!! I also have some ideas for paint like Ofive...
Whats that plasma rifle though ? Are you painting & finishing that as well ?
The first thing I printed was a plasma rifle that just wasn't as nice looking as this one where I was able to upscale the game rip.
Just felt kinda "meh" as I looked at it.
The files for the updated one are in the free model index here on site. Painting is always a slow process for me and showing it off was mainly for scale (also plasma rifles are cool). I'll be keeping the paint on the fuel rod as true to Halo 3 as I can. I really like the decorative/ hazardous look of the gold/silver/grey combo.
 
Last edited:
Dude, this looks so cool!! I'm already researching gold paint for this.
Side note: ya never realize how big Halo weapons are until you see someone making them. Like, fuel rod ain't playin around.
Seriously. I did a DMR at full scale from what the wiki states and the thing is massive! I cant even shoulder it right. The more I look at the "accurate" scale of things compared to what the game show the more I see things don't line up right. Take the plasma rifle for example, little 5'7 me holding it looks just like a "normal" marine in Halo Reach when it comes to size. It almost looks small in a Spartans hands and even more so in an Elites. I find it hard to believe some of the dimensions the wiki list sometimes when I take a closer look at the games.

As for the fuel rod, thanks! I'll still be posting the files after everything is printed as I'm finding little things that need fixing every so often. It may not be the best or as detailed as it can be but it is at a point that I'm happy with what I turned the OG game rip into by just referencing photos. I'm not even done adding to it yet. I was looking at it in game the other day and noticed some small things I missed at the start. The nice thing is im not so worried about the integrity of the thing now. Glue and the support pegs I've printed are holding up very well so far and on the more delicate parts I'm planning to weld things together with a hot knife to play it safe. Still need to hollow parts out for the lights... not looking forward to that

Screenshot (63).pngScreenshot (76).png
 
Last edited:
The first thing I printed was a plasma rifle that just wasn't as nice looking as this one where I was able to upscale the game rip.
Just felt kinda "meh" as I looked at it.
The files for the updated one are in the free model index here on site. Painting is always a slow process for me and showing it off was mainly for scale (also plasma rifles are cool). I'll be keeping the paint on the fuel rod as true to Halo 3 as I can. I really like the decorative/ hazardous look of the gold/silver/grey combo.
Yeah, Its a good scale as a "mid-sized" weapon in the halo universe lol. Also, I can't wait for the fuel rod !! Gonna be great !
 
What am I doing with my life right now
20230913_002359.jpg

The barrels gonna stick out like another 25 cm from the front. Only the arches are glued together right now but just by friction fitting the front and back to them this is surprisingly sturdy! The handle should give plenty of added support once everything is in place.
 
What time is it? That's right! Its time for crudely engineered solutions and a whole lot of technical talk!

Still here? Good
here we go batman GIF

The hood on the barrel needs to be able to rotate freely to a degree to allow the whole thing to reciprocate.


With just my imagination, a rather horrifying thing, I've come up with this contraption that in THEORY will work for what I'm aiming to do.
Screenshot (107).png

Screenshot (108).png

After cutting up the rod that connects the hood to the barrel, I've designed things so that when the portion in direct contact with the hood slots back onto the rod it will form a solid connection.
Screenshot (109).png

The inner most portion of the rod will be fixed in place inside the barrel with bearings inserted that will allow an axel to connect to the outer lug that will connect to the hood. This would allow the hood to rotate as needed and I plan to install an internal stop pin similar to what a pocket knife implements that will prevent the whole thing from flopping around aimlessly. I only need it to rotate about 12 degrees so movement will be minimal. This is likely going to be the most delicate part of this build so the plan is to beef up the construction of the moving bits and go as minimal on mass with the hood as I can.
 
Ooo, I like it, Picasso

Makes sense to me! I won't be too much help with engineering design, just make sure to add some spacing tolerance for printing!
You got this.
 
How funny is it that the area I find most interesting and put the most effort into is on the bottom of the stock where most won't see.
20230916_234601.jpg

I detailed this around a year ago and it was a bad time. Sketchup doesn't really care to do things like this too well but I was stubborn and found a way.
 
Last edited:
Status
Not open for further replies.
Back
Top