Halo Reach ODST

Status
Not open for further replies.

ewatt99

New Member
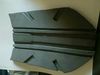
OK, so hello everyone. This is my first major build with EVA foam but is a fun and enjoyable project. I decided to do an ODST build since its a good start, and when Andrew DFT uploaded files I decided to take the easy route and use those and his tutorials. I plan on doing changes like a better helmet and adding a lot more detail, but this is my base. Please leave suggestions or feedback as it helps me make my armor better. Anyways, here is my chest, I went a little crazy with the battle damage but ill cover some of it with blackwash. More to come.

20161001_201917.jpg

20161001_201917.jpg
 
Last edited:
1361d01fb7c224b2c823375429d5a8e8.jpg
Here is my reference photo, except I'll be adding a little bit more "color" with white.
 

Attachments

  • 1361d01fb7c224b2c823375429d5a8e8.jpg
    1361d01fb7c224b2c823375429d5a8e8.jpg
    66.5 KB · Views: 24,459
I too am using Andrews templates. For the most part I followed them and his instruction. However I took some creative liberties. I added a foam belt to wrap the ab plate around instead of belt strapping it into place. Also instead of slicing the shins and doing the multi level terracing effect he likes to use I kept it a solid and cut the raised pieces out of 5mm foam and attached to the top of the shin (for example). I thought slicing it into thin strips and gluing it back together was too much for the structural integrity of that piece.

Looking forward to your finished piece. Keep your blade sharp!
 
Haha yes, I got 100 pack of blades for this project. I might do that shin thing, seems way easier

Sent from my SM-G930T using Tapatalk
 
f317752ba85d77f53a212e67e60562db.jpg


Shoulders, I'll be filling the seams with clay since there is a gap.
 

Attachments

  • f317752ba85d77f53a212e67e60562db.jpg
    f317752ba85d77f53a212e67e60562db.jpg
    311.8 KB · Views: 258
72e88a6fa3d25a9fc9419079d92a5557.jpg


Ab and back plates, I did these at 3 in the morning so they are rough, but paint will cover the hot glue gun burns haha.
 

Attachments

  • 72e88a6fa3d25a9fc9419079d92a5557.jpg
    72e88a6fa3d25a9fc9419079d92a5557.jpg
    345.6 KB · Views: 252
299bb5a1fd6b9f26c476b2cdc872ee1b.jpg


Finished a shin :D 
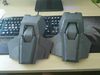
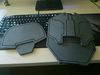
should have heated before cuts. Well time to improvise
 

Attachments

  • 299bb5a1fd6b9f26c476b2cdc872ee1b.jpg
    299bb5a1fd6b9f26c476b2cdc872ee1b.jpg
    322.4 KB · Views: 269
OK so I'm almost done with the foam build, still have to finish the other shin and the thighs. Lastly I'll do the wrists and then the helmet. Painting it a grey and white, blue visor, and adding a lot of stuff like tactical belt, pouches, grenades, pistol, etc. Still lots to do but just wanted to give an update.
 
Good job on your build, it's coming along nicely! I like your chest plate paint job. I am also working on an ODST build.

Keep up the great work!
 
OK so I'm almost done with the foam build, still have to finish the other shin and the thighs. Lastly I'll do the wrists and then the helmet. Painting it a grey and white, blue visor, and adding a lot of stuff like tactical belt, pouches, grenades, pistol, etc. Still lots to do but just wanted to give an update.

From your right shoulder it looks like the blade is dragging slightly or you're sawing through the beveled edges. If you're sawing with a craft knife it might be time to look into getting a longer one or setting up cutting blocks to reach a consistent angle along the length of the armour piece.

Other than that one spot the armour is looking pretty rad and well done.
Yeah, I had trouble beveling but after a few practice cuts I think I got it. I should have practiced before doing it but we all learn from mistakes.
 
the right shoulder bevel cut can be cleaned up some by using sandpaper. Step them down like (i don't remember the grits, but something like 60, 80, 120) it will smooth that out, if you want. Everything is looking great!
 
Do you guys have any suggestions on cutting straighter? My shin cuts in the middle lines seem a little curvey.
 
Do you guys have any suggestions on cutting straighter? My shin cuts in the middle lines seem a little curvey.

If you have a straight edge of some sort, or a metal ruler, use that. It helps keep your line straight and your cut angle square since you're not sliding left and right to follow a line drawn on the foam.

For most of my armour it was just loosey-goosey cutting without a straight edge and nothing matched up well. For my pistol every cut that wasn't curved I used a ruler and boy did it help. Everything looks cleaner and you save on glue and filler because everything ends up being flush.
 
I use a clear plastic ruler, I use it for almost every cut. It's extremely useful. Would definitely recommend a ruler of any kind over a pokémon-card.
Also, for using sandpaper, start off by using 100 or 120 grit. 80 grit can rip up the foam and make it look bad.
 
Status
Not open for further replies.
Back
Top