1st Build Hardening the inside of a 3D printed armor

TrollDude

New Member
I was wondering how I could harden the inside of my 3D printed Master Chief armor, since it's rather brittle. I thought about using epoxy resin, but due to the high temps it produces while hardening I think that falls out of question. Are there any alternatives? Another thought was to use a fiberglass mat and cut it, then use epoxy to make it rigid, but it seems like that falls out of question too then.
The layers and joints sometimes tear apart, so I'd need something to make it rigid from the inside... Best would be a faster but still reliable option since I need the armor in about 2 weeks and I still gotta paint it.

Any tips are greatly appreaciated, thanks in advance!
 
I used a 2 part resin from Michael's on the inside of my mk.7 helmet to give it more structure. It's held up pretty well so far but it's had a long cure time, I think 48hr cure time?
 

Attachments

  • Resized_20240827_134056.jpeg
    Resized_20240827_134056.jpeg
    3 MB · Views: 20
My helmet and shoulders were printed with PLA instead of PLA+ and they are *very* brittle. I reprinted the shoulders, but did end up testing a simple 2 part resin from Michael's on the old shoulders and it really held up well. The heat from curing didn't cause issues, and because the helmet was printed in 3 parts, I used the resin to hold it together and they feel very solid.

I'm still not going to use the old shoulders, because they're just that brittle, but the helmet should be good to go.


In the end, printing with PLA+ was the best decision, and didn't cost any more than the regular PLA
 
I used a 2 part resin from Michael's on the inside of my mk.7 helmet to give it more structure. It's held up pretty well so far but it's had a long cure time, I think 48hr cure time?

My helmet and shoulders were printed with PLA instead of PLA+ and they are *very* brittle. I reprinted the shoulders, but did end up testing a simple 2 part resin from Michael's on the old shoulders and it really held up well. The heat from curing didn't cause issues, and because the helmet was printed in 3 parts, I used the resin to hold it together and they feel very solid.

I'm still not going to use the old shoulders, because they're just that brittle, but the helmet should be good to go.


In the end, printing with PLA+ was the best decision, and didn't cost any more than the regular PLA
So, do those not produce heat while hardening? I'm pretty new in armor printing, let alone resin coating or casting... so I basically have no clue about different resins. Are there ones that won't produce heat and ones that do? And if yes, how can I tell the difference? Also, I'm in Germany, so Micheal's falls out of the ruster I guess, do you by chance know some good alternatives that might be available in my region?
 
So, do those not produce heat while hardening? I'm pretty new in armor printing, let alone resin coating or casting... so I basically have no clue about different resins. Are there ones that won't produce heat and ones that do? And if yes, how can I tell the difference? Also, I'm in Germany, so Micheal's falls out of the ruster I guess, do you by chance know some good alternatives that might be available in my region?
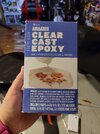
This one does produce heat, but it had no negative effects on the print because of it.

This is the one I used:
 
This one does produce heat, but it had no negative effects on the print because of it.

This is the one I used:
How much heat did it produce? I did do some research before asking and some sources said an epoxy resin can put up up to 200°C or more during hardening and mixing, and some said 50 to 60°C etc... Might be dumb questions, but I haven't worked with it yet, and before getting myself some large amount of resin and destroy my armor with it I'd rather ask stupid questions . Also I thought about reinforcing the print with an epoxy-fiberglass layer, so not just the resin alone
 
I was wondering how I could harden the inside of my 3D printed Master Chief armor, since it's rather brittle. I thought about using epoxy resin, but due to the high temps it produces while hardening I think that falls out of question. Are there any alternatives? Another thought was to use a fiberglass mat and cut it, then use epoxy to make it rigid, but it seems like that falls out of question too then.
The layers and joints sometimes tear apart, so I'd need something to make it rigid from the inside... Best would be a faster but still reliable option since I need the armor in about 2 weeks and I still gotta paint it.

Any tips are greatly appreaciated, thanks in advance!
Honestly - I'd stop to figure out where you went wrong at the beginning then reprint. Everything you add to it is just going to weigh it down.
If you made a bad choice in material like choosing some flavor of PLA, then reprint in a better material like PETG or ASA.
If the problem was bad settings choices like making everything single wall thin, then thicken up your prints and accept the longer print time.
If the problem was under extrusion from not calibrating the printer then fix the hardware issues.
If the problem was you just kept printing after the first part was bad... well... there's something to be learned from that too.

This issue is something I post about at least 10 times a week on one platform/channel or another. So many people jumping from "just bought my first printer" directly to "I'm going to print armor" without ramping up their skills and experience from small things first.

From my regular 'new printed armorer' post:


Jumping right to armor is really not the best way to go when beginning 3d printing. You really want to work up to something this big and specialized. Work up to things so big that a 3% goof can mean added costs, joints that lock up and you can't bend your elbow etc. Little easy things first… Things with no supports to start. Move up to props like pistols. And keep moving upward over time.

• A few settings differences can be the difference between a part too weak to be used and printing your armor so heavy it's exhausting to wear. The difference between a $10 part and a $40 part adds up to a significant difference over an entire armor.


Helmet probably should be last, not first. Yeah yeah, everyone wants a helmet to drool over. But it's the thing everyone stares at so you want to do it AFTER you've developed a process, techniques and skills.

Personally I always recommend starting at the feet & hands then working up & in to the body.

• You're going to weather and distress the boots more than anything else... and they get looked at with the least critical eye.

• Then shins which have to ride on the boots.

• Then thighs since you have to avoid joint conflict so you can sit etc.

• See how this goes? Up from the boots, and inward from the hands to forearms to biceps to shoulders.

• By the time you get to the chest and helmet; the parts at eye level that everyone stares at, looks at first, is right there in your face in every photo - you can make them look stellar.

And if you start at the boots you're looking at parts that are only a day or two per part not 6 days per part. So you can hone your scaling skills.
 
Honestly - I'd stop to figure out where you went wrong at the beginning then reprint. Everything you add to it is just going to weigh it down.
If you made a bad choice in material like choosing some flavor of PLA, then reprint in a better material like PETG or ASA.
If the problem was bad settings choices like making everything single wall thin, then thicken up your prints and accept the longer print time.
If the problem was under extrusion from not calibrating the printer then fix the hardware issues.
If the problem was you just kept printing after the first part was bad... well... there's something to be learned from that too.

This issue is something I post about at least 10 times a week on one platform/channel or another. So many people jumping from "just bought my first printer" directly to "I'm going to print armor" without ramping up their skills and experience from small things first.
For me it's mostly only the chestplate, I printed with a 0.8mm nozzle and appearently had a little bit of a clog, found out about that just yesterday when I swapped for a .4 and my printer appearently didn't enjoy that, no filament was extruded. If I knew that I had a clog I would have reprinted the chestplate, I guess not questioning the sometimes torn open walls was kinda not so good... I'll see what I can do, since reprinting isn't really an option for the time I still got to finish it, since I'd need the armor pretty shortly :/
 
If it's just one part... I'd mix up some two-part resin (like epoxy) and pour it in so it seeps through all the crevises to fill gaps and bond areas together.

Maybe wide tape the good face - lay that side down - epoxy from the back side. Let gravity work in your favor so it pools against the back of the good face.
 
This seems mostly resolved but I can definitely attest to Epoxy Resin being a fantastic hardening material, I've used it in my armour extensively. IT does take some time getting used to working with and a fair share of care when pouring and mixing (I hope you didn't stir the mix with anything you like). Gloves and overalls for me are a must when working with it. Personally I like to almost paint it on some parts externally as well as pouring it internally so that it smooths layer lines a small bit but that does REALLY add to your sanding work.

Best of luck (y)
 

Your message may be considered spam for the following reasons:

If you wish to reply despite these issues, check the box below before replying.
Be aware that malicious compliance may result in more severe penalties.
Back
Top