Hi! I'll do my best to help.
I want to understand what your problem is first. From what I understand, you are cutting the pieces out and gluing them together with hot silicon (which from my understanding is sort of like hot glue), although you want to switch to contact cement soon. One of the problems you have is that you didn't connect pieces together by angling the cuts, but rather you've made all flat cuts and butted the pieces together which causes an unsightly seam.
If I am correct in assuming hot silicon behaves similarly to hot glue, then I can tell you that these seams will be difficult to make smooth. That adhesive you're using likely won't sand very nicely. If there's a small void in the seam that can be filled, you might consider filling it with a general use bathroom tub caulk like kwik seal. If you apply the caulk to the seam and smooth it out with a wet gloved finger you may be able to smooth out the seam. That's what I did to smooth out all of the seams on my suit. Although, from this next comment, I may have a better suggestion:
I want some material that can mold out (Like that grey modeling clay but less fragile) and then get hard, to make the angles look smooth, i'll currently be using FX Plaid Paint, which is flexible with foam but i need that material to have compatibilty with that kind of paint, i also thought about using Filler Primer but still, i have no idea of how FX Plaid Paint will react.
The product you are describing here is called foam clay. It is a product that can be molded and shaped onto your foam armour and dries with the qualities of EVA foam - a light, airy, somewhat flexible material. The reason I do not use foam clay is because it is much more expensive than caulking, although some folks like
KaeSpoon find it well worth the extra expense.
I would not recommend using filler primer on foam armour. Filler primer, by nature, goes on very thick and is designed to be applied to a rigid surface. The flexible foam will cause the filler primer to crack much more severely than a regular thin layer of primer or spray paint.
Before you apply FX-Plaid paint to your foam work, so some tests with a scrap piece of foam! I tried using FX-Plaid paint on my armour but I couldn't get results I was happy with. The instructions say it can be applied directly to foam with a brush and it will level itself out. But even after 4 coats, there were still many visible brush strokes and the colour of the foam as well as the pen marking were still very visible. I may have had a bad batch, or there was something else I was doing wrong. Either way, it's a good idea to test it out first.
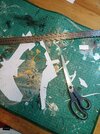
My cuts aren't perfectly smooth and plains like other cosplayers, currently i'm having to Dremel out the angles instead of doing them with the cutting angles.
One tip I can give you for making those cuts as smooth as possible is to keep your blade sharp! It's a good idea to get ahold of a high quality blade sharpener and constantly sharpen your blades as well as replace the blades frequently. I try to sharpen my blade every 5-10 cuts I make. I also replace my blade after I complete an armour piece because hand sharpening a blade can lead it to become uneven over time. A sharp blade will make a world of difference. EVA foam can dull a blade surprisingly fast!
Dremeling the angled pieces before you glue them together is a perfectly fine way of making sure your pieces go together nicely! It's best to not rely solely on the Dremel to angle the cut, rather cut the piece roughly on the angle you want and then clean it up with the Dremel. This way you can create those perfect angled cuts without creating a huge pile of foam dust, and you don't have to worry about your Dremel creating a wavy cut.
I also noticed this cosplay from N8TEBB having smooth angles that are really noticeable, even though the Pepakura files make it seem more geometric (Picture Below), which is my currently goal.
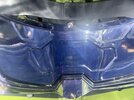
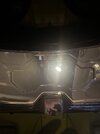
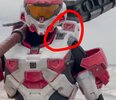
Let's look at those angled parts of my Torso section and I'll explain what compromises were made and why. Here is a picture of my cosplay, the in-game model, and the pepakura model. I've put a box around the area we'll focus on. You can click on these images to view them in full screen.
The angle of this particular piece in the pepakura model and the in-game model is very gradual. While sharp angles are easier to define, a very gradual angle is harder to make pop. Because these foam pieces are not just aesthetic but also structural, they have a bit of tension it them which pulls them to be flatter. This fact, along with the fact that my gluing is not perfect means that when I came by with the Dremel to even out the seams, this particular connection ended up becoming more rounded. To make this edge more defined, you will have to align the two pieces very precisely and do minimal to no sanding.
While it is possible to make that joint and similar edges more geometric, may may find that a rounder edge can be made cleaner with just a tad of sanding and filling, and may look better than a geometric edge with imperfections. This of course is personal preference and taste, and is something that's totally worth experimenting with. For myself though, I find the slightly rounded look, while not entirely canon, was an improvement over what my foam work looked like before.
And my biggest problem: 3 months just building the chest, i have all pieces cutted but only a few are pasted, and i really want to progress a lot more.
Don't be discouraged! Crafting takes time! If you find that you're simply not spending enough time building the suit, you may find it helpful to dedicate a chunk of time to crafting every day. While I crafted my suit for example, Immediately after I returned from work I would have a small snack, and then get right to crafting for an hour or two. Having a dedicated time slot every day made sure progress was constantly being made. I wouldn't schedule it as "free time", It was taken. I wouldn't make plans in that time slot, I wouldn't do any other hobbies in that time slot, just crafting.
Another tip is to start with the smaller things and work your way towards the bigger things. That way you feel like you're making more progress! Some folks work on their suit from bottom to top. They start with the shoes, then the shins, then the thighs, etc.. This way they can check the scaling as they go, but this also means they start with the smaller and more forgiving pieces, and end with the tricky and time consuming pieces. You'll be able to see visible progress that way, and as an added bonus, by the time you get to the helmet and torso sections, you'll have had lots of practice with the other pieces that you'll be able to do an especially good job on those final very important pieces.
Best of luck as you continue to work on your suit! I'm excited to see how it all comes along. I hope some of this message was helpful.
")