These are my plans for what I want to make.
Colors (Unless Otherwise Noted):
Primary: Olive Green
Secondary (Upper Body): Dark Grey/Black
Secondary (Lower Body): White
Under Armor / Undersuit: Black
Emblem/Insignia & Designations:
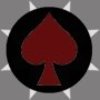
Spade: Red
Circle: Black
Star Point Tips x8: White
Call-Sign 1: W28
Call-Sign 2: AHNZ
Spartan Number: S-128 (Spartan-II)
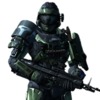
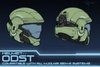
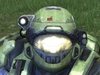
Helmet: ODST UA/HESA-E w/Raised protrusions, Ridges and Vents
Model: Hugh Holder v2 Helmet with:
• Modifications:
- - • Halo-Reach ODST Upgrade
- - • Removed Side Vent Straps
- - • Dutch Stacked Double Side Vents
- - • Dutch Above-Visor Vents
- - • Dutch Raised Mohawk Ridge
- - • Dutch Raised Upper Side-Ridges (OPTIONAL)
- - - - (Dutch Raised Protrusions Modified to fit Attachments)
Material: Smooth Cast 320 plastic (Preferably)
Visor: Sharp Edges, 2-Piece Design or vacuformed
• Color: Black (Matte/Flat)
• Detachable or Retractable in some way
• Internal VISR Mode LEDs - Illuminate face (OPTIONAL)
- - • May use EL-wire around the visor's internal perimeter
• Secondary Screen with HUD details behind the Visor and the VISR LEDs
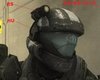
Attachments: UA/HESA-E
• UA = Up-Armored, forehead armor attachment
• HESA-E = Hardened External Sensor Array-External = HU/RS + CNM Combo =
- - • CNM = Command Network Module (Left Ear)
- - - - - • Working Camera in Front - Top Aperture (OPTIONAL)
- - - - - • LED (Green) on Front - Bottom Aperture (OPTIONAL)
- - - - - • LED (Cyan) on Side
- - - - - • No Connection Cables Visible, just the 2-Position Mount
- - • HU/RS-Torch = Hardened Uplink/Remote Sensor (ODST Flashlight - Above Right Ear)
- - - - - • Hardened Uplink LED (Cyan) next to connection cable
- - - - - • Working Torch (Flashlight)
Decals:
• Emblem/Insignia on the back side of the raised mohawk ridge
• Designation: "W28-AHNZ-•-S128" located on rear/lower brim of helmet below the mohawk
• Stripes: Either Black or White - currently undecided
Extras & Internal Components:
• Padding (Motorcycle Helmet Liner)
• Multiple Ventilation Fans (Cooling/Defog)
• Motorcycle Breath Deflector
• LEDs in the Dutch Above-Visor Vents (OPTIONAL)
• Possible LEDs on the back of the helmet (OPTIONAL) - See Longshot-X's build
• Detachable CBRN Breather Attachment (using Magnets)
• Long Lasting Batteries w/ battery housings.
• On/Off switches for electronics
• AI Chip Helmet Port
• AI Chip: Metal
- - • Thin Profile; Non-illuminated - Use Clear-Blue Plastic across hole for looks
- - • Gold SIM Card Interface
• AI Chip: Wired so that it turns on the fans and LEDs in the helmet when plugged in
Under Armor/Undersuit:
Still trying to think of how I want to approach this. I am a perfectionist, and the style of the undersuit is REALLY needed.
I might try to make rubber or foam pieces for the larger openings in the armor, especially for the stomach+lower back, inner thighs, neck-hole, and the arm-hole gaps around the chest.
I would consider getting a snowboard/skiing padded/protective suit to be used for the rest of the gaps in the armor.
Also, having something that will be able to cover the under side of my jaw/chin is a must.
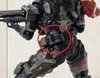
Torso: Collar/Breacher
Specifications:
• Hardened Collar Plate - Hard Plastic, maybe w/ some metal
• Nylon Vertical Belt Strap w/ Metal Belt Buckle
• Shells Basket made w/ Metal & Plastic Components
• Need to find a way to mount M45 Shotgun to Back*** - Has anyone done this? - I think Longshot-X might have...
- - • Use Magnets
- - - - - • Make sure there is a thin piece of rubber on the external side of the armor to prevent the shotgun from scraping on the armor.
• Chest Base:
- - • Rigid/Hardened in most spots
- - • May do unhardened foam for stomach segment and under the arms
- - • Front separates from Back at the top via Lift Release Seat Belt Buckles
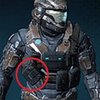
• Combat Knife: Mounted to Upper-Left Side of Chest
• Kukri Knife: Mounted Under-Left arm side of Chest
- - • Might Switch Placement of these knives with one-another
- - • Lower Knife might be eliminated
• Functional Hip Side Pocket Plates - These are hard pockets, right?
- - • I will keep bags of tea in one of the pockets... I don't drink tea.
- - • UNSC/ONI ID Card kept in opposite pocket.
• Secondary Colors of the belt will be white
Attachments:
• Type-3 Refraction Dissonance Modifier/Camouflage Module
- - - aka: Active Camo Armor Ability Module Back Attachment
- - - Cyan/Light Blue/White-ish LEDs
• Pistol Ammo Clips (x2) on Front Side of Belt (HP/Parafoil style)
- - • Removable Ammo Clips
- - - - - • Magazines will serve as storage compartments for extra batteries for the suit's electronics
- - • Functional Pockets in front of Ammo Clips
• Grenades (x2) on Back Side of Belt (Assault/Sapper style)
• Chest Pouch, Lower/Right Side Covering the Lower-Side LED (Tactical/Recon Style) (OPTIONAL)
• Custom detachable UA/Collar with upgraded collar.
Extras/Details:
• Separated Spine Plates
• Chest LEDs:
- - • Left Side of Breast (2, 1of2 is hidden when looking straight at chest)
- - • Either side of Breacher Shotgun Shells (1ea)
• Chest Decals:
- - • Personal Emblem/Insignia moved so the Collar does not cover it
- - • UNSC Emblem/Insignia moved so the Collar does not cover it
- - • 405th Decal (Left Shoulder Blade/Back)
- - • Call-Sign #1 "W28" on front/top of Collar
• Rear-Torso LEDs:
- - • Upper Side (1),
- - • Upper/Mid Sides (1ea),
- - • Lower/Outer Sides (1ea),
- - • Right-Side Spine (3)
- - • LEDs under the Separated Spine Plates for illuminated silhouettes
• Rear-Torso Decals:
- - • UNSC (Upper/Right)
- - • Red Caution Triangle (Upper/Right)
- - • Caution/Warning Label (Upper Middle Spine)
- - • "I Made This"
- - • "I <3 Sheila"
• Halo Reach Service Record Medals (OPTIONAL)
- - • Extermination (1)
- - • Perfections (3)
- - • Unfrigginbelievable (1)
- - • Skullamanjaro (1)
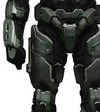
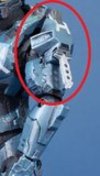
Upper & Lower Arms
Shoulders/Upper Arms:
• Base Upper Arm:
- - • Scaled properly, stretched if necessary
- - • Must hang at proper height on arm
- - • Will use upper garnish piece to attach armor to undersuit
- - • Reinforcements for the Shoulder Armor Mounts will likely mount through the Upper Arm Base
- - - - - • This way, the heavy shoulder pieces mount directly to the undersuit
- - • Outer Bicep LED (Cyan) (1ea)
• Right Shoulder: Commando
- - • Olive&Black w/white stripe
- - • Hidden Knife on Inner Side of the Large Shoulder Plate
- - - - - • Possibly a ballistic knife (appearance-wise anyways)
- - • LED inside shoulder to illuminate Inner Side of the Large Shoulder Plate
• Left Shoulder: CQC
Wrists/Lower Arms:
• Base Lower Arm:
- - • Must be proper size, stretched if necessary
- - • Must hang at proper height on arm
- - • May possibly be made of foam in order to handle muscle flexing
- - • LEDs (Cyan) on Lateral (Outer) Sides
- - • LED (Cyan) on Dorsal Side (by elbow)
• Right Wrist: Assault/Breacher (OR No Attachment)
• Left Wrist: Tactical/UGPS - Custom Up-Armored Variant
- - • If forearm's secondary color is black, use white (or vice versa)
- - • Opens so phone can be mounted within
- - • Modify: Use aspects from Tactical/Tacpad
- - - - - • LEDs (Green x2/x4?)
- - - - - • Display Screen: Blue tinted
Hands:
• Standard Hand Plates
• Might simply use fingerless ODST styled gloves
- - • May or may not add armor to the fingers
Legs/Greaves/Boots:
Upper Legs/Thighs:
• Right Thigh Attachment: Mount for Custom M6H Pistol (magnets)
- - • Add a rubber tip just above magnet on surface so pistol does not scrape on thigh
- - • Might possibly also try to fit a collapsed M7S attached as well
• Left Thigh Attachment: UA/NxRA Reactive, Non-Explosive Supplemental Armor
- - • LED (Green) at bottom
• Details:
- - • LEDs (Cyan x2ea) on Ventral/Front Side of thighs
- - • Decals:
- - - - - • Caution/Warning Label - Upper/Front Hip/Thigh (Right and Left)
- - - - - • Might do a stripe around the Right Thigh (see Emile) (OPTIONAL)
Knees Guards:
• FJ/Para (White)
Lower Legs/Shins:
• Standard Reach Style (White)
• Might do an ODST (Mickey) Breacher Shotgun Shell Wrap Attachment (OPTIONAL)
• Details:
- - • LED (x1ea) on Ventral/Front side of Shins at the bottom
- - • LED (x1ea) on Dorsal/Rear side of Shins near the bottom
- - • Decals: TBD
Boots/Feet Specifications:
• Divided into 3 Sections:
- - • Heel/Ankle-Rear Side Armor
- - - - - • Underfoot LED
- - • Foot Arch Front-Side Armor Plate
- - - - - • Caution Stripes Medial & Lateral Sides
- - - - - • LEDs Medial & Lateral Sides of each foot (See Vanity)
- - • Toe Boot Armor
• Will likely use a high-heeled or platformed design for height
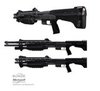
Carried Weapons:
M45 (TS) Tactical Shotgun
• Mounted on Back
Suppressed M7/Caseless Submachine Gun (M7S SMG)
• Mounted/Connected to Shoulder Sling, (OR mounted with Magnum to right Thigh)
• Collapsable
Model 6H Personal Defense Weapon System (M6H-PDWS, Magnum Sidearm)
• Mounted on Right Thigh / Hip Holster
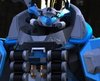
Kig-Yar Point Defense Gauntlet (Jackal Plasma Shield)
• Carried... or left in the car >.>
• Perhaps there might be a way to make this collapsible...
More Details on these weapons listed in Comments below........
Weapons for Custom Spartan Build:
• Black Rubber Grip
• Dark Grey/Off-Black Handle (Forms two-tone scheme with the Grip)
• Barrel Slightly Beyond Flush with front end (Chrome)
• Removed Iron Sights (They are not on the standard M6H, but should still be noted just in case)
• Modified handle at the bottom so M6G clips/magazines can be used and so they sit flush (Bottom of Handle made flat)
- - - Removable magazine
- - - - - Batteries for electronics/LEDs mounted in Magazine
• Movable Slide (Painted: UNSC Green, Shell Release left unpainted (Nickle))
- - - Yellow LEDs (x2) on back end of Slide
- - - Red LED on back end of Slide (OPTIONAL: Otherwise paint it Red)
• Movable Trigger
- - - Connected to movable Slide (OPTIONAL)
• Movable Safety On/Off Switch
• KFA-2 x2 Scope, Top Attachment (Detachable) (Painted: UNSC Green, with faded Yellow band across the top)
- - - Red LED on front
- - - Grooves in Screws on the sides painted Red
- - - NOTE: The M6H KFA-2 attachment is physically larger than its M6G counterpart
• KFA-2 x2 Smart Linked, Bottom Attachment (Detachable) (Painted: Black)
- - - M6G (Reach) Styled with Red Dots on the sides
- - - Yellow LED on front
- - - Red LEDs on the sides
• SOCOM Muzzle Attachment (Detachable)
- - - with Chrome Barrel Tip
- - - with VnSLS/V-6E Bottom Attachment (Detachable)
- - - - - - White LED/Flashlight in the bottom section of the attachment behind a Lens
- - - - - - Chrome Tip
- - - - - - with rotating Dial/tuning grip
- - - - - - Red details painted on
• Sound Effect when trigger is pulled (cheesy?)
• BONUS: Can fire nerf darts (Just 1 is okay)
• Detachable Silencer/Suppressor
• Rotatable Forward Grip Handle
• Illuminated Red Reflex Sight
• Red LEDs on the side
• Flashlight under the barrel
• Shoulder Strap Attachment
• SMG Sound Effect when the trigger is pulled (cheesy?)
• BONUS: Ability to fire nerf darts. (Just 1 is okay)
• LEDs Galore
• Working Flashlight
• Working/Movable "Pump"
• Rather than using LEDs, will probably just try to paint bits of red and blue in. Someone on the forums made one a while back, I will try to do my best to emulate their build. I can't remember what the wrist mount looked like in their build, but I found an HD image I could base it off of. I will likely turn the wrist mount into a hand grip since the Jackal shields probably could not have ever been worn by the larger Spartans, but surely they could hold them in their hands. If for whatever reason people freak out on me and say that they could never be used by a spartan, I will create a severed limb of a Jackal and attach the shield to the wrist of it and then proceed to hold onto the severed limb.... Yep.
#WinterContingency
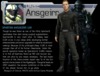
This is a Custom Reach (multiplayer) based Spartan-II Build

Reach Player Model 360° View: [video]http://vid296.photobucket.com/albums/mm193/WandererTJ/Halo/My%20Spartan/playermodel.mp4[/video]


Reach Player Model 360° View: [video]http://vid296.photobucket.com/albums/mm193/WandererTJ/Halo/My%20Spartan/playermodel.mp4[/video]


Colors (Unless Otherwise Noted):
Primary: Olive Green
Secondary (Upper Body): Dark Grey/Black
Secondary (Lower Body): White
Under Armor / Undersuit: Black
Emblem/Insignia & Designations:
Spade: Red
Circle: Black
Star Point Tips x8: White
Call-Sign 1: W28
Call-Sign 2: AHNZ
Spartan Number: S-128 (Spartan-II)
Helmet: ODST UA/HESA-E w/Raised protrusions, Ridges and Vents
Model: Hugh Holder v2 Helmet with:
• Modifications:
- - • Halo-Reach ODST Upgrade
- - • Removed Side Vent Straps
- - • Dutch Stacked Double Side Vents
- - • Dutch Above-Visor Vents
- - • Dutch Raised Mohawk Ridge
- - • Dutch Raised Upper Side-Ridges (OPTIONAL)
- - - - (Dutch Raised Protrusions Modified to fit Attachments)
Material: Smooth Cast 320 plastic (Preferably)
Visor: Sharp Edges, 2-Piece Design or vacuformed
• Color: Black (Matte/Flat)
• Detachable or Retractable in some way
• Internal VISR Mode LEDs - Illuminate face (OPTIONAL)
- - • May use EL-wire around the visor's internal perimeter
• Secondary Screen with HUD details behind the Visor and the VISR LEDs
Attachments: UA/HESA-E
• UA = Up-Armored, forehead armor attachment
• HESA-E = Hardened External Sensor Array-External = HU/RS + CNM Combo =
- - • CNM = Command Network Module (Left Ear)
- - - - - • Working Camera in Front - Top Aperture (OPTIONAL)
- - - - - • LED (Green) on Front - Bottom Aperture (OPTIONAL)
- - - - - • LED (Cyan) on Side
- - - - - • No Connection Cables Visible, just the 2-Position Mount
- - • HU/RS-Torch = Hardened Uplink/Remote Sensor (ODST Flashlight - Above Right Ear)
- - - - - • Hardened Uplink LED (Cyan) next to connection cable
- - - - - • Working Torch (Flashlight)
Decals:
• Emblem/Insignia on the back side of the raised mohawk ridge
• Designation: "W28-AHNZ-•-S128" located on rear/lower brim of helmet below the mohawk
• Stripes: Either Black or White - currently undecided
Extras & Internal Components:
• Padding (Motorcycle Helmet Liner)
• Multiple Ventilation Fans (Cooling/Defog)
• Motorcycle Breath Deflector
• LEDs in the Dutch Above-Visor Vents (OPTIONAL)
• Possible LEDs on the back of the helmet (OPTIONAL) - See Longshot-X's build
• Detachable CBRN Breather Attachment (using Magnets)
• Long Lasting Batteries w/ battery housings.
• On/Off switches for electronics
• AI Chip Helmet Port
• AI Chip: Metal
- - • Thin Profile; Non-illuminated - Use Clear-Blue Plastic across hole for looks
- - • Gold SIM Card Interface
• AI Chip: Wired so that it turns on the fans and LEDs in the helmet when plugged in
Under Armor/Undersuit:
Still trying to think of how I want to approach this. I am a perfectionist, and the style of the undersuit is REALLY needed.
I might try to make rubber or foam pieces for the larger openings in the armor, especially for the stomach+lower back, inner thighs, neck-hole, and the arm-hole gaps around the chest.
I would consider getting a snowboard/skiing padded/protective suit to be used for the rest of the gaps in the armor.
Also, having something that will be able to cover the under side of my jaw/chin is a must.
Torso: Collar/Breacher
Specifications:
• Hardened Collar Plate - Hard Plastic, maybe w/ some metal
• Nylon Vertical Belt Strap w/ Metal Belt Buckle
• Shells Basket made w/ Metal & Plastic Components
• Need to find a way to mount M45 Shotgun to Back*** - Has anyone done this? - I think Longshot-X might have...
- - • Use Magnets
- - - - - • Make sure there is a thin piece of rubber on the external side of the armor to prevent the shotgun from scraping on the armor.
• Chest Base:
- - • Rigid/Hardened in most spots
- - • May do unhardened foam for stomach segment and under the arms
- - • Front separates from Back at the top via Lift Release Seat Belt Buckles
• Combat Knife: Mounted to Upper-Left Side of Chest
• Kukri Knife: Mounted Under-Left arm side of Chest
- - • Might Switch Placement of these knives with one-another
- - • Lower Knife might be eliminated
• Functional Hip Side Pocket Plates - These are hard pockets, right?
- - • I will keep bags of tea in one of the pockets... I don't drink tea.
- - • UNSC/ONI ID Card kept in opposite pocket.
• Secondary Colors of the belt will be white
Attachments:
• Type-3 Refraction Dissonance Modifier/Camouflage Module
- - - aka: Active Camo Armor Ability Module Back Attachment
- - - Cyan/Light Blue/White-ish LEDs
• Pistol Ammo Clips (x2) on Front Side of Belt (HP/Parafoil style)
- - • Removable Ammo Clips
- - - - - • Magazines will serve as storage compartments for extra batteries for the suit's electronics
- - • Functional Pockets in front of Ammo Clips
• Grenades (x2) on Back Side of Belt (Assault/Sapper style)
• Chest Pouch, Lower/Right Side Covering the Lower-Side LED (Tactical/Recon Style) (OPTIONAL)
• Custom detachable UA/Collar with upgraded collar.
Extras/Details:
• Separated Spine Plates
• Chest LEDs:
- - • Left Side of Breast (2, 1of2 is hidden when looking straight at chest)
- - • Either side of Breacher Shotgun Shells (1ea)
• Chest Decals:
- - • Personal Emblem/Insignia moved so the Collar does not cover it
- - • UNSC Emblem/Insignia moved so the Collar does not cover it
- - • 405th Decal (Left Shoulder Blade/Back)
- - • Call-Sign #1 "W28" on front/top of Collar
• Rear-Torso LEDs:
- - • Upper Side (1),
- - • Upper/Mid Sides (1ea),
- - • Lower/Outer Sides (1ea),
- - • Right-Side Spine (3)
- - • LEDs under the Separated Spine Plates for illuminated silhouettes
• Rear-Torso Decals:
- - • UNSC (Upper/Right)
- - • Red Caution Triangle (Upper/Right)
- - • Caution/Warning Label (Upper Middle Spine)
- - • "I Made This"
- - • "I <3 Sheila"
• Halo Reach Service Record Medals (OPTIONAL)
- - • Extermination (1)
- - • Perfections (3)
- - • Unfrigginbelievable (1)
- - • Skullamanjaro (1)
Upper & Lower Arms
Shoulders/Upper Arms:
• Base Upper Arm:
- - • Scaled properly, stretched if necessary
- - • Must hang at proper height on arm
- - • Will use upper garnish piece to attach armor to undersuit
- - • Reinforcements for the Shoulder Armor Mounts will likely mount through the Upper Arm Base
- - - - - • This way, the heavy shoulder pieces mount directly to the undersuit
- - • Outer Bicep LED (Cyan) (1ea)
• Right Shoulder: Commando
- - • Olive&Black w/white stripe
- - • Hidden Knife on Inner Side of the Large Shoulder Plate
- - - - - • Possibly a ballistic knife (appearance-wise anyways)
- - • LED inside shoulder to illuminate Inner Side of the Large Shoulder Plate
• Left Shoulder: CQC
Wrists/Lower Arms:
• Base Lower Arm:
- - • Must be proper size, stretched if necessary
- - • Must hang at proper height on arm
- - • May possibly be made of foam in order to handle muscle flexing
- - • LEDs (Cyan) on Lateral (Outer) Sides
- - • LED (Cyan) on Dorsal Side (by elbow)
• Right Wrist: Assault/Breacher (OR No Attachment)
• Left Wrist: Tactical/UGPS - Custom Up-Armored Variant
- - • If forearm's secondary color is black, use white (or vice versa)
- - • Opens so phone can be mounted within
- - • Modify: Use aspects from Tactical/Tacpad
- - - - - • LEDs (Green x2/x4?)
- - - - - • Display Screen: Blue tinted
Hands:
• Standard Hand Plates
• Might simply use fingerless ODST styled gloves
- - • May or may not add armor to the fingers
Legs/Greaves/Boots:
Upper Legs/Thighs:
• Right Thigh Attachment: Mount for Custom M6H Pistol (magnets)
- - • Add a rubber tip just above magnet on surface so pistol does not scrape on thigh
- - • Might possibly also try to fit a collapsed M7S attached as well
• Left Thigh Attachment: UA/NxRA Reactive, Non-Explosive Supplemental Armor
- - • LED (Green) at bottom
• Details:
- - • LEDs (Cyan x2ea) on Ventral/Front Side of thighs
- - • Decals:
- - - - - • Caution/Warning Label - Upper/Front Hip/Thigh (Right and Left)
- - - - - • Might do a stripe around the Right Thigh (see Emile) (OPTIONAL)
Knees Guards:
• FJ/Para (White)
Lower Legs/Shins:
• Standard Reach Style (White)
• Might do an ODST (Mickey) Breacher Shotgun Shell Wrap Attachment (OPTIONAL)
• Details:
- - • LED (x1ea) on Ventral/Front side of Shins at the bottom
- - • LED (x1ea) on Dorsal/Rear side of Shins near the bottom
- - • Decals: TBD
Boots/Feet Specifications:
• Divided into 3 Sections:
- - • Heel/Ankle-Rear Side Armor
- - - - - • Underfoot LED
- - • Foot Arch Front-Side Armor Plate
- - - - - • Caution Stripes Medial & Lateral Sides
- - - - - • LEDs Medial & Lateral Sides of each foot (See Vanity)
- - • Toe Boot Armor
• Will likely use a high-heeled or platformed design for height
Carried Weapons:
M45 (TS) Tactical Shotgun
• Mounted on Back
Suppressed M7/Caseless Submachine Gun (M7S SMG)
• Mounted/Connected to Shoulder Sling, (OR mounted with Magnum to right Thigh)
• Collapsable
Model 6H Personal Defense Weapon System (M6H-PDWS, Magnum Sidearm)
• Mounted on Right Thigh / Hip Holster
Kig-Yar Point Defense Gauntlet (Jackal Plasma Shield)
• Carried... or left in the car >.>
• Perhaps there might be a way to make this collapsible...
More Details on these weapons listed in Comments below........
Weapons for Custom Spartan Build:
Custom Halo 4 Pistol -- Model 6H Personal Defense Weapon System (M6H-PDWS, Magnum Sidearm)
• Nickle Finish• Black Rubber Grip
• Dark Grey/Off-Black Handle (Forms two-tone scheme with the Grip)
• Barrel Slightly Beyond Flush with front end (Chrome)
• Removed Iron Sights (They are not on the standard M6H, but should still be noted just in case)
• Modified handle at the bottom so M6G clips/magazines can be used and so they sit flush (Bottom of Handle made flat)
- - - Removable magazine
- - - - - Batteries for electronics/LEDs mounted in Magazine
• Movable Slide (Painted: UNSC Green, Shell Release left unpainted (Nickle))
- - - Yellow LEDs (x2) on back end of Slide
- - - Red LED on back end of Slide (OPTIONAL: Otherwise paint it Red)
• Movable Trigger
- - - Connected to movable Slide (OPTIONAL)
• Movable Safety On/Off Switch
• KFA-2 x2 Scope, Top Attachment (Detachable) (Painted: UNSC Green, with faded Yellow band across the top)
- - - Red LED on front
- - - Grooves in Screws on the sides painted Red
- - - NOTE: The M6H KFA-2 attachment is physically larger than its M6G counterpart
• KFA-2 x2 Smart Linked, Bottom Attachment (Detachable) (Painted: Black)
- - - M6G (Reach) Styled with Red Dots on the sides
- - - Yellow LED on front
- - - Red LEDs on the sides
• SOCOM Muzzle Attachment (Detachable)
- - - with Chrome Barrel Tip
- - - with VnSLS/V-6E Bottom Attachment (Detachable)
- - - - - - White LED/Flashlight in the bottom section of the attachment behind a Lens
- - - - - - Chrome Tip
- - - - - - with rotating Dial/tuning grip
- - - - - - Red details painted on
• Sound Effect when trigger is pulled (cheesy?)
• BONUS: Can fire nerf darts (Just 1 is okay)
Halo 3: ODST Submachine Gun -- Suppressed M7/Caseless Submachine Gun (M7S SMG)
• Retractable butt• Detachable Silencer/Suppressor
• Rotatable Forward Grip Handle
• Illuminated Red Reflex Sight
• Red LEDs on the side
• Flashlight under the barrel
• Shoulder Strap Attachment
• SMG Sound Effect when the trigger is pulled (cheesy?)
• BONUS: Ability to fire nerf darts. (Just 1 is okay)
Halo Reach Shotgun -- M45 (TS) Tactical Shotgun
• Special Extended Barrel Concept Model• LEDs Galore
• Working Flashlight
• Working/Movable "Pump"
Jackal Plasma Shield -- Kig-Yar Point Defense Gauntlet
• Probably a Vacuformed piece of Plexiglass (or acrylic plastic)• Rather than using LEDs, will probably just try to paint bits of red and blue in. Someone on the forums made one a while back, I will try to do my best to emulate their build. I can't remember what the wrist mount looked like in their build, but I found an HD image I could base it off of. I will likely turn the wrist mount into a hand grip since the Jackal shields probably could not have ever been worn by the larger Spartans, but surely they could hold them in their hands. If for whatever reason people freak out on me and say that they could never be used by a spartan, I will create a severed limb of a Jackal and attach the shield to the wrist of it and then proceed to hold onto the severed limb.... Yep.
#WinterContingency