1st Build Kelly-087 (Halo 5 version)

JadePhoenix

New Member
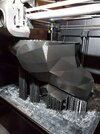
I started this build back in February (2024) when my new 3D printer, a Creality K1 Max, arrived. (I had bought an Anycubic Chiron because I liked the idea of a large build plate. But I never had good luck with it. I couldn't get it to stay levelled and I only got maybe 2 successful prints off it. It was just more of a headache than it was worth. Maybe one day I'll revisit this printer and see if I can get it running properly, but for now I'm just going to stick with my K1 Max.)

I picked up the files from the armoury here and got right to work in Armorsmith. I decided to print the armour in PETG because the material offers a bit higher heat resistance than PLA (and knowing what kind of luck I have, I'd print in PLA then end up with it getting stuck in a hot car on the way to a con and having it melt/warp on me).

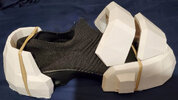
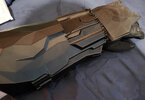
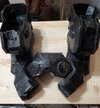
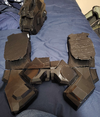
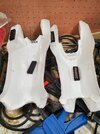
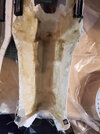
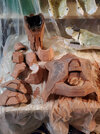
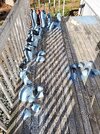
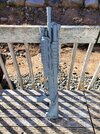
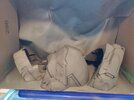
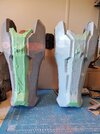
My first prints (the forearms) were not successful. The prints themselves came off looking great. But I had made a mistake. Creality print is great for like simple models, but it wants to repair models and fill things in. Which meant it had filled the part where my arm had to go. Switching to Orca Slicer pretty much solved that issue right away thankfully. And resulted in the arm pieces coming off beautifully. From there I got the boot pieces, shins, knee caps, butt plate, pauldrons/shoulder plates, bicep and back of biceps all printed.

With this underway I ordered some basic motorbike style gloves and new sneakers from Amazon. I already had a basic black bodysuit from a previous cosplay so that'll probably be repurposed for part of the techsuit.

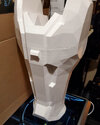
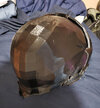
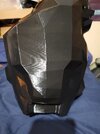
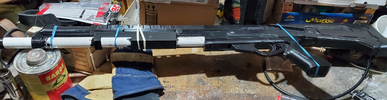
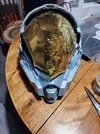
Currently the plan is to print the thigh sections, then the breastplate and back sections, finally the helmet. (So... the bulk of the printing time really.)

Though I need to figure out the techsuit. I was thinking about using TPU and printing some visible sections of it. But I'm not 100% here. I'm super tempted to buy a Halo 5 screen printed bodysuit and just modify that. (I want to follow Ashuraa's guide to have the hidden nylon straps for attaching everything. But at the same time I'm super nervous about like cutting into the printed bodysuit and either it like not holding up or just outright ruining it. I mean if I wreck a basic black bodysuit I don't care so much, they're much cheaper to replace.)

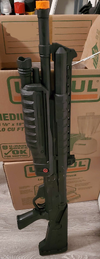
I hope to have everything all done by like September of this year. (Maybe then I'll have enough time to print/assemble and paint an M90 Shotgun to go with it.)
 

Attachments

  • 04-14-2024 Boots printed.jpg
    04-14-2024 Boots printed.jpg
    167.4 KB · Views: 73
  • 05-11-2024 Right shin printed.jpg
    05-11-2024 Right shin printed.jpg
    157.8 KB · Views: 73
  • 02-27-2024 Left forearm printed.jpg
    02-27-2024 Left forearm printed.jpg
    139.4 KB · Views: 66
> Creality print is great for like simple models, but it wants to repair models and fill things in.

Generally I recommend fixing models before giving them to the slicer. Windows 3d Builder is pretty darn good at auto-repair of models with issues.
 
Looking forward to seeing more of your build, I recently purchased the K1Max and I haven't had the same issues you have (touch wood) either way I may look into orca slicer inn any event. As SgtSaint mentioned 3D builder is a great program to repair models and it is a very good first step before slicing to make sure the geometry is manifold (water tight)
 
DeMan
The issues I mentioned in my first post were about the Anycubic Chiron. Which I just could not get to stay levelled, couldn't get good bed adhesion or anything. It was definitely way more of a headache than anything. And, sadly, I've heard that was super common with that printer. So, for now it sits as a dust collector.

I've had a few pretty minor issues with my K1 max, though honestly they've been fixed pretty quickly and easily. The chain started to sag a bit but I printed a chain support and installed that (took like 15 minutes to print and then like 5 to install). The scariest one was error 2564 which was the extruder not heating as expected. (I suspect it was the fan wire getting loose and just needed to be reseated. Because that's literally the only thing I touched in the disassembly/reassembly and it was good to go again.) I'll probably have to reseat it again in 2 months after another few hundred hours of printing.

Lojak, those shoes are really nice. I'm super tempted to order another pair just to wear around now.

In terms of my progress though...
I picked up some fiberglass matting and resin so that I can possibly use it on the insides of the forearms/legs just for a bit extra strength. (I went with 4 walls for the legs and I'm kinda feeling like that's not quite enough now so I want a bit more strength/durability just to be on the safe side.) And I have a bit of room in those sections so I can do a bit of reinforcing and then should have enough to pad them a bit too.

I have sliced the chestplate up some and have printed a bunch of the parts of it. The shoulder straps and under arm straps are printed. The front of the chestplate is currently printing as I write this. (Should be done in like 4 hours.)
After that I need to print the back pieces including the large like jets? Blocks? I'm not 100% sure what they're called/are but those. I'm very tempted to slice them up some more and go with a 0% infill so like I can access the insides, add some metal plates or strong magnets then fiberglass them on the inside for extra strength/support. This way later on I can add some magnets to a Shotgun or Battle Rifle (if I get time to print them) and see if I can have them secured to the side kind of like done in the games.


Though thighs and helmet still need printing too. My goal is to use the first week of June to just non-stop print all the rest of the pieces I need so I can start the next steps.
 

Attachments

  • 05-21-2024 Front chestplate printing.jpg
    05-21-2024 Front chestplate printing.jpg
    939.3 KB · Views: 77
I picked up some fiberglass matting and resin so that I can possibly use it on the insides of the forearms/legs just for a bit extra strength. (I went with 4 walls for the legs and I'm kinda feeling like that's not quite enough now so I want a bit more strength/durability just to be on the safe side.) And I have a bit of room in those sections so I can do a bit of reinforcing and then should have enough to pad them a bit too.
I've been doing 5 walls myself and they seem to hold up okay. They really crank up the print time, though. You should be okay with 4 as long as your layer-to-layer adhesion is good. Reinforcement never hurts.
 
I've been doing 5 walls myself and they seem to hold up okay. They really crank up the print time, though. You should be okay with 4 as long as your layer-to-layer adhesion is good. Reinforcement never hurts.
To add to this, I typically only use 3 walls. The only breakage I've ever had is along the seams where the prints are glued (with the exception of absolutely slamming failed prints on concrete lol)
 
For a bit of an update here...

I've gotten everything for the armour printed except the cat ears during the first week of June. I was printing the cat ears when my printer decided it had enough and started throwing error 2564 again. (I reached out to the store, they asked for pictures and then pretty much just said replace the hotend and have a good day.) Printer is still down at the moment as I'm waiting on some proper thermal paste to use (something that can handle temps of 300 Celcius just to be on safe side) that should be here soon then I'll get it all back together and print the final parts. (And maybe get to work printing an M90 too...)

I spent some time today assembling the back of the chestplate using JB Weld Plastic Bonder and using a soldering iron to weld pieces together and try to hide some of the seams. (I'll hit them with the Bondo spotting putty later to hide them even better later.)

I had ordered some plastic to use to make the visor. Though I'm not sure now if that's going to work or not. I used a piece from the pack and tried heating it up and forming it... Only to discover I think I bought the wrong stuff. One part of the plastic got a bit too hot and turned white. I might still be able to get a workable visor out of this stuff... but I'm going to have to heat it up slowly and press in place quick.

I also picked up a cheap set of electronic ear protection to gut and use in the helmet so I can hear people... I may look at getting an aux/amp or something so I can speak normally and people can hear me. But that's going to be on a later pay cheque at best.

At this point it's now down to lots of sanding. Filler/Primering. More sanding. Then getting the harness system done. A friend showed me some basics on sewing so I think I might be good enough to do the harness now. But that's going to be a "we'll see" kind of thing.
 

Attachments

  • 20240622_ Back assembled.jpg
    20240622_ Back assembled.jpg
    368.8 KB · Views: 36
  • 20240608_Helmet top printed.jpg
    20240608_Helmet top printed.jpg
    255.6 KB · Views: 32
  • 20240531_Backparts printed.png
    20240531_Backparts printed.png
    13 MB · Views: 37
  • 06-04-2024 Thigh printed.jpg
    06-04-2024 Thigh printed.jpg
    690.2 KB · Views: 50
I received my thermal paste on the 28th of June and promptly got to work and installed the new hotend. Which as brought the printer back to life and hasn't had an issue yet. So I decided to put it through it's paces and print an M90 shotgun during the week of July 4th. I used CasuallyFlacid's file from Thingiverse for it. I had a good ol time finding the right pvc. (Apparently there's pvc and cpvc which are different sizes... cpvc is a bit smaller.) So it took a few trips to the hardware store. But I did eventually get the right stuff.
I've since cut holes in the pvc pipe for the pump and added a bit of bondo glazing putty to the seams to clean/cover them up.
I've still got to add the cube magnets so I can attach it to my back/jets. But that shouldn't take too long.


I also went on a lovely (sarcastically of course) quest to find someone local who can do vaccuum forming of visors. There's only really like one option I could find locally, so I reached out to them and we eventually met up. I needed to do a bit more prep to the helmet to have it ready to go. But it's been done now and ready to go off for the next stage there.

For the rest of the armour, I thought I was ready to go into sanding... I've been going over areas with glazing putty to fill them in. (Some pieces that don't need a ton I've been using a mix of acetone and glazing putty to just paint it on. Just to stretch out how far my glazing putty goes before I need to go buy more.)

I kinda broke my workflow (to do the visor out of sequence) so I can get it off for vaccuum forming and now I'm kinda all over. I need to fiberglass the shins, thighs, forearms inside of backpack jets. I intend to do that Monday night (the 29th). Though I ran into an issue where I had to cut the shins apart to make them into a clamshell design (couldn't get my foot through the bottom otherwise). So I had to figure a solution out for that. (My plan is to use magnets to hold the front/back together but still allow it to split apart for putting on/taking off. Plus a nylon strap or two around the front section with buckles to help hold and secure it in place.)
 

Attachments

  • 20240706_M90 Printed.png
    20240706_M90 Printed.png
    8.6 MB · Views: 22
  • 20240728_001408.jpg
    20240728_001408.jpg
    1.4 MB · Views: 24
I finished the fiberglass on the shin sections, inside the forearms, inside the thighs and in the right side of the backpack just under 2 weeks ago. I had never done fiberglass work before and honestly it wasn't too bad. Not as bad as I was kinda fearing it would be. Messy and sticky for sure and I had to change gloves like 6 times. But once I got going it really wasn't that bad. The only downside was that for one of the shins sections I didn't quite use enough hardener in the resin so it took longer to cure than I'd have liked. But it still set/hardened/cured. So they're all done now.

I only bothered to take one picture of one shin section during the fiberglass process because, honestly, they all look the same inside. It's not glamourous or good looking by any stretch (again, my first time doing this). And no one but me will really see this part anyway. (I also made sure to trim any sections of the fiberglass that extended out of the respective part. So no jabby/pokey bits.)

I also went ahead and layered the suit parts with the glazing putty and acetone mix to fill the layer lines in. Then gave everything (minus the helmet) a good sanding. So at this point I think I'm ready to do my filler primer pass on all of that. Everything is super smooth to the touch now. So I don't think I'll need too much for the filler primer now. (Hopefully 2 passes with that, sand again, then I should be good to paint.)

I also got the magnets for the jet back section and got them installed. They hold the M90 in place really well. So I went ahead and glued the magnets into place. I just need to go over the back section with the glazing putty, sand it off and then attach it to the back of the jet.

I've got some EVA foam that I'm going to add to the inside of the fiberglassed sections to add for padding and making sure everything is comfortable.

So at present the roadmap looks like:
  • Glazing putty the right jet back,
  • Sand right jet's back,
  • Attach jet cover to back,
  • Fill parts,
  • Sand everything again,
  • Fill again,
  • Paint,
  • Add nylon straps for attachment points,
  • Add EVA foam padding to inside parts,
  • Paint M90,
  • Finish assembly of M90,
  • Get visor back from vacuum forming shop,
  • Add tint to visor,
  • Glazing putty helmet,
  • Sand helmet,
  • Fill helmet,
  • Paint helmet,
  • Gut electronic ear pro and install into helmet.
  • Run pvc tubes for cooling system.
  • Mount water resevoir and power supply.

Still so much to do... Or at least it feels that way. I hope I can get it all done in the next 2 months.
 

Attachments

  • 08-17-2024 Bondo layering.jpg
    08-17-2024 Bondo layering.jpg
    976.8 KB · Views: 15
  • 08-17-2024 Fiberglassed insides 1.jpg
    08-17-2024 Fiberglassed insides 1.jpg
    805.7 KB · Views: 14
I finished the fiberglass on the shin sections, inside the forearms, inside the thighs and in the right side of the backpack just under 2 weeks ago. I had never done fiberglass work before and honestly it wasn't too bad. Not as bad as I was kinda fearing it would be. Messy and sticky for sure and I had to change gloves like 6 times. But once I got going it really wasn't that bad. The only downside was that for one of the shins sections I didn't quite use enough hardener in the resin so it took longer to cure than I'd have liked. But it still set/hardened/cured. So they're all done now.

I only bothered to take one picture of one shin section during the fiberglass process because, honestly, they all look the same inside. It's not glamourous or good looking by any stretch (again, my first time doing this). And no one but me will really see this part anyway. (I also made sure to trim any sections of the fiberglass that extended out of the respective part. So no jabby/pokey bits.)

I also went ahead and layered the suit parts with the glazing putty and acetone mix to fill the layer lines in. Then gave everything (minus the helmet) a good sanding. So at this point I think I'm ready to do my filler primer pass on all of that. Everything is super smooth to the touch now. So I don't think I'll need too much for the filler primer now. (Hopefully 2 passes with that, sand again, then I should be good to paint.)

I also got the magnets for the jet back section and got them installed. They hold the M90 in place really well. So I went ahead and glued the magnets into place. I just need to go over the back section with the glazing putty, sand it off and then attach it to the back of the jet.

I've got some EVA foam that I'm going to add to the inside of the fiberglassed sections to add for padding and making sure everything is comfortable.

So at present the roadmap looks like:
  • Glazing putty the right jet back,
  • Sand right jet's back,
  • Attach jet cover to back,
  • Fill parts,
  • Sand everything again,
  • Fill again,
  • Paint,
  • Add nylon straps for attachment points,
  • Add EVA foam padding to inside parts,
  • Paint M90,
  • Finish assembly of M90,
  • Get visor back from vacuum forming shop,
  • Add tint to visor,
  • Glazing putty helmet,
  • Sand helmet,
  • Fill helmet,
  • Paint helmet,
  • Gut electronic ear pro and install into helmet.
  • Run pvc tubes for cooling system.
  • Mount water resevoir and power supply.

Still so much to do... Or at least it feels that way. I hope I can get it all done in the next 2 months.
Water cooling! This is going to be so incredible. Thanks for the updates. It’s helping me plan my roadmap! (Just started planning and printing)
 
Wow, this sounds incredible. Currently I am working on my silicone undersuit and Im searching for a good cooling solution. So I`ll follow your build with huge interest! Continue the great work!
 
I did post a full write up on how I made my first generation version of my liquid cooling system here if anyone is interested.
The version 2 is going to be similar in a few ways (same water pump, same battery pack, same water lines, same ball valves) the only major differences is that I'll be running the pvc lines though my bodysuit instead of under a EVA "vest" and that the water reservoir is going to be mounted to the back of the bodysuit and harness.
 

Your message may be considered spam for the following reasons:

If you wish to reply despite these issues, check the box below before replying.
Be aware that malicious compliance may result in more severe penalties.
Back
Top