JadePhoenix
New Member
I've mentioned a few times on the 405th's discord about having a liquid cooling system I made for another cosplay and a couple people asked for more details. So here's how I made the version 1. (I'm well into version 2, but I haven't completed it yet. Version 2 will be built into the bodysuit itself. For that I just need to run the water lines and use Ashuraa's guide on adding strapping inside the bodysuit to add the attachment point on the back for the water tank. Though that'll be another post once I actually complete it and have pictures to show off.) But for now I'll go into making of the first iteration...
To start with here is a list of items you'll need:
For tools you will need access to:
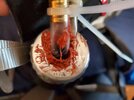
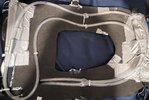
First step is to prep the thermos. I used a drill press to punch 2 small holes in the top to allow the PVC tubing to push into it. I pushed one tube most of the way down into the thermos and the other (the return line) just barely an inch in. After I was sure the hoses fit in snugly, I used silicon sealant around the tubes to secure them in place. I then cut the pvc tube about an inch over where I siliconed them in place. (The second photo has this a bit clearer.) Here I added the ball valves to allow myself to turn off the lines as necessary (with the idea being in case I needed to shut the system off and empty the now warm water and fill with new/cold water). I also cut a small, like 1 inch section of tube, for use later...
Next I took the EVA foam and cut a hole in the center of it large enough to fit my head through. This would serve as the mounting board for the cooling system. I cut a small slit in the left side shoulder section. I ran the PVC tubing through the slit and along the inside. Once I had it in roughly the pattern I wanted I cut a few small holes in the foam and used zip ties to secure the tubes in place. I also made sure to leave a bit of tube open to run to the return line on the thermos.
I then attached the water pump to just under where I'd made the slit and fed the pvc tubing into the hole and onto the underside of the eva foam. I attached the tubes and, admittedly, I got a bit lazy here and only used zip ties to secure the tubes to the pump's inlet's outputs. Next I took that small section of tube I'd cut earlier and attached them to the other side of one of the ball valves (to bridge the ball valve and the input of the pump). I then attached the return line to the other side of the ball valve and attached it to the inline on the water tank. This completed the water line.
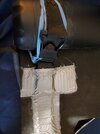
To attach the water tank/thermos, I took some nylon strapping coated the strap in contact cement and wrapped it around the bottom to attach it. I left the end with a bit of excess and added a buckle here. I then added some strapping to the right shoulder of the foam and the other end of the buckle here. I contact cemented this strap in place and then went over it with duct taped just to ensure it stayed put. (I also then went over it with hot glue to seal the edges down, but I don't know if this was 100% necessary. Up to you if you want to do this step or not.) This way I can lock the thermos in place on my back but still have a way to thread it on/off if I need to change the water. The results of this step are shown in picture 3.
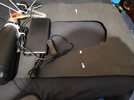
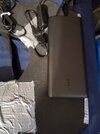
Next I (re)mounted the power bank. I had originally put it on the back (as shown in the first picture to test the system out), but it was too much weight on the back and kinda pulled it down. So I moved the powerbank to the front (picture 4). I used velcro on both sizes of the powerbank to hold it on. I also had to cut a slice into the velcro and foam and use a zip tie to make sure that size of the velcro stayed put. I added the USB on/off switch to the end of the pump's USB plug and plugged the on/off switch into the power bank. A little cable management to ensure things aren't all over. And the system is done.
To actually use the system now... You need to pre-fill the lines. This pump is too small and doesn't have enough suction to draw from the reservoir and effectively charge itself. Which is not a big deal. But once there is water running to it, it will push it through the tubes with no problem.
This version probably won't work for every situation of course. Using a bulky thermos might take too much space to hide on the back. Though a little creative use of a pouch or hiding in a backpack may work well. Though I should point out that this was my version 1. It looks pretty rudimentary because, well, it is. (And admittedly I was never really planning on showing it off to anyone. It was just going to be a cool thing I did for myself. So please forgive me if things aren't like perfectly crisp/pristine and cool looking.)
Beyond that, if there's any questions I'd be happy to answer them.
To start with here is a list of items you'll need:
- a USB powerbank (I used an Anker 26800mah one because I had no idea how much power I'd need. It's probably more than a bit overkill.)
- a USB water pump with 8mm inlet/output ports (I purchased mine off Amazon. I bought the Hffheer brand, but I'm sure there are a dozen knock offs of it which will work equally well.)
- a length of PVC (I went with 12ft/3m of 3/8th inch/10mm outer diameter and 8mm inner diameter, but this is 100% up to how much you want to use),
- 2 ball valves (with 1/4" barbs, I used uxcell brand),
- a small cheap metal water bottle/thermos,
- a pair of USB on/off toggle switches,
- about 10 zip ties,
- 4" of Velcro,
- 5mm eva foam (I used about 2ft by 14"),
- duct tape,
- nylon strap,
- a buckle,
- silicone sealant.
For tools you will need access to:
- A drill, drill press or at least a hand drill
- scissors
- sharp knife
- Hot glue gun (optional)
First step is to prep the thermos. I used a drill press to punch 2 small holes in the top to allow the PVC tubing to push into it. I pushed one tube most of the way down into the thermos and the other (the return line) just barely an inch in. After I was sure the hoses fit in snugly, I used silicon sealant around the tubes to secure them in place. I then cut the pvc tube about an inch over where I siliconed them in place. (The second photo has this a bit clearer.) Here I added the ball valves to allow myself to turn off the lines as necessary (with the idea being in case I needed to shut the system off and empty the now warm water and fill with new/cold water). I also cut a small, like 1 inch section of tube, for use later...
Next I took the EVA foam and cut a hole in the center of it large enough to fit my head through. This would serve as the mounting board for the cooling system. I cut a small slit in the left side shoulder section. I ran the PVC tubing through the slit and along the inside. Once I had it in roughly the pattern I wanted I cut a few small holes in the foam and used zip ties to secure the tubes in place. I also made sure to leave a bit of tube open to run to the return line on the thermos.
I then attached the water pump to just under where I'd made the slit and fed the pvc tubing into the hole and onto the underside of the eva foam. I attached the tubes and, admittedly, I got a bit lazy here and only used zip ties to secure the tubes to the pump's inlet's outputs. Next I took that small section of tube I'd cut earlier and attached them to the other side of one of the ball valves (to bridge the ball valve and the input of the pump). I then attached the return line to the other side of the ball valve and attached it to the inline on the water tank. This completed the water line.
To attach the water tank/thermos, I took some nylon strapping coated the strap in contact cement and wrapped it around the bottom to attach it. I left the end with a bit of excess and added a buckle here. I then added some strapping to the right shoulder of the foam and the other end of the buckle here. I contact cemented this strap in place and then went over it with duct taped just to ensure it stayed put. (I also then went over it with hot glue to seal the edges down, but I don't know if this was 100% necessary. Up to you if you want to do this step or not.) This way I can lock the thermos in place on my back but still have a way to thread it on/off if I need to change the water. The results of this step are shown in picture 3.
Next I (re)mounted the power bank. I had originally put it on the back (as shown in the first picture to test the system out), but it was too much weight on the back and kinda pulled it down. So I moved the powerbank to the front (picture 4). I used velcro on both sizes of the powerbank to hold it on. I also had to cut a slice into the velcro and foam and use a zip tie to make sure that size of the velcro stayed put. I added the USB on/off switch to the end of the pump's USB plug and plugged the on/off switch into the power bank. A little cable management to ensure things aren't all over. And the system is done.
To actually use the system now... You need to pre-fill the lines. This pump is too small and doesn't have enough suction to draw from the reservoir and effectively charge itself. Which is not a big deal. But once there is water running to it, it will push it through the tubes with no problem.
This version probably won't work for every situation of course. Using a bulky thermos might take too much space to hide on the back. Though a little creative use of a pouch or hiding in a backpack may work well. Though I should point out that this was my version 1. It looks pretty rudimentary because, well, it is. (And admittedly I was never really planning on showing it off to anyone. It was just going to be a cool thing I did for myself. So please forgive me if things aren't like perfectly crisp/pristine and cool looking.)
Beyond that, if there's any questions I'd be happy to answer them.