MK-VI Silver team season 2 [2024 build]

SgtSaint

Well-Known Member
Member DIN
S027
  • I was planning on this being written up much later when the entire suit was done - more of a 'reveal' than real-time build logging. But I think with all that's going on, I could personally use the focus on this, keeping on top of this and on top of posting, and basically just getting back to what it is we do here: Building.
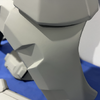
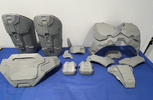
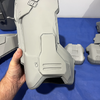
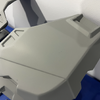
  • This will be a 3d printed build, with custom under suit. If you're more of a foam person this might be your exit, but you're welcome to enjoy the rest of the ride anyway just to take in the scenery.
  • Its currently mid-June. There is an event mid-September. In practical terms I've got about 90 days which means there's no 'con crunch' on the horizon.
  • Context: I'm a 178cm/95kg old guy with a thick stocky build and by no means a lean swimmer or long-distance runner body. I don't need to pad-out but I do need to cheat some added height.
  • This new build is intended to be my final Silver team build (for myself) with the most details and closer paint etc. We never know what the future holds, but that's the plan anyway.
My 2023 suit is gone/sold already. That was deliberate tactic to make sure I stayed on top of this build. If I don't have it as a fallback then I don't dare get lazy.

Files are starting with a base of the 2024 remastered Galactic Armory MK-VI gen 3. Then a generous helping of moding parts, modeling new parts, swapping out parts for ones in other file sets and even other armor bases since the TV series is kind of a hybrid between Reach and Infinite and just whatever they kinda found worked in the physical world for filming. I'm not going to debate the show v. the games. Not getting into the show's plot or whatever. But as a real-world wearable armor they had to solve a lot of issues like mesh folding in the game that doesn't happen in the world. To complicate it beyond that we as cosplayers have additional issues they don't have on the show.
  • I don't have a team of handlers to un/re/dress me every time I want to sit down or go to the latrine. So the suit has to be something a single person can be in for 12 hours.
  • I am not going to be 10cm tall on a TV screen, with dark lighting effects, where nobody notices if my rubber helmet or chest armor flex when I move. My audience is right there, in person, looking at me up close.
  • I don't have $15,000 per suit and a 40 man team of specialists to make it.
  • This should all sound familiar as we are all in the same boat.
As always, it starts with scaling in Armorsmith. No its not going to be a yellow suit. I just like high contrast colors when I'm working.
1718699858206.png


I love my check lists, of course.
1718700519531.png
 
Last edited:
So a couple folks reached out asking about the season 2 knife shown in the Armorsmith picture above.
That's from my shop: Starbase3d
And is available on Esty or the direct store either 'ready to wear' or as a DIY kit.

Today's work was mostly on things other than my armor but I did manage to get the shin|calf parts sanded, test fitted, etc. as well as first primer put on and scuffed up to reveal where more work will be needed.

1719134069964.png
 
I left the house today. No, really, I did. Hahaha
It was glorious... magical... Montana Colors as far as the eye could see. And in my mind all I could hear was Gene Wilder singing "A world of pure imagination" from Willy Wonka.
Later my debit card screamed in pain.
2024-07-09_18-29-09.PNG
 
How do you connect your shins those are very nice your file or someone elses mine are one and a pain to get on and off.
 
How do you connect your shins those are very nice your file or someone elses mine are one and a pain to get on and off.
My previous suit I just slid the shin on - it didn't 'connect' to anything. It was all one piece: Just slid it on.
For this suit I'm striving for accurate(-ish) functionality. But this suit is still very much a work in progress. This is literally the first time trying on the shins with the boots.

 
So ends another Sunday. I got after some other parts.
  • Sand
  • Prime
  • Spot putty a couple places
  • Sand
  • Prime
That second coat of primer revealing some places to clean up.


Attachments

  • IMG_9536.png
    IMG_9536.png
    654.5 KB · Views: 37
  • IMG_9533.png
    IMG_9533.png
    744.2 KB · Views: 46
  • IMG_9539.png
    IMG_9539.png
    786.7 KB · Views: 35
  • IMG_9535.png
    IMG_9535.png
    669.4 KB · Views: 54
Don't you hate it when work gets in the way of your busy social life? I just realized how long its been since I posted an update.

Classic "selfie in the mirror" photo while lining it all up. No straps or connections yet so I can't let go of the chest while I shoot. Haha.:D
I just realized... My earbuds match the armor {smirk}
IMG_0001.png
 
A little weird trying to film doing this and not look down since I'll be in a helmet later and have to do it blind, but here goes.


Don't you hate it when work gets in the way of your busy social life? I just realized how long its been since I posted an update.

Classic "selfie in the mirror" photo while lining it all up. No straps or connections yet so I can't let go of the chest while I shoot. Haha.:D
I just realized... My earbuds match the armor {smirk}
View attachment 352423
COuld you share photos of your how your front chest piece connects with the back. I use magnets but you obviously use something more cooler thanwhat I use.
 

Your message may be considered spam for the following reasons:

If you wish to reply despite these issues, check the box below before replying.
Be aware that malicious compliance may result in more severe penalties.
Back
Top