My Project MJOLNIR Mk. VII Spartan Armor

armoryofalbus

New Member
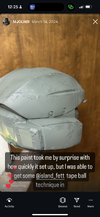
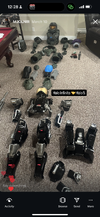
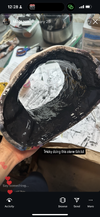
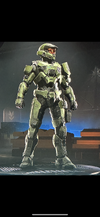
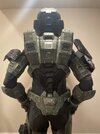
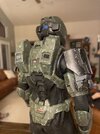
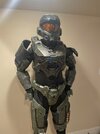
Hello 405th! Here’s my first post on here: a build thread documenting my build of Mk. VII MJOLNIR Armor. My build includes a rubber undersuit I made using Smooth On’s Dragon Skin 10 Fast. A lot of the pics in this thread come from my Instagram stories, where I have posted this build throughout months of sporadic work on it. Feel free to check that at “armoryofalbus” on insta

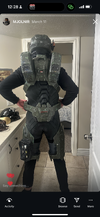
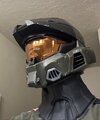
This past year I started reading the OG Halo books, and that inspired me to make my Spartan a solemn, no-nonsense green boi. (Secretly I just wanted to get called Master Chief at all the cons…NOT lol). I still probably love the Mk V B the most, but the Mk VII has some really cool elements to it and that’s what I opted for.

As of April 2025, I still need rig the knees, calves, and do the boots. But I’m nearly there so I thought I’d do a post now (and procrastinate studying for finals). Read on for a bit more depth on what’s going on in the pictures!

IMG_8424.jpeg
 

Attachments

  • IMG_2151.png
    IMG_2151.png
    9.1 MB · Views: 7
  • IMG_8417.jpeg
    IMG_8417.jpeg
    1.8 MB · Views: 5
  • IMG_8420.jpeg
    IMG_8420.jpeg
    1.7 MB · Views: 5
  • IMG_8412.jpeg
    IMG_8412.jpeg
    1.5 MB · Views: 5
Last edited:
What launched this build was the gorgeous MK. VII resin print I was able to snag from Minutefett on Instagram. That print, paired with a hydrochromed branfuhr visor, was so encouraging and came out effortlessly- all I really had to do was carve out the visor area and drill some attachment points for the visor. I used epoxy putty to mount some Chicago screws into the helmet, and drilled some small holes into the edges of the visor. This allows me to remove it or swap as needed. For painting this helmet I used various Rustoleum camo colors- a lighter one underneath, then dark. As soon as the dark green was laid down, I attacked the wet paint with a rolled up tape ball to get some organic paint chipping. I used this technique, plus some others, across all the armor to get the type of beat up paint chips I wanted. Silver chips, gray splotching, some greens, and other weathering colors were applied topically across my armor, replicating the weathering I saw on the suits from the Halo show (the suits looked pretty good despite the show’s many disappointments).

Oh yeah- somewhere along the road, I printed Galactic Armory’s Mk V helmet and did my own chroming / dyeing effort on the visor. I wanted a helmet that I could swap out, to save my precious resin one from too much con abuse.
 

Attachments

  • IMG_2044.png
    IMG_2044.png
    6.1 MB · Views: 11
  • IMG_2045.png
    IMG_2045.png
    4.7 MB · Views: 7
  • IMG_2046.png
    IMG_2046.png
    5.3 MB · Views: 7
  • IMG_2047.png
    IMG_2047.png
    5.5 MB · Views: 7
  • IMG_2048.png
    IMG_2048.png
    6.1 MB · Views: 5
  • IMG_2049.png
    IMG_2049.png
    6.8 MB · Views: 6
  • IMG_2050.png
    IMG_2050.png
    6.2 MB · Views: 6
  • IMG_2051.png
    IMG_2051.png
    6.6 MB · Views: 6
  • IMG_2052.png
    IMG_2052.png
    8.1 MB · Views: 6
  • IMG_2053.png
    IMG_2053.png
    10.9 MB · Views: 6
  • IMG_2054.png
    IMG_2054.png
    7 MB · Views: 8
  • IMG_2056.png
    IMG_2056.png
    7.1 MB · Views: 8
  • IMG_2057.png
    IMG_2057.png
    5.7 MB · Views: 7
  • IMG_2071.png
    IMG_2071.png
    7.3 MB · Views: 9
  • IMG_2073.png
    IMG_2073.png
    6.6 MB · Views: 10
  • IMG_2082.png
    IMG_2082.png
    6.4 MB · Views: 13
Last edited:
Most of my armor comes from files by Titlewavedesigns. At about the halfway point of this build, I saw the masterful work of datboibuilds and others who made rubber undersuits for their Noble Team, and I knew I had to try that. So I ended up printing the InstinctCreative MK VII rubber molds. While those rubber parts are intended for the Instinct creative armor files, they worked out just perfect with the titlewave armor. So no complaints at all with the titlewave pieces, and they printed great. I also love all the shoulder options titlewave offers. But if I were to do it all again, I’d go with the full instinctcreative set for uniformity.

Last year I was using an Ender 3 Max Neo, but once I got a Bambu P1S I completed the remaining half of my prints on that machine. Sanding was a breeze on most parts with very little clean up needed. I reinforced the chest parts with glue, then plastic welding, and finally fiberglass mats. I did the same reinforcing on my thigh parts, which printed in 3 pieces. The two halves of the chest come together on me using four parachute clips, which have similarly been locked in with resin. The clips are not the most tight join to bring the two halves together, and takes a bit of fiddling to get on, but I think I prefer that to magnets.
 

Attachments

  • IMG_2061.png
    IMG_2061.png
    7.4 MB · Views: 2
  • IMG_2062.png
    IMG_2062.png
    3.8 MB · Views: 3
  • IMG_2063.png
    IMG_2063.png
    5.2 MB · Views: 4
For the rubber undersuit, it was honestly pretty straightforward to make the parts: print the moulds, pour equal parts of each part of the Dragon skin, add some black acrylic ink, mix, and cast. I did ask many questions to others on Instagram before making my attempt at these parts though, and I learned a lot- happy to answer questions about this process. I started with the neck mold, cast a part— it was too short for my long neck and didn’t mesh with the helmet well (prolly cuz I’m 6’2” and skinny lol). So I reprinted that mold at a bit of a longer height along the Z axis, and it was perfect on my second cast!

As for wearing the rubber parts, that has been slightly more challenging. Basically each rubber piece is going to need some parachute webbing fused / embedded into it, so that you can clip in to the armor. (The only piece that didn’t need this was the elbows, they lock in nicely once you wiggle them on). Some of the rubber molds have intentional areas for you to thread webbing through a loop, but you still need to fuse them to the part first. I’m still learning as I go on these, and tackling the floating knee area is gonna take some fennangling as I try to get into the thigh/knee rubber combo.
 

Attachments

  • IMG_2083.png
    IMG_2083.png
    6.8 MB · Views: 6
  • IMG_2084.png
    IMG_2084.png
    10.8 MB · Views: 7
  • IMG_2085.png
    IMG_2085.png
    8.5 MB · Views: 7
  • IMG_2080.png
    IMG_2080.png
    6.1 MB · Views: 5
  • IMG_2086.png
    IMG_2086.png
    8.1 MB · Views: 8
  • IMG_2087.png
    IMG_2087.png
    7.8 MB · Views: 8
  • IMG_2088.png
    IMG_2088.png
    7.2 MB · Views: 11
  • IMG_2079.jpeg
    IMG_2079.jpeg
    332.5 KB · Views: 5
  • IMG_2078.png
    IMG_2078.png
    8.1 MB · Views: 8
  • IMG_2077.png
    IMG_2077.png
    7.3 MB · Views: 7
  • IMG_2076.png
    IMG_2076.png
    8.4 MB · Views: 6
  • IMG_2075.png
    IMG_2075.png
    7.3 MB · Views: 5
  • IMG_2074.png
    IMG_2074.png
    8.2 MB · Views: 7
  • IMG_2089.png
    IMG_2089.png
    8.5 MB · Views: 8
A few months ago, my cousin wanted in on the action and he decided to print his own Spartan. He went for a security look from Halo four and five. Together, we cast two sets of rubber suits using about 2 gallons of dragon skin plus a few pints for touchup areas. His armor was slightly less complex than mine in terms of rigging, and by the end of a week working together, we were able to get his 95% of the way done. You’ll see some shots of his work sporadically throughout my pics. It’s a cool comparison to see a glossy black ONI operative type lad next to my beat up green boi
 
I also *think* I’ve landed on my loadout. LMG by Blazingforge on Instagram. Knife from galactic armory. Magnum found on Thingiverse. I got some 60lb weights and screw them to my thigh armor, they hold my magnum exceptionally well.
 

Attachments

  • IMG_2090.png
    IMG_2090.png
    11.7 MB · Views: 7
  • IMG_2070.png
    IMG_2070.png
    8 MB · Views: 8
  • IMG_2067.png
    IMG_2067.png
    7.4 MB · Views: 10
  • IMG_2068.png
    IMG_2068.png
    6.2 MB · Views: 8
  • IMG_2069.png
    IMG_2069.png
    4.9 MB · Views: 7

Your message may be considered spam for the following reasons:

If you wish to reply despite these issues, check the box below before replying.
Be aware that malicious compliance may result in more severe penalties.
Back
Top