Hello there.
It's been a hot while since I posted anything in here. But let's get back on the topic of this thread.
In retrospect, my previous 2.0 thread was more of a 1.5 patch to my first ODST suit. But now I'm actually making new, more detailed and complex version of the ODST armor. So let's get started.
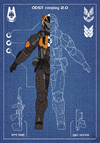
1. CONCEPT
As a start to my project I did a visualization of how I would like my new cosplay to look.
(Refer to the the first attached file)
I drew this back in January. It's a slight departures from what I currently have. I will loose some orange colored areas in favor for more greys. But I do think this would look more in line how ODST usually look.
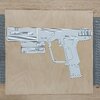
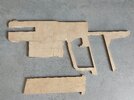
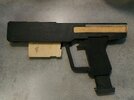
2. M6C/SOCOM
Fast forward to the end of May and the start of June. I have acquired some cosplay supplies and started planning on how I wanted to make the prop. Of course it will be made for the most part out of EVA foam but I also got some plywood as well as some hdf board. The plywood will be used as a core of the prop to make it more sturdy. And so the work on it has begun. And for the past 2.5 weeks, as of writing this, I've been cooking and made a great progress on it.
(Progress pictures will be attached below)
First I used my own templates I made and cut out the shape out of plywood. Also cutting out the magazine and space for the slide. Yes, this will be a functional part of the prop. Next I added a bunch of of foam layers and the hdf board was used to construct a simple rail system to make the slide. Then more and more layer of foam was added. And here are we now. My M6C is not yet fully built but I'm getting close. It's still lack some of the smaller details scattered across it.
This is a tl;dr version so I left a lot of details from the process of making the Magnum so you have more compacted and less time consuming post to read through.
And that's gonna be it from me as of right now. For now I will focus on finishing and refining what I have and then I'll go and start working on the SMG. And after that will start working on the suit itself.
Thanks for reading and have a good day or night
It's been a hot while since I posted anything in here. But let's get back on the topic of this thread.
In retrospect, my previous 2.0 thread was more of a 1.5 patch to my first ODST suit. But now I'm actually making new, more detailed and complex version of the ODST armor. So let's get started.
1. CONCEPT
As a start to my project I did a visualization of how I would like my new cosplay to look.
(Refer to the the first attached file)
I drew this back in January. It's a slight departures from what I currently have. I will loose some orange colored areas in favor for more greys. But I do think this would look more in line how ODST usually look.
2. M6C/SOCOM
Fast forward to the end of May and the start of June. I have acquired some cosplay supplies and started planning on how I wanted to make the prop. Of course it will be made for the most part out of EVA foam but I also got some plywood as well as some hdf board. The plywood will be used as a core of the prop to make it more sturdy. And so the work on it has begun. And for the past 2.5 weeks, as of writing this, I've been cooking and made a great progress on it.
(Progress pictures will be attached below)
First I used my own templates I made and cut out the shape out of plywood. Also cutting out the magazine and space for the slide. Yes, this will be a functional part of the prop. Next I added a bunch of of foam layers and the hdf board was used to construct a simple rail system to make the slide. Then more and more layer of foam was added. And here are we now. My M6C is not yet fully built but I'm getting close. It's still lack some of the smaller details scattered across it.
This is a tl;dr version so I left a lot of details from the process of making the Magnum so you have more compacted and less time consuming post to read through.
And that's gonna be it from me as of right now. For now I will focus on finishing and refining what I have and then I'll go and start working on the SMG. And after that will start working on the suit itself.
Thanks for reading and have a good day or night


")