SgtSaint ODST build (AU regiment)

SgtSaint

Well-Known Member
Member DIN
S027
Planning
So I decided to go ahead and build an ODST cosplay. In hind sight I know now I should have done it before my Spartan - just because the loose tolerances, visible straps, military surplus pouches and 21st century military inspired look make it a better choice before the more exacting scaling and rigging of a Spartan. Live and learn, and thus the advice I give out now to do it first.

Concept and color scheme.
I decided I'd do something a bit more… Me. For 35 years I've always cosplayed as me inside a franchise or universe. Me as a Klingon, but not as Worf. Me as Peacekeeper but not Capt. Crais. …A spartan but not Master Chief. You get the idea.


I wanted my ODST to look as if it were part of the same military in the same universe as my Spartan which is made to have the aesthetics of Halo The TV series. That got me thinking about: "What if the TV series had gotten a third season? That would make it Halo3, right?" So a mix of colors, textures and aesthetics from the show while drawing inspiration from some well-known game ODST characters. Besides, if the two suits are standing side by side they should look like they belong together.

The armor is to be 3d printed. There's some resin and FDM in there. Some foam accents. Stencils. Sewing. Decals… All the typical mix of disciplines, materials and techniques.

Files are a mix of Galatic Armory, MoeSizzlac, my own.


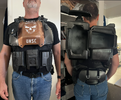
Undersuit is me being lazy and starting with the Kryptek Typhoon ACU's I already have, then adding on top of that.
1744586028381.png


With the typical plate carrier as the vest the torso parts attach to.
2025-04-14_07-23-03.PNG
 
Last edited:
More planning.
I then scrubbed through a bunch of footage from Halo3:ODST. Basically I grabbed a YouTube of "All cuts scenes" from the game, as well as the 343 official rookie cosplay guide and studied the heck out of all the little details as well as other people's build threads to find what they liked and didn't like about this that and the other thing.
2025-04-14_09-18-21.PNG


Digital build and pre-vis
I brought all the armor into Armorsmith for layout and scaling. Like I said, some of the armor was Galactic Armory, some MoeSizzlac, some my own. Once laid on the digital avatar and scaled I made couple choices:
  • Shoulder armor - It was a choice to make the arm armor a bit smaller than game-scale. I often say one sometimes has to make a choice between "game accurate" and "real world wearable". I kept the forearm+elbow a little short: Not extending beyond the elbow in length and not limiting the amount I could fold my elbow toward me. I kept the shoulder more form fitting and not extending beyond my bicep or above the shoulder. I wanted to avoid two potential problems.
    • Armor collisions where I might limit my range of motion reaching for a weapon on my back, doing a pose and so on.
    • I didn't want armor so bit that crowded convention pathways would have parts that jut out get snagged on other people's costumes, capes, robes etc.
Once that was all laid out I also added some graphics I designed to help me visualize what had only been in my head until now.
1744586974921.png
 
From the legs upward, and the hands inward.
Its a build order I've adopted and recommend. If you start at the boots and hands those are smaller parts, faster prints, and a functional order that just makes sense to me.
Boots on the ODST are so much simpler than Spartan. Its just a toe cover and heel greeblies. So its a great intro to scaling if you've never done armor before. All you have to do is scale a couple parts to match your boots.
1744587423785.png


And I do mean *boots*. High top combat/work/hiking boots. And I dedicate them to each cosplay with the armor screwed right to them. I don't try to make it so my sneakers come in and out of them. That's me. If you want to do something else go for it. But for me the boots give the shin/calf armor something to ride on other than my foot and ankle bone.
IMG_1678.jpg


1744587677621.png


Once the boots are done, then the calves. To some degree I goofed. Because I was used to wearing a morph suit under my Spartan armor I forgot to account for the much bulkier ACU pants. In the end, I have to wear UnderArmor not ACUs because of this fit. Learn from my goof and plan accordingly.

 
Last edited:
Working upward...
Did the boots...
Then the calves...

Next come the thighs.
These were done as a hard main body with a flexible inner thigh for comfort and little more freedom of movement.
thigh.JPEG
IMG_1618.JPEG


You get how this is going. The shins have to ride on the boots. The thigh have to not conflict with the shins if you expect to walk up & down stairs, sit down, pose for "take a knee" photos etc.
_DSC6767.jpg
 

Attachments

  • IMG_1449.MP4
    4 MB
  • thigh.MP4
    3.5 MB
Last edited:
Arms
I won't waste a ton of your bandwidth here. Same thing going on here. Arms were scaled to what I call "real world wearable" as mentioned earlier.
Printed, sanded, painted.
2025-03-12_11-11-51.PNG
2025-03-12_11-19-44.PNG
 
Back
I've got a wide rib cage and kinda barrel-chested as used to be the phrase. For me doing the back plate was next because that had to fit well then I could scale the chest and other torso pieces to match and look right.


Sand and paint just like any other prop or armor
IMG_1213.JPEG


IMG_1494.JPEG
 
Mounting

Next comes the part lots of people seem to post about on the various socials:

How do you put it all together and mount and strap it all?

Most everyone I see gets a 'plate carrier' and mounts to that and I didn't re-invent the wheel here. I got a cheap plate carrier off Temu and use that, modifying it as I went as seemed to make the most sense.

First all the pouches that came on it, came off it. I just need the carrier as a platform to mount armor. Then adjust and size to fit.
2025-02-21_13-52-11.PNG


Then hold up parts and figure out where I went them to be. What's too high? If I put this here, does it get in the way of some other part?
Yes this means all the cliché photos in a mirror etc.
2025-02-21_13-54-28.PNG


From there it was just
  • Add a part
2025-04-07_18-19-32.PNG


  • Add a part
2025-04-07_18-19-32.PNG


  • Add a part
IMG_1571.JPEG
 

Attachments

  • 2025-04-07_18-19-32.PNG
    2025-04-07_18-19-32.PNG
    770.1 KB · Views: 4
Helmet

Sorry -
My bad. I got out of order and the other sections are already posted/committed.
The helmet is printed and the visor is clear resin printed.


The helmet is resin printed in left/right halves, and of course was scaled to my head. These means only 1 seam down the center and virtually no sanding because its resin smooth to start with.
IMG_9899.JPEG


IMG_9928.JPEG


Mask and paint
IMG_1128.JPEG

Then some hand painted details etc. etc. You know the drill.

Balaclava that matched the camo pattern - was cheaper to get an assorted 4 pack than just one: Go figure.
2025-04-07_13-25-01.PNG
 
Last edited:
Visor
As I mentioned, the visor is clear resin printed.
IMG_9647.JPEG


Sanded to a high grit and it comes out nice and optically clear.
AfterPolish.png


You can see from these convention photos just how clear it is looking from the outside. I had no problem walking around the convention.

fc2ec59c-b306-4352-a084-a72065453483.jpeg


One shameless plug here for my shop. The helmet, the visor, the printing, the custom grenades that hold soda cans... all of that is available through my shop. Starbase3d.com or Starbase3d.etsy.com
 
Convention time!
Yesterday was the moment of truth - The Supanova Gold Coast convention.
Saturday I work my Spartan MK-VI but that's not what this thread is about.
Sunday was the trial run for the ODST

Wristband - Its like everything just falling into place.
IMG_1712.JPEG


Waiting for the doors to open
IMG_1681.JPEG


IMG_1686.JPEG
IMG_1690.JPEG

IMG_1689.JPEG


Posing with some of the vendors carrying Halo merch.
IMG_1694.JPEG
IMG_1697.JPEG


A little fun with the promotional booths

IMG_1705.JPG
IMG_1706.JPG
 
The proof is in the pudding pictures

There's more still being uploaded by those that shot photos for the group. I thank everyone that took pictures, braved the rain, brought there gear, suffered the heat and made these possible. These are just a couple I received early enough to do this thread but please check out all the shared images.

All up - yeah, I'm pretty darned happy with the new armor!

20ec3139-f010-4da5-b926-36b04d34c932.jpeg
23b7acf9-dcb7-41bf-9976-703ce2051c15.jpeg

f99f007d-3e29-4c18-a23e-6c52df4e65dd.jpeg
860eeada-0a1e-4744-b41d-703dc951505d.jpeg
 
Ok - I'm done banging on this new thread with entries. Thanks for your patience and putting up with numerous new post alerts.
 
Wow very thorough write up saint! This will surely be a useful resource I'll be linking folks when they ask about each of the pieces you covered. So cool to see the progress on the suit too. It looks great! Well done.
 

Your message may be considered spam for the following reasons:

If you wish to reply despite these issues, check the box below before replying.
Be aware that malicious compliance may result in more severe penalties.
Back
Top