- Member DIN
- S128
This process was not developed by me. It was developed and shown to me by EVAkura who authorized me to write up a tutorial. It has since been used by many who immediately contact him thanking him for the hours of sanding he has saved and how cheap and accessible the products are.
Materials:
3d Printed Part
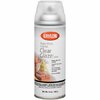
Krylon Triple Thick Glaze
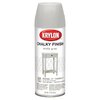
Krylon Chalky Finish Spray Paint


*Disclaimer: For these photos I did 0% sanding just to show you what the results can be with the least amount of effort. Trust me, you will get better results if you sand your part in between any or all coats of Glaze/Paint.
This process is similar to using thick filler spray paint, but is more controlled which results in better kept edge detail. There is some sort of reaction that happens when spraying these two Krylon products together while they are still wet that helps it autolevel when drying.
 Here is an uncoated, PLA 3d print. Take a hobby knife or craft knife to it to knock off any supports or overprints that should not be part of your final piece.
Step 1: Spray it with the Triple Thick Glaze enough to coat, but not enough to pool. Keep the can 12” away from part and try aiming for the hard to reach parts first.
Step 2: Immediately (before the glaze dries) spray the part with the Chalk Paint in a light dusting. Keep the can 18”-24” away from part and do not hold down nozzle for long periods.
Step 3: Let dry completely and sand with 220 grit if desired.
Repeat all above steps 3-4 times. On the last coat sand with 320 grit if desired.
I used a heat gun at medium setting from a couple feet away, just to help the drying process along.
 1st coat of Glaze+Chalk (let dry 5-7 minutes)
 2nd coat of Glaze+Chalk (let dry 7-10 minutes)
 3rd coat of Glaze+Chalk (let dry 10-12 minutes)
 4th coat of Glaze+Chalk (let dry 15 minutes)
Step 4: Select your final paint and test a small section to see if there are any reactions to the glaze/chalk layers. I have seen standard Acrylic Spray Paint as well as Automotive Enamel Spray Paint work with no issues.
 I sprayed my test on the lower left corner and then sanded it off once dried.
Step 5: Spray paint your piece with 1-2 coats of paint following the directions of your paint.
 Again, this is with no sanding between layers. Sand between layers for even better results.
And you're done!
 Here is another photo just to show you that a splotchy pattern between layers is normal.
Materials:
3d Printed Part
Krylon Triple Thick Glaze
Krylon Chalky Finish Spray Paint


*Disclaimer: For these photos I did 0% sanding just to show you what the results can be with the least amount of effort. Trust me, you will get better results if you sand your part in between any or all coats of Glaze/Paint.
This process is similar to using thick filler spray paint, but is more controlled which results in better kept edge detail. There is some sort of reaction that happens when spraying these two Krylon products together while they are still wet that helps it autolevel when drying.
Step 1: Spray it with the Triple Thick Glaze enough to coat, but not enough to pool. Keep the can 12” away from part and try aiming for the hard to reach parts first.
Step 2: Immediately (before the glaze dries) spray the part with the Chalk Paint in a light dusting. Keep the can 18”-24” away from part and do not hold down nozzle for long periods.
Step 3: Let dry completely and sand with 220 grit if desired.
Repeat all above steps 3-4 times. On the last coat sand with 320 grit if desired.
I used a heat gun at medium setting from a couple feet away, just to help the drying process along.
Step 4: Select your final paint and test a small section to see if there are any reactions to the glaze/chalk layers. I have seen standard Acrylic Spray Paint as well as Automotive Enamel Spray Paint work with no issues.
Step 5: Spray paint your piece with 1-2 coats of paint following the directions of your paint.
And you're done!
Attachments
Last edited:


