SpaceX Helmet WIP

Status
Not open for further replies.

macktruck

Member
I was recently doing work on this forum and several people suggested I use Fusion 360 for desighning. I've started another project and tried to use Fusion 360 But I can't find a solution to my current problem.

I have made one "form" with several bodies from it. I have used a sketch to trip the objects but I can not find any way to join the two objects.

I've tried sweep, trim, and bridge.

Sweep doesn't let me select the line on a new sketch, trim doesn't find my selections to be valid, and bridge doesn't work either.

How should I go about fixing this?
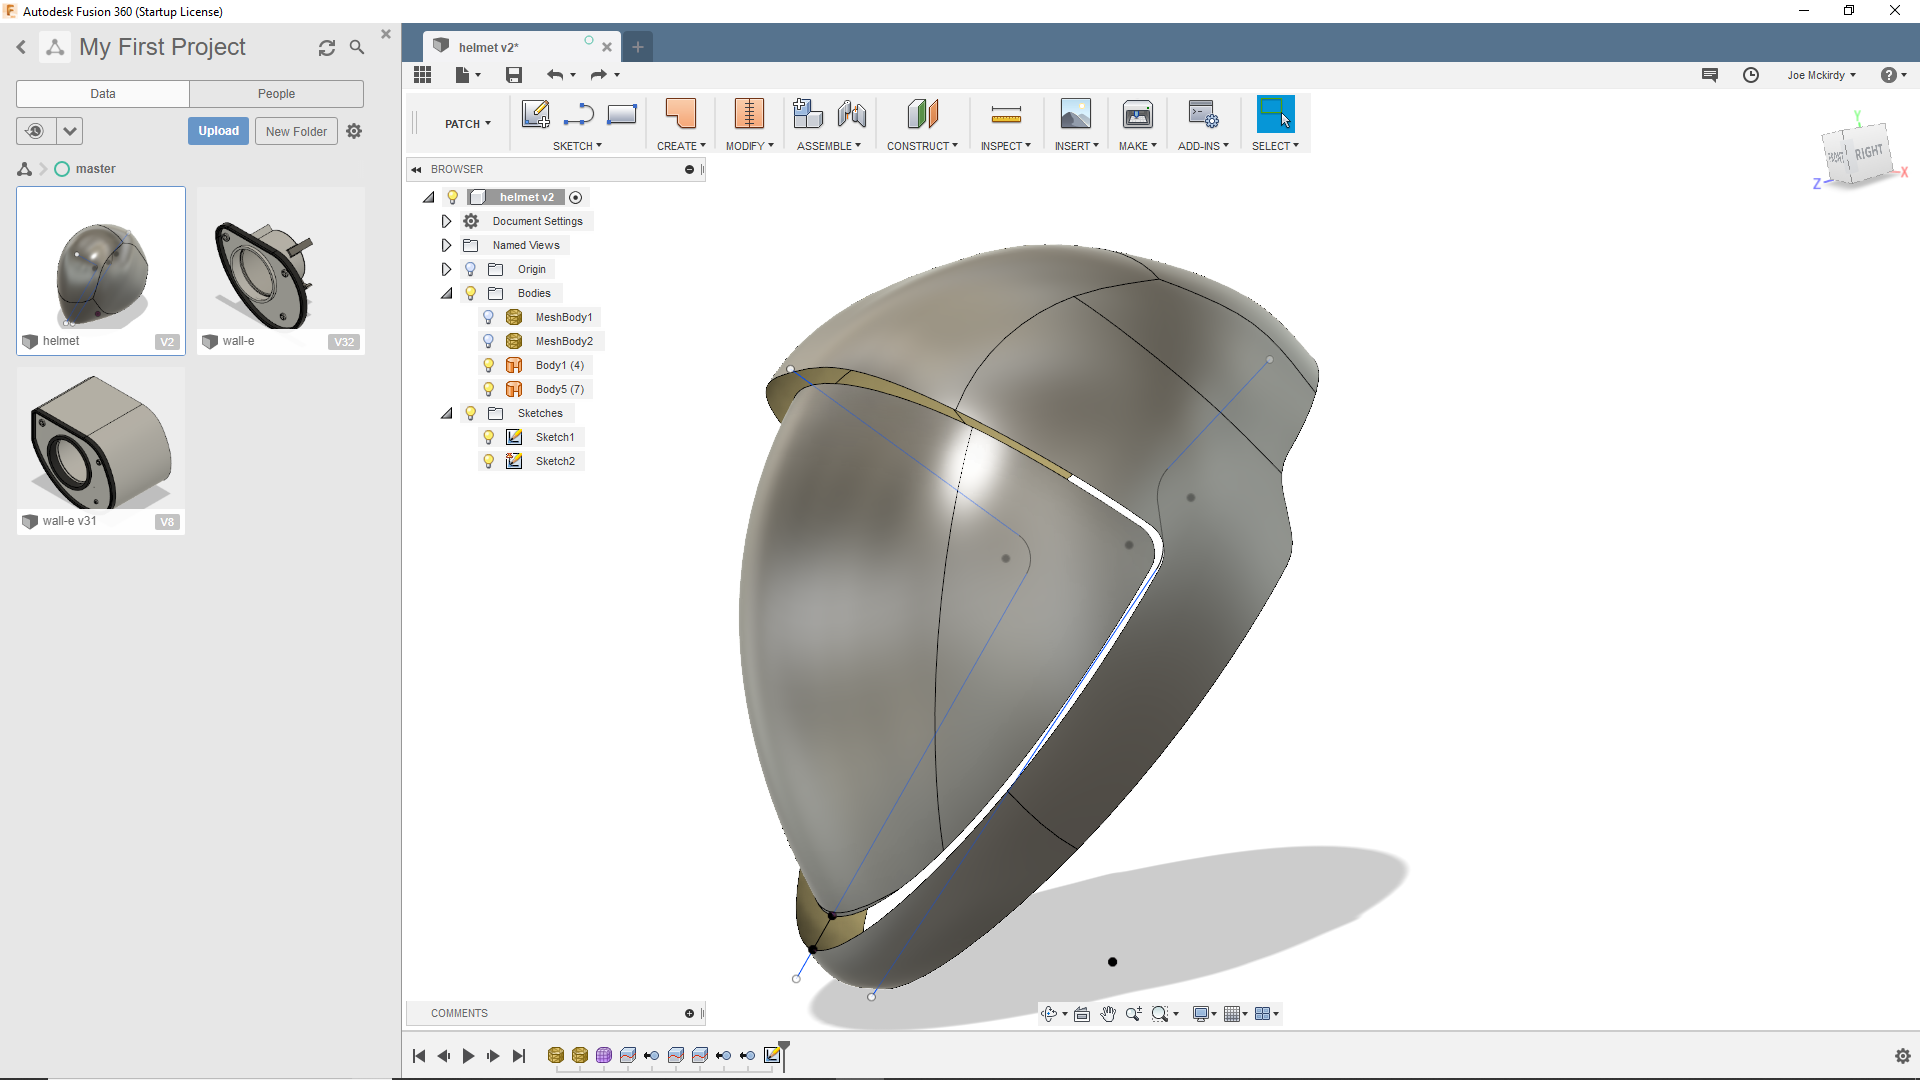
problem.png
 
Last edited:
I almost immediately found the solution after I made the post. :p
View attachment 262222

I'm not going to let you leave that quote without a explanation of the solution you found! That's just bad tech forum juju that we don't allow on the 405th!

My best guess is that you didn't have your form set up as a BRep Body. You can convert from Mesh or T-Spline in either the Sculpt or Patch work-spaces. Once you have a BRep you can in the Patch work-space Create > Patch by selecting your edges that you want to bridge. The last step is to make a solid from your newly patched body by Modify > Stitch and selecting all areas where your patch was made. Then you have a solid body that'll be easy to manipulate in the Model work-space which is where sketching and other operations are king.

Did I win?
 
I don't really know what you just said, but I tried a random thing I thought I had already tried. Basically went into patch mode and did a sweep with the sketch. Perhaps I was trying to do it in Model mode. Don't know why it worked, but hey, it worked. Now, to figure out how to do a chamfer after stitching without crashing the program. I guess I could manually add chamfers to the sketch as arcs, but that is a task for another day. Anyone guess what the other files in the project are for?
 
Okay small update. I added a mirror to make the inlets easier. I know they aren't in the correct spot, but I"m trying to get the process down. Unfounately I couldn't get two fillets on the inlet. This can be solved by adding some body filler and running my finger across the corner.

upload_2018-11-13_20-16-50.png
 
No update for today :(. To busy playing Fallout 76. :(
I will however post this image of a model that I commissioned someone to make.
Unfortunately the model was not smooth enough for production, so I have started remodeling it in Fusion 360 as everyone can see in the recent posts.

composite.png
 
I can only work on this a couple hours a day and all my time is trying to figure out how to make the program do what I want it to do. Today, I tried giving the helmet wall some thickness by adding a smooth interior. I wasn't able to close the bottom yet, but I have an idea I'm going to try tomorrow. I also made the visor a separate object now.

upload_2018-11-15_21-30-6.png
 
I can only work on this a couple hours a day and all my time is trying to figure out how to make the program do what I want it to do. Today, I tried giving the helmet wall some thickness by adding a smooth interior. I wasn't able to close the bottom yet, but I have an idea I'm going to try tomorrow. I also made the visor a separate object now.

View attachment 262317

In the Patch work space Create>Thicken is your friend if you're working with T-Spline bodies to get them to a printable thickness!

Handy reference guide from AutoDesk
 
There might not seem like allot of detail, but there is. I have had to adjust some angles to be more accurate.

The major changes this time is some fake release buttons, adjusting the angle where the base and top of the helmet meet, and adding a gentle fillet to the bottom of the base so it doesn't catch/scrape people's neck. I used some dark materials to highlight the buttons.

buttons.png


I am a little confused on how to smoothly add the bulge to the helmet around the ear and how to make the base to slide under the top.
 
Okay, I'm having a little trouble with a different project. I'm trying to import a stl or obj into fusion for a reference, but the sale of the mesh is wrong. How do I scale a newly imported mesh.
 
Okay, I'm having a little trouble with a different project. I'm trying to import a stl or obj into fusion for a reference, but the sale of the mesh is wrong. How do I scale a newly imported mesh.

The downside to meshes as a reference is that you can't calibrate them to exact sizes like you would canvasses but there is a work around.

If you have two points that you know your desired distance between you can either use the Measure tool in the Model workspace to get a point to point distance or create two construction planes at the points and measure the distance between the planes. Divide your measured distance by your desired to get a scale factor. In the object browser list if you right click on the mesh body you want to use as your reference, you should have the option of Scale which asks for a scale factor, input your magic number and you're good to go. You can also do this in the Mesh workspace Modify > Scale and use the scale factor.
 
I actually had to actiate the mesh workspace. From there it was pretty easy.

I've gotten a little sidetracked again and I started working on a custom computer case. Anyone know what this will eventually be?

0OoaamE.png


This forum has been a lot more helpful the the tech forums I'e been posting on. I'm still have trouble finding dimensions for computer hardware, mainly the dimensions and mounting hole placement dimensions for standard PSU, optical drive, 5.25'' hdd, 3.5'' ssd drive. If anyone is able to find blueprints with this information, it would be immensely helpful.
 
Okay, I'm having trouble figuring out how to continue with the helmet. The problem is that I want a good (as possible) seal between the two pieces. In the first image you can see the black rubber is meant to seal against the visor section when the visor section is pulled down. In the second picture you can see where the visor section and the base section meet in the back. I have no idea how to smoothly do this.

open.png back.png
Is there a way to do this without eyeballing everything?
sidev2.png
 
Last edited:
Small update, worked on refining the lines some and adding the piece on the back. It seems like I may need to do some sculpting in another program to get some of the shapes correct but Fusion 360 is doing a good job keeping edges straight.
update.png
 
Some more progress, I would have more, but one of my sketches makes everything else go invisible for someone reason. This file is getting real lagy I added a different material to show the detail. I tried to add some detail that is exlusive to the flight version but was unsuccessful so I took the easier test version.
recessed.png
.
 
Status
Not open for further replies.
Back
Top