Ral Partha
Sr Member
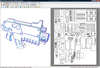
I finally decided to start building after months of searching and editing Warhammer 40k stuff. I found more than half a dozen models of the bolter but settled on the one created by psychotron, found in the Google 3D Warehouse. The pep file that I used had a fair number of open edges but I finally learned enough 3D editing to completely eliminate them (v3). I will be releasing that pep file at a later date when I'm done unfolding it. Here are some pics of my progress so far that began during the Christmas break:
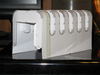
Magazine:

I began with this part because I felt that this was the most problematic area with those exceedingly small folds and flaps and thus susceptible to warping, as well as a missing face.
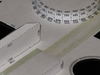
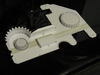
Trigger and Handle:

This came out a lot easier than I anticipated. Note how close the edge ID numbers are in the trigger and handle areas.
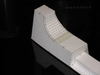
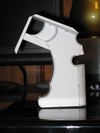
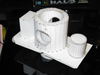
Grip:

This is the third part that I built. The flaps here are even smaller/narrower than the ones in the magazine but putting it together is not really as bad as it sounds but you need to take your time when gluing the parts together. IIRC, it took me 2-3 days to make it look like the one in the pic above.
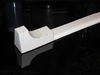
Barrel:

I kinda messed up the gluing on this part, as you can see in the pic, but a little bondo patch up should clear it up.
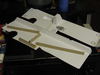
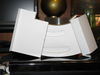
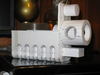
Trigger, Handle and Magazine:

This is what I got after gluing the trigger to the magazine together. It feels pretty sturdy together so I'm quite happy with this result.
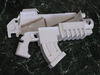
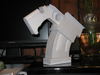
Grip with Barrel:

Note that I glued the flaps on the outside of the barrel. I did this for half of them. If I didn't, the edge IDs will start shifting away from each other due to the thickness of cardstock, which will lead to warping.
That's all I got at the moment. The temperature here is still hovering around the low 30s so resining it will have to wait.
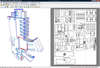
Magazine:
I began with this part because I felt that this was the most problematic area with those exceedingly small folds and flaps and thus susceptible to warping, as well as a missing face.
Trigger and Handle:
This came out a lot easier than I anticipated. Note how close the edge ID numbers are in the trigger and handle areas.
Grip:
This is the third part that I built. The flaps here are even smaller/narrower than the ones in the magazine but putting it together is not really as bad as it sounds but you need to take your time when gluing the parts together. IIRC, it took me 2-3 days to make it look like the one in the pic above.
Barrel:
I kinda messed up the gluing on this part, as you can see in the pic, but a little bondo patch up should clear it up.
Trigger, Handle and Magazine:
This is what I got after gluing the trigger to the magazine together. It feels pretty sturdy together so I'm quite happy with this result.
Grip with Barrel:
Note that I glued the flaps on the outside of the barrel. I did this for half of them. If I didn't, the edge IDs will start shifting away from each other due to the thickness of cardstock, which will lead to warping.
That's all I got at the moment. The temperature here is still hovering around the low 30s so resining it will have to wait.
 !
!