WoW - Judgement Paladin

BHE Photos

Member
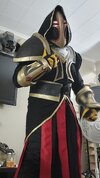
Cosplay: Judgement Armor from World of Warcraft
Completion Date Goal: have a rough draft ready by DragonCon (9 days from now).

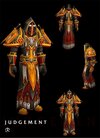
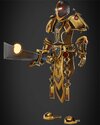
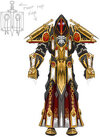
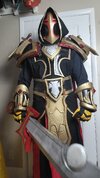
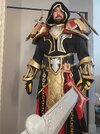
While I didn't play a Paladin in Vanilla (my mains were a Prot Warrior and Marksmanship Hunter), I have always felt like the Judgement tier set was one of the most iconic/cool armor sets from Vanilla WoW and arguably still to this day.

It is surprisingly difficult to find WoW armor files for anything besides Arthas and Anduin, but I was able to find a set of files for this armor.

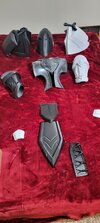
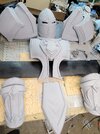
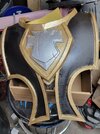
I will be 3D printing most of the hard parts shown in the attached image, though I don't really like the way the designer did the feet, and I think I'm going to do the belt out of leather.
The chest piece is a bit too "barrel chested" for my body shape, so I may have to reprint it later.

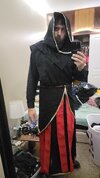
This will be the first project that I do significant sewing for. I intend to make all of the soft parts myself, with the exception of the boots. So far I've sewn a very basic tunic/tabard in solid black, which will be the base layer (though I made it a bit tight, so I might have to adjust it a bit). I will attach some sleeves eventually once I decide if I want to pursue the more detailed style or just a basic sleeve.

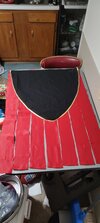
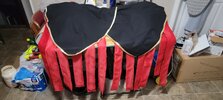
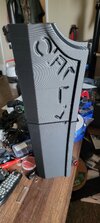
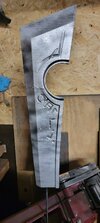
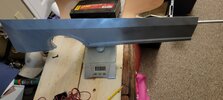
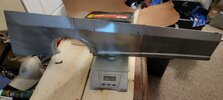
Shown in the first attachment is one of the side kilt pieces. There will be two of these, and I intend to have about a 4" overlap in the back, and they'll be attached to the belt at the top. The red ribbons are currently 4" wide, but once I pick up some red thread I'm going to hem the edges and make them 3" wide. At the bottom of each strip, I'm going to print out plastic hanging pieces/ends. I think this will give them some weight to keep them hanging properly, though if they end up being too noisy I might switch to white cloth. These red ribbons will be under the side piece but over the bottom layer tunic and completely wrap around me.

I am planning on using resin printed gems and real wax for the various seals and gems on the reference images. Ideally I'd like to put some real paper on the shoulder books, but that might have to wait for a later update.

I want to age some paper and do the small hanging scrolls, so I bought a couple of sheets of various papers from Joann's, and I'm going to see which looks better after some aging. I'll need to figure out some appropriate runes to print on them though.

I am hoping to get an Ashbringer printed out in time for the Con but that's a relatively low priority. I'd also like to eventually do a cool leather tome to carry around with me as an off-hand piece.

Since I'm sewing this and have total control of things, I want to explore sewing my rigging right into the tunic. I'm going to run a piece of nylon across the shoulders with buckles on each end for the shoulder armor, and maybe a similar system for keeping the bracers from slipping too far down.

Goal for Sunday, Aug 18:
  • Hem and bias tape the tunic and other side piece
  • Buy red thread and hem up the red ribbons
  • Create base layer leather belt to attach kilt to (side pieces and ribbons)
  • Design and start printing white ribbon ends
  • Put an initial coat of UV Resin on all the currently printed parts
I've got a lot of work to do on this build and not much time to do it in. I'm tempted to bust out a basic cape or something similar to avoid having to put much effort into the back. I wanted to get this thread started though, before I got too deep into it.
 

Attachments

  • 20240818_013926.jpg
    20240818_013926.jpg
    710.4 KB · Views: 101
  • 20240818_015952.jpg
    20240818_015952.jpg
    1,007.8 KB · Views: 114
  • Screenshot_20240818_015601_Firefox.jpg
    Screenshot_20240818_015601_Firefox.jpg
    477.8 KB · Views: 116
  • world-of-warcraft-paladin-judgment-armor-and-sword-for-cosplay-3d-model-719e2cd108.jpg
    world-of-warcraft-paladin-judgment-armor-and-sword-for-cosplay-3d-model-719e2cd108.jpg
    413.4 KB · Views: 331
  • Judgement_Concept.jpg
    Judgement_Concept.jpg
    24.7 KB · Views: 206
Aug-20 Update:

Kilt/skirt portion is basically complete. I have to finish about a foot of stitching, but my bobbin ran out of thread on my leather sewing machine and it's a pain to refill, so I'll finish it tomorrow. Currently I printing a test piece for the ribbon bottoms, a 4 layer-thick tab that will be hand stitched to the ribbons.

Also slapped together a hood, which I don't currently plan to sew to the tunic but I'll see how well it decides to stay under the armor when the time comes.

For the belt, I've decided to place the ribbon skirt as the bottom layer, with a 6" wide EVA foam belt directly over that, and then a 4" strip of leather directly over that. The foam will give it the heft of a paladin belt and hide the top of the ribbon skirt, while the leather will be what actually holds it together. I'm undecided about how I want to actually make the buckle and tightening work, I'll have to look into some options tomorrow.

Outside of stitching the belt layers together and strapping, I think this should conclude the sewing portion of the build.

I'm hoping that my Neptune 3 Max is going to cooperate now that I've swapped out a nozzle so I have a piece of the Ashbringer sword printing on it.

I need to really get working on post-processing the 3D printed pieces soon. I suspect that DragonCon may have to go without the large front chains and the various scroll pieces in the interest of getting the other stuff done. I think if I finish everything I currently have printed/sewn, the build will be acceptable.
 

Attachments

  • 20240820_012444.jpg
    20240820_012444.jpg
    1.7 MB · Views: 63
  • 20240819_213556.jpg
    20240819_213556.jpg
    546 KB · Views: 62
  • Snapchat-1770746026.jpg
    Snapchat-1770746026.jpg
    1.4 MB · Views: 64
Aug-21 Update:

Made a small modification to the tabard (leaving the sides open) and I'm just going to wear a long sleeve shirt underneath. After DragonCon, I will probably revisit it and sew a roomier and complete piece with sleeves.

Finally got the printed parts their UV Resin coat, an initial sanding, and a layer of filler primer. I'll probably sand the helmet and maybe the breastplate again, but the rest of the parts will likely go straight to top coat in the interest of time.

I heat sealed the 6" EVA foam belt and hit it with a coat of plasti-dip. It'll get a coat of white primer and then a gold top coat. The 4" leather belt will go over that, dyed black. I'm going to sew some 2" black nylon webbing to the ends of the leather and use the same "tactical belt buckle" that I've used on my Mark IV armor, and then place the decorative belt buckle over that (not shown in the photos, forgot to bring it to the garage last night for resin + primer). I'd like to engrave some holy runes on the belt, but I'm having a hard time finding good examples online, so I might shelf this idea as well for a future upgrade. The ribbon Kilt, foam belt, and leather belt will be bound together with Chicago screws, as I have no interest in hand stitching them all together.

I'm printing out the pieces for Ashbringer, and have 2 of the 3 blade pieces printed, and should be able to have the handle pieces printed by the end of the day tomorrow.

Tasks ahead:
  • Dye leather belt
  • Restock on filler primer
  • Keep printing Ashbringer
  • Start applying top coats to armor pieces
4 evenings of crafting remain before DragonCon.
 

Attachments

  • 20240821_080816.jpg
    20240821_080816.jpg
    1.2 MB · Views: 101
  • Snapchat-1540298085.jpg
    Snapchat-1540298085.jpg
    2.2 MB · Views: 71
  • 20240821_075556.jpg
    20240821_075556.jpg
    1.1 MB · Views: 75
Aug-22 Update:
Last night I did a ton of painting. It's my least favorite part of any build, and this build is no different.

The helmet was the most frustrating. I wanted a gloss black to really pull attention to it (compared to a matte black on the rest of the armor), but because of how quickly I rushed from the black to the colors, I ended up with tape residue messing up the gloss black. I might tape off the red/gold and redo the black before I do the top clear coat.

I realized that outside of the helmet, I was only using black, gold, and a couple of spots of silver. The tertiary color of red isn't represented on many pieces, so I added a couple of accent points (corners of the shoulder books, undertrim of the shoulders, a spot on the glove plate. Eventually there will be a lot more once I start adding gems and wax detail pieces, but that'll be the next iteration.

Goals for tonight:
  • Weld Ashbringer pieces together. Most of the surfaces are pretty flat, so I should be able to get a pretty aggressive UV Resin coat down to minimize sanding. I anticipate having the sword to the primered stage in a single evening.
  • Clear coat the finished pieces.
  • A couple pieces were missed in the painting: back piece of breastplate, shoulder sword handles, belt buckle, and the ribbon tags I've been steadily printing one at a time (because my Neptune 3 Max is being a fickle machine).
  • I apparently never printed the blades for the shoulder swords, so I need to get those printed this evening.
  • There are a couple of the middle robe pieces that I'd like to print if I have time, but I'm not very hopeful about it for this Con.
  • I should be getting the buckles delivered today, so I'd like to put together the belt.
 

Attachments

  • 20240822_015659.jpg
    20240822_015659.jpg
    1.2 MB · Views: 65
Aug-23 Update:

Got the belt put together, PLA welded all the Ashbringer pieces together that need to be welded and got the pieces all the way through the primer stage. Tossed a quick initial topcoat of silver on the blade before leaving for work this morning.

I discovered last night that I only had a small amount of clear coat left, so only the helmet is currently sealed. I'll have to pick up a few cans after work today to take care of the rest of the parts.

Did a real quick fit up before going to bed last night. No rigging has been done yet. Missing from the fit up pic are the shoulder books (painted and ready to be glued on), the shoulder knives (blades still need to be printed, I completely forgot to start the print before leaving this morning, but the handles are primed and ready for paint), the belt buckle (base plate is printed and primed, cross needs to be reprinted in resin), and the front belt drop (finished printing this morning, needs to be welded and finished).

I don't have any time for crafting this evening or tomorrow due to a small Con I'm going to, so Sunday will be the day for finishing the prints, and then Monday will probably be rigging. Tuesday will be packing and then driving.
 

Attachments

  • 20240823_081101.jpg
    20240823_081101.jpg
    1.1 MB · Views: 71
  • 20240823_023442.jpg
    20240823_023442.jpg
    849.3 KB · Views: 174
Aug-27 Update:

I stayed up until 4 am last night to finish this, but the Judgement armor is at a stage that I'm comfortable calling it "good enough for DragonCon".

I slapped together a cape and opted to not use the back of the collar/breastplate because the process of putting it all on is currently not optimized for having to do it all myself. I'll have to refine it later.

Cracked the Ashbringer blade when I was gluing the aluminum rods inside of it, which is pretty frustrating but also entirely on par with my gluing experiences.

I went through a ton of Chicago screws in this build, and they have quickly become my favorite way to attach straps (nylon or leather) to the 3D printed parts. I'm definitely going to restock and buy in bulk from now on.

The helmet fits, but due to the breastplate I can't really look down at all, and the helmet is super snug not allowing for great vision or even really breathing. I don't intend to wear it a lot anyway, but I'll definitely be reprinting it or maybe making an extension piece to sit between the front and back half. Also fans are needed.
 

Attachments

  • 20240827_014329.jpg
    20240827_014329.jpg
    806.2 KB · Views: 200
  • 20240827_014409.mp4
    57.4 MB
DragonCon After Action Report:

Possibly even moreso than the Mark IV, this Cosplay was crazy toasty. There are 4 layers of cloth around my legs and 2 layers of cloth, a plastic breastplate, and a cape at the torso. I was sweating profusely before I got a single block away. Due to the heat, I didn't bother bringing the helmet. Since I have no way to sheath/carry the Ashbringer without just holding it, putting the helmet on and taking it off repeatedly would be a major hassle.

The armor held up pretty well though. One of the snaps that holds up the buckle plate almost worked it's way out of the leather and kept getting unsnapped, but otherwise everything stayed together. One of the shoulder swords had to be re-hot glued when I first arrived, and one will also need to be fixed due to getting knocked off during the return trip.

Probably the main "issues" I ran into were the fact that the most comfortable way to carry the Ashbringer was propping it up on my shoulder, which caused the paint to rub in that spot. The helmet was obviously an issue because it's mostly unwearable except for brief, stationary photos. The bracers don't have any padding and currently like to roll around on my wrists and required constant reorienting. The Kilt ribbons are just long enough that I need to be very careful when walking up steps. I think if I didn't have Ashbringer in hand, I could just hold them apart.

Unfortunately I never ran into the other Judgement Paladins at DragonCon, though I did see one in the Masquerade. There was a group of like 5 people that did the Dragonflight that I didn't see until I was out of my armor unfortunately. I really wish I could have got a photo with them.

The next Con I'll be bringing this to is Colossalcon North, in November. My plans for upgrades/fixes:
  • Pauldrons: currently the swords are hot glued to the Pauldron books, with a piece of EVA foam between them to create more surface area. This works in theory, but makes them a nightmare to pack and a hazard when walking through tight spaces and crowds. While I normally despise magnets, I think this will be a perfect use for them. I want the swords to fall off when they get caught on something/someone, and be easily removable for packing, so I'll put a couple of magnets on the blades and the books.
  • Helmet: I'm undecided about what I want to do to make this more wearable. I think I'll start by printing an extension piece to add length (front to back) of the helmet, but I also might reprint the back piece, scaled up in the right direction. Then I'll probably add a hinge to allow it to pivot like a knight's helmet. That way I think I will be able to keep the helmet on my head with the face plate lifted when I'm just standing around and then just pop it down when someone wants a photo. I might use some magnets to get the hood to lock into place as well, so I don't have to try to grab it from behind my helmet.
  • Bracers: just going to add some foam to the inside to the insides and hope that keeps them in place. I'll probably try to strategically layer it to create the correct shape of my forearm.
  • Ashbringer: for Colossalcon North, I think I'm just going to fix the paint. I am going to experiment with making a fiberglass version of the blade though, to drastically reduce the weight. When I do make a fiberglass version, I will take the opportunity to add wire channels so that I can make the puck light up. For carrying the sword, I'm going to try to figure out something to allow me to hang it at my side. Ashbringer is a two-handed sword and I'm fairly certain the in-game version is back sheathed, but I don't have the flexibility to do that. I'll probably make a 3D printed bracket that will hang off my hip and let me slot the sword onto it.
  • Extra details: I really want to start adding the paper ribbons to the armor and the wax seals.

Long term goals:
I'd really like to add the Avenging Wrath wings to the armor. It would be my first attempt at animatronics, since I'd have then retract/extend when I "cast" it. This definitely wouldn't happen until at least next year.

Also, anyone that keeps up with WoW is certainly aware that they just announced updated models for the Tier 2 armor sets. So as I can find files and ideas, I plan to start working towards converting the armor to the new model. This would mostly mean new Pauldron swords, bracers, and some adjustments to the belt.
 

Attachments

  • Screenshot_20240906_111120_Facebook.jpg
    Screenshot_20240906_111120_Facebook.jpg
    643.7 KB · Views: 860
  • 20ff845b54a249e074936f4057a1d425.jpg
    20ff845b54a249e074936f4057a1d425.jpg
    30.8 KB · Views: 132
  • FB_IMG_1725580971733.jpg
    FB_IMG_1725580971733.jpg
    1.8 MB · Views: 393
  • FB_IMG_1725580967501.jpg
    FB_IMG_1725580967501.jpg
    288.9 KB · Views: 89
  • 20240830_202438.jpg
    20240830_202438.jpg
    968.5 KB · Views: 104
Pre-C2E2 Update:

Since DragonCon, I have brought this to two different Cons: Colossalcon North (Wisconsin Dells) and Akeome Con (a tiny Con in Minneapolis). There were only minor updates made to the armor during that time, including better snaps for the belt buckle plate and a strip of EVA foam to create more space within the helmet. It still clashes (physically) with the breastplate such that I can't look down, and visibility is garbage so I usually carry the helmet until someone asks for a photo (which means my hood is usually not up).

I also added velcro to the pauldron knives. This has worked decently well, the blades have fallen off multiple times when they hit door frames/people. While it is very awkward to place them back on, I would rather they fall off than break or hurt someone.

For C2E2, I have made a few updates in the last couples of weeks:

Pauldrons:
I printed the front diamond/gem greeblies. I need to eventually make a stencil for the design that is supposed to be painted on there, but for now just a red "gem" look will be fine.

Bracers:
I decided that foam inserts are the best way to create a more snug fit without making it harder to put on the armor. I dabbled with the idea of gluing the padding in, but that made it harder to put my hand through. So instead, I cut out two pieces of 10mm EVA foam, one larger piece that slides in on the top of the arm and a smaller piece that slides in underneath (palm side). This creates a pretty snug fit, but means I need to be aware of them possibly sliding out, and also something that needs to be tracked when packing and not thrown out (I've done this with some padding I cut for my Mark IV calf armor...)

Belt:
I bought some plastic gold chain meant for wanna-be rapper cosplays and added rings to one end and leather snaps to attach the chains to the belt. I have the gem greeblies printed, but don't have the time to finish painting them. After C2E2, they will be finished and mount over the connection point of the chains.

Ashbringer:
Since I have a belt printer now, I decided to reprint the Ashbringer to see if I could significantly reduce the weight. The original blade was printed in 4-6 pieces and welded together, while this new one is 1 main piece and 1 tiny piece for the tip (to allow the main piece to sit flat on the bed). So I'm going from 3-5 large wall-to-wall interfaces (6-8 solid layers of PLA at each interface) to just one short interface. The original blade also wasn't sanded enough to eliminate all of the visible seams, and some of them have split over the last 7 months, so the fact that there is only 1 seam on the new blade will create a much cleaner look. I still rushed the one seam that there is and it's visible, but much less so than the original.

Without as many pieces, I also didn't feel the need to have both interior support rods be full length. The original used a roughly 36" rod (3/8" diameter) for the full run from blade tip to pommel, plus a shorter piece that is roughly 24" long for the blade. I kept the longer rod running the full length, but reduced the "blade only" rod to about 6" (it extends slightly into the blade guard for gluing/alignment purposes).

With these changes (I am reusing the blade guard, hand grip, and pommel), I only reduced the weight by about 100g. The blade itself is about 10% lighter. Not as amazing as I had hoped (probably could go lighter with fewer walls/infill), but I think it will still be noticeable when carrying the blade around at the Con. I glued it up last night, so I'll see how it feels this evening.

The pommel came loose during the previous iteration and would have a tendency to spin, so in addition to being re-glued, I am also going to add some hot staples to help lock it in place.

Currently I am also reusing the puck that sits in the blade. I experimented with putting an LED inside, but it seems that the paint I put over it is too opaque for the light to make a difference. After C2E2, I will reprint it in a clear resin and see about making it glow, though I also intend to revisit my vacuum forming table project, so I might see about using PETG sheets instead.

There are no remaining tasks for C2E2 for this build. I intend to wear it on Friday during the times I don't need to be at photoshoots and roughly up until the Friday evening 405th activities start up. After C2E2, I want to update the puck, add a chain that wraps along the belt, add the greeblies that sit at the top of the hanging chains, and find a better way to wear the helmet. I also need to find a better way to attach the pauldrons and the pauldron knives that isn't so hard to reattach when they get knocked off. I also want to sew a better undersuit and make a tomebook to carry with me. Plus maybe some health/mana potions to hang from the belt.

Next update will be a Post-C2E2 Report, with some updated full armor photos.
 

Attachments

  • 20250408_200903.jpg
    20250408_200903.jpg
    1.6 MB · Views: 10
  • 20250408_200832.jpg
    20250408_200832.jpg
    767.2 KB · Views: 11
C2E2 After Action Report:

  • The new Ashbringer blade definitely made for a moderately more pleasant experience walking around. The 10% weight reduction was very welcome at the level of my wrists, and I didn't have to switch hands nearly as often as at previous Cons. I would still like to explore even more weight reduction though.
  • I opted to not wear the helmet. I did have the hood up on occasion, though it gets a bit too floppy and droops over my face, obscuring my vision.
  • While I have new shoulder knives, I opted to not finish and attach them due to time constraints. I ended up snapping the handle of one of the older ones. I can hot glue it back together fairly easily, though I have time to fix it more properly.
  • The chains were a nice addition.
  • The foam inserts for the bracers helped a lot, I didn't have to be continuously adjusting them to stay in the proper orientation. I did end up removing the smaller insert because it was a bit too tight on my forearms and I didn't want to randomly lose feeling in my hands.
Future Goals:
  • Helmet improvements: I want to make the helmet more practical to wear. Right now I lack the flexibility to easily put it on/take it off, especially if I'm carrying the Ashbringer. I think having something that holds the hood in place, and maybe using a system more akin to Iron-Man. Instead of a full helmet, just make a faceplate front that attaches via magnets to the rear frame piece that I leave on the entire time (as much as I despise relying on magnets). I might expand the eye slots as well, so that when I am wearing it I can see better.
  • I want to remake the cape. It drapes weirdly in the back, and I don't particularly like the way I have it connecting to the breastplate. Right now I use a double-d ring set with a leather strap (like a motorcycle helmet). This works, but isn't really necessary since there is no adjustment necessary. I want to move to something more like a clasp, either using a buckle or more of an overalls clip. Plus a better cape design in general, maybe with some gold trim/a fun World of Warcraft design on the back (a good use for my embroidery machine).
  • Add gold chains to the circumference of the belt. I mostly just need to figure out how I want to secure the chain to the belt so that it isn't flopping around. Also add the gemstone greeblies that I have printed and ready for painting.
  • Add the gold chain bottom pieces.
  • The red strips that make up the kilt have been fraying like crazy due to the curtain material I used. I will probably either add bias tape to the borders or remake the strips entirely.
  • I want to build a leather grimoire to carry around. Something bulky, ancient looking, and that lights up when I open it. Have it connect via chains to the belt for easy carrying.
  • I would like to reprint the Ashbringer puck to be able to light up when I want (probably via a switch in the handle). I may run a channel down the back of the blade, or more likely, go the wireless route with an esp8266 board since the puck should be large enough to hold a battery, the board, and some powerful LEDs, and then I can reprint the crossguard with a switch, the other board, and another battery.
    • I still want to pursue further weight reduction (and the above electronics projects are definitely going to push it in the wrong direction). I am thinking that this blade would be a good candidate for the fiberglass projects I've been wanting to experiment with. I want to eventually make the Hunter shield for my Achilles armor out of fiberglass, as well as replace my Soldier Boy shield with a fiberglass version, so the relatively simply design of this blade would be a good project for experimenting with the process. If I do go this route, I won't need to do a wireless control setup as mentioned above, and can easily run wires from the handle to the puck, probably with a connector set into the puck groove to allow it to be removed when I want to change the LEDs/to make it easier to pack/transport.
  • The pauldrons currently attach to the breastplate via the same double-d ring and leather strap system as the cloak, and I think I'd like to change this. Originally this was done to allow me to loosely connect them, and use the leather straps to pull them into the right place once everything was on, but realistically I don't need adjustability with these pieces. Nowadays, I tighten the straps before putting the armor on and then they don't really need any more adjusting, but the straps themselves sometimes get in the way, if they hang down the front of my armor (I don't have the flexibility to tuck them down the back). I'll probably replace these with a more simple buckle.
  • I still need to figure out an option for the seals/ribbons. I am thinking that I will take strips of aged cotton fabric (aged in tea for a mummy costume I never ended up making) and using my embroidery machine to add a gold border (though bias tape would also work for this) and some stitching for the text/symbols.
  • I still want to experiment with sewing a better shirt for under the tabard, or adding something to the bicep area.
  • I also need to do something about the gloves. These bright yellow mechanics gloves work okay, though they're not great. At the very least, I should use my gold paint pens to change the yellow details over to gold so they blend in better with the rest of the armor.
  • The bracers are still a bit unweilding. I may experiment with making foam versions that are better formed to my forearms, and taking that opportunity to update the design to match the new 20th Anniversary design.
  • I want some way to sheath/carry the Ashbringer without needing to have it in my hands at all times. I don't think I have the flexibility to attach it to my back, but some kind of sword frog for my belt would be acceptable. It probably won't be practical for walking around with it sheathed, but when I'm standing around and wanting to drink, use my phone, or hold the helmet, it would be amazing.
  • I also want to add more random little pieces to the armor to flesh it out. The ribbons, extra chains, and grimoire/holy book will definitely help with this, but I would also like to add some potions hanging from the belt, as well as maybe a hearthstone. The hearthstone could also be made to glow, which would be a fun detail.
For more extreme updates, I still want to pursue the idea of making wings to simulate the Avenging Wrath buff. I also have been kicking around ideas for how to simulate the infamous "bubble hearth" that Paladins have always been known for. I kind of want to see about having a mast pop up from my back that has a long piece of EL wire attached to it, which runs down to something like a looped track around my feet so that the wire can be spun rapidly around me (think like a jump rope rotated 90 degrees, or a cowboy doing lasso tricks). This would mostly be with the idea of using it for a stage prop. For photoshoots it would be infinitely easier to just add the effect in post.

The next Con I plan to attend is Anime Central in mid-May. I will probably not be bringing my Mark IV armor, but I will be bringing the Paladin armor. By then, I would like to at least have the helmet figured out, the cape attachment system improved, the pauldron attachment system improved, and the ribbons added. If I procrastinate too hard, I can definitely Con Crunch most of those improvements out in a single evening, but hopefully I will start working on them much sooner...
 

Attachments

  • 490979609_3006343606207028_5962688454458198835_n.jpg
    490979609_3006343606207028_5962688454458198835_n.jpg
    106 KB · Views: 1
  • 490063176_1768405747050189_4285767467830785294_n.jpg
    490063176_1768405747050189_4285767467830785294_n.jpg
    232.3 KB · Views: 1

Your message may be considered spam for the following reasons:

If you wish to reply despite these issues, check the box below before replying.
Be aware that malicious compliance may result in more severe penalties.
Back
Top