1st Build First Build - Carter-A259

The build is looking fantastic so far! What is that chest gasket printed out of? Is is solid, or did you use TPU (or something similar)?
 
The build is looking fantastic so far! What is that chest gasket printed out of? Is is solid, or did you use TPU (or something similar)?
It's just solid PLA. The designer recommends making it out of foam to make it easier to put on, but I didn't quite have the means to do that well. I opted to print it solid and just cut the front open instead, which works just fine.
 
I haven't been able to work on anything almost all week, so this morning I got started on rigging and a bit of an experiment with the boot.

View attachment 347900
The two buckles on each thigh will be connected to the codpiece and backside bulkhead on the belt to prevent any unwanted drifting or shifting, and will be mostly concealed by the inner suit while the buckles are tucked underneath the armor.

View attachment 347906
I haven't done the shins yet but I drew up a rough sketch of how I'm thinking the strap will be placed. The buckle (red) will be just out of sight above the knee, then the strap (green) will run underneath a kneepad (blue) and be cemented to the inside of the shin guard a little ways down. The distances are off in the photo but that's the vague idea.

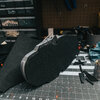
I'm trying a little something with the boot that I don't know will work. My plan is to add a treaded sole underneath using layers of 10mm EVA floor tile and sole rubber.
View attachment 347902View attachment 347903View attachment 347904View attachment 347905
I started by opening the boot STL in OrcaSlicer and cutting all but 1mm off of it, leaving just the bottom outline. I merged this with a .4mm thick rectangle. which will equate to two printed layers at a .2mm layer height. This is thick enough that it won't tear out, but just thin enough to cut with scissors with minimal resistance. Once printed I cut off all of the extra material.
This now serves as a more solid bottom layer for the boot, which will be sandwiched between layers of foam, to which I'll add the tread for traction. All of this will be glued together using shoe cement.
This is about as far as I got this morning so I apologize there's not much more to show. It'll definitely need a lot of testing to see how comfortable it will be to walk in, and it certainly won't be 100% accurate to the game model, but if it works, I think it'll elevate the look (pun intended). It'll keep the plastic from dragging or scraping the ground, hopefully minimizing the risk of damage. It can also give me almost an extra inch of lift. I think the boot will also look more solid this way instead of simply sitting on top of the shoe, while still allowing for some flex.
This is looking great! I'm excited to see how this whole system comes together.
 
It's just solid PLA. The designer recommends making it out of foam to make it easier to put on, but I didn't quite have the means to do that well. I opted to print it solid and just cut the front open instead, which works just fine.
Gochya! How's mobility? I used a printed gasket similar to yours (albeit a bit larger) early in my first build, and it severely restricted my arm movement,
 
Gochya! How's mobility? I used a printed gasket similar to yours (albeit a bit larger) early in my first build, and it severely restricted my arm movement,
I would say it's pretty good. I haven't experienced any loss of movement. There are some segmented pieces that will be run along the edge of the arm holes (you can see them in the images on this Etsy listing), so I'm sure my biceps will collide with those when my arms are at rest, but I'll be printing those from TPU so they'll have plenty of flex and won't be in the way.
 
Put some more work into the boots.

I cut the "insoles" out of 5mm foam and stuck it on with some cement. They look like little SPARTAN slippers - "little" not being the operative word here.
MNZ00003.jpegMNZ00005.jpegMNZ00007.jpg

Then another layer of 5mm foam on the underside for reinforcement. This one got tricky. Once the cement sets and the two surfaces come into contact, there's no backsies. Unfortunately one of the boots got out of control and is shifted to the side. There was no way I could reposition it without destroying the part, so I had to add some scrap foam to fill out the problem areas. I still need to add the actual sole, but this was as far as I could get last night.
MNZ00007.jpg

Nobleezys, coming soon to stores near you.
MNZ00013.jpg
 

Attachments

  • MNZ00009.jpg
    MNZ00009.jpg
    2.9 MB · Views: 6
dehancer 2024-05-12 004355 UTC.jpg

Small but big update. With all the big pieces printed I was finally able to do a test of my rigging, which allowed me to pinpoint the problem areas (of which there were many).

I had hooked the thigh pieces to the codpiece and mudflap, and the shins to the thighs. I significantly underestimated just how heavy the thigh/shin assembly would be, so it was pulling the belt down quite a bit, which is why the entire lower half is sitting so low in the photo. I decided to reroute the thigh strap to the shoulder harness, which I'm sure will bear the weight much better.
IMG_4798.jpg
I've also had some questions about my harness setup so here it is. I can get a better photo of it later but I was in a bit of a hurry this morning. I'm wearing these tactical suspenders, and the torso armor just sits right on top. The padded shoulders I'm going to swap those swivel clips out (shown in the photo) for some proper side-release buckles which will be lower profile and much easier to hide.

The second major problem area was the shins dangling a little too freely, though I knew that going in. They simply required more padding, so I layered some foam tile on the inside, attached in such a way that I can still lift up part of it to adjust the straps if need be. It fits a little more snugly now, but I can still get my leg in and out fairly easily. I'm toying with the idea of putting an elastic strap in there for extra security, but I'll need a way to hold it open while I'm slipping the leg on so it doesn't catch my compression pants and bunch them up.
IMG_4796.jpg
 

Your message may be considered spam for the following reasons:

If you wish to reply despite these issues, check the box below before replying.
Be aware that malicious compliance may result in more severe penalties.
Back
Top