Gibson Slayer
New Member
Hi everyone! Today I´m showing you my Halo Infinite diminisher of hope build. I think this is the first ever attemp someone has done at it, but I´m very glad of the final result. It´s been on a time crunch, and I made it in over a month or so; but I hope I inspire some other people to make it even better.
Also I´m gonna be attaching the PDF file, and AI file that I used for taking the measurements right.
First off: materials:
-2mm, 6mm and 10mm eva foam.
-Half a meter of synthetic leather
-Contact cement
-Plastic tube (3cm radius, tho it would depend on the scale).
-Red, metallic and black spray praint.
-Plastidip or something to seal foam, don´t be like me :,) (tho plastidip is hard to get here)
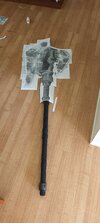
First I sectioned each parts of the hammer (where the head started, and where the leather parts would go). After that, and using basic forms (also a lot of eyeballing) , I started making the upper part of it.

 It took me around 2 days to get those shapes right, but still you can find the base shapes and templates I used in the AI and PDF files. Also: the inner part of the head is hollow, so you can save some time with that. Also to consider: when wraping foam or any material around a circular piece, make it at least double or triple the intended size in widht. I hope you can get what I´m saying, as I´m not a native english speaker person.
 Once I got all the details right, I started making layering. This is where it all takes it´s shape and life. I used mainly 2mm eva foam for this process. You can also make the little details with a pen, to give it more textures. Having a 3d model at hand it´s really useful (I used Halo Infinite´s Weapon Armory from the Halo Archived discord for this process).

 After I finished all the EVA process, it came down to painting. PLEASE seal your foam, if you want a really clean build. I didn´t due to time limitations for a con, but I hope you give this process the time it needs. First I sprayed Black primer in all of the pieces, and then I started nailing down the specific paint areas using the model as a reference.

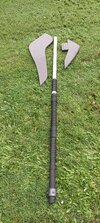
 After having all the base painting done, it was time for the blades. I really didn´t document this process, but you can find the measurements in my files. For this please use a very thick foam, from 10mm to above. Also I glued the leather to the hammer, I cutted 2cm tall straps, and wrapped it around. I wanted to give it a very nasty look, as the banished are a faction that use scraps and remnants of stuff that came before them.
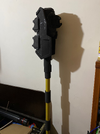
And finally...
 This was the final result.
I hope this was really useful, and I can´t wait to see your builds. This was done in less than a month, so I hope you give it a little more time to your builds. Cheers!
I attached the PDF file to this thread, but it doesn´t support AI. Here´s a link to the file (it´s compatible with Ilustrator 2020 onwards): Diminisher of Hope templates (AI File) .
Also I´m gonna be attaching the PDF file, and AI file that I used for taking the measurements right.
First off: materials:
-2mm, 6mm and 10mm eva foam.
-Half a meter of synthetic leather
-Contact cement
-Plastic tube (3cm radius, tho it would depend on the scale).
-Red, metallic and black spray praint.
-Plastidip or something to seal foam, don´t be like me :,) (tho plastidip is hard to get here)
First I sectioned each parts of the hammer (where the head started, and where the leather parts would go). After that, and using basic forms (also a lot of eyeballing) , I started making the upper part of it.
And finally...
I hope this was really useful, and I can´t wait to see your builds. This was done in less than a month, so I hope you give it a little more time to your builds. Cheers!
I attached the PDF file to this thread, but it doesn´t support AI. Here´s a link to the file (it´s compatible with Ilustrator 2020 onwards): Diminisher of Hope templates (AI File) .
") , cheers and the best of luck!
, cheers and the best of luck!