Helldivers 2 B-01 Helmet / ODST Mashup

FuriousFido

New Member
This is my first thread so I am new to the documentation portion of cosplay, and first time making a helmet.
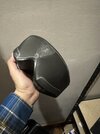
The helmet I am making is a Helldivers 2 B-01 Helmet, the default helmet used in the game when you start out but my take on it will be a mix of Helldivers with ODST themed Paint scheme and decals. This helmet will be used as a mashup with my (unfinished at the moment) Sean Bradley ODST kit which will use the same colors.
The helmet files are provided by GalacticArmory through their patreon, the files were scaled by default to a 24" head size. The dome piece had to be split to allow for bed size, the prints took between 3-11 hours. The longest being 11 hours 24 minutes for the Visor Buck. I wanted it to take its time slowed down and decreased layer height to provide a smoother surface for when the visor will be vacuum formed by myself.

Printer- Bambu X1 Carbon
Material- Hatchbox PLA (black)
Paint- Rustoleum Black for the main sections, Rustoleum Chrome for the vents, and detail paint like the stripes will be Ford Engine Green. This is to tie into another hobby of working on a 1930 Ford Model A truck with my dad and brother and also green is our favorite color. We plan to use this same green for detail coloring in our ODST kits.

I plan to use the ODST emblem in place of the Helldivers skull emblem on the sides of the helmet, if I am to make a cape I will do the same for the emblem on that.

I will try to keep the thread updated and motivation high, cannot wait to show others and see the project finished.
Front n Details.JPG
Rear.JPG
Top Piece 2.JPG

Top Piece.JPG

Excuse the dirty mirror :P
 
Looks realy good, can`t wait to see the complete armore
I am not so certain that I will be making any sort of armor specifically to go with the helmet as I currently have my SB ODST kit to still complete and cosplay suits lined up already after that, but this helmet will go nicely with my completed ODST suit. The colors will be the same and my wife has made a design to replace the Helldivers skull on the side with something more fitting for the UNSC aspect. I'll post that after I get some more work done on the helmet.
 
With the Visor buck printed I sanded it smooth with 220 grit sandpaper before applying some primer filler, still some more to go at it but quickly it’s smoothing out. I’m not sure exactly why but the top part in the middle of the buck was pretty rough as compared to the rest of the print, my thought is it could be from the speed of the X1C. The printer was set for “standard” which is 100% but that is still pretty fast.
Hoping to get the helmet assembled and primed this weekend while also finishing the buck and possibly forming a visor or two.
IMG_3017.jpeg
IMG_3082.jpeg
IMG_3083.jpeg
 

Attachments

  • IMG_3016.jpeg
    IMG_3016.jpeg
    1.3 MB · Views: 19
Unfortunately I had plans come up over the weekend but here’s what I got so far.

IMG_3118.jpeg

Got the helmet officially glued together.
IMG_3119.jpeg
IMG_3120.jpeg


There are some gaps between the parts that I will have to fill. I was hoping to avoid having gaps like I do but I was trying a quick glue and it set quickly, but the bond feels strong so there’s that. They’ll just get extra attention with bondo filler putty, as for the top of the helmet I plan on using an orbital sander to help get that smooth. I’m not quite sure why it came out so rough but I plan to tweak the printer to prevent that from happening again but the filament used has been open to air for a few years. I was just trying to get rid of and use as much as I could.

IMG_3116.jpeg
IMG_3117.jpeg


And here is the visor buck, I initially sanded with 220grit for at least 30 minutes straight and then one pass of filler primer then sanded with 1500 grit. It’s incredibly smooth and the main rough spot in the middle smoothed out really well. I’ll let it go and try forming a visor on it before spending too much time on making it perfect. It’ll be dyed black so I doubt any imperfections will be well seen.

Since the last update my wife had a decal worked up and can’t wait to show that but I’ll be waiting until the helmet is finished for that.

Still thinking about trying to make a cape also to go onto my ODST kit along with this helmet, I feel like that’ll really sell it as a mashup.
 
With the helmet still taped together at the time, we had gotten excited, so I suited up with what I have of my SB ODST and gave the helmet a try. We were pleased.
1710721644254.jpeg
IMG_3036.jpg


Also images of the glue used and the helmet during the sanding / putty phase
1710721672490.jpeg
1710721678054.jpeg
1710721682470.jpeg
 
Unfortunately I forgot about the post and I feel I did not take great photos along the way. I am still getting use to thread aspect of the hobby. Where I had left off was assembly of the helmet and having to fill in gaps and smoothing out the rough layer lines in certain spots and where I had glued the sliced helmet pieces together.
IMG_3145.jpg

I had used bondo filler spot putty with thing layers with multiple coats to fill in any of these gaps. Between each coat drying (with the aid of an air blow gun and heat gun) I would sand and then filler primer spray. I would appreciate any feedback but I thought I had seen somewhere along many cosplay youtube videos that a heat gun between coats of spray paints will help it dry and cure faster.
IMG_3581.jpg
IMG_3578.jpg

IMG_3575.jpg
IMG_3576.jpg


After patching the seam lines with the spot putty I had painted the helmet black thinking I would be set and it would be "good enough"... I was not pleased as you can see in the last few photos that you could clearly see (especially with light reflecting off the surface) the spot putty had an edge to it and I dont think I sanded enough. After this small disappointment I had decided to sand more extensively and the difference this time would be that I would try wet sanding and also go to a higher grit. Before this moment I had never wet sanded before, and on a print I had not used more than 220 grit sandpaper. I started at 220 and went up to 400 from there, then to 1000. All of this was done with wet sanding and after a few moments I felt as though the sandpaper was gumming up, especially when sanding any spot with the spot putty. To help combat this new issue I would wipe the helmet down more frequently with a rag to remove any excess material and also dry it up and take a look to see how the helmet looked. I repeated this process until I was pleased with the smoothness and lines, I have never been shooting for "the perfect helmet" with this being my first helmet. I am using all of the methods and ideas as tests and treating them all as attempts, if something works out then I note mentally what I did to achieve that effect and if it doesn't work out then I try to revert the helmet back to what it was before the previous attempt and try another route.

I'll update again soon as it is late. At this moment in time the helmet has already been finished, the contest over and results in. I just will be continuing the thread to finish up in parts the work done to the helmet.
 
Alright back at it, I see now where it would be beneficial to write these things up as I progress. One reason would be for feedback, hopefully before I were to make any mistakes. Another reason is so I don't forget any details, which I am trying to remember any difficulties I had to possibly hear back on better ways to execute any ideas for next time. Ah well I'm sure there will be plenty more projects.

After painting the helmet with it's base layer of black I noticed that by the front left area of the helmet there was cracking of the paint taking place. I had sanded this spot when I felt it was dry enough after 1 day of sitting in a relatively dry and warm location. After another coat the cracks were hard to notice as you'll be able to see (or more like not see) in the finished photos. I have read different accounts of people saying this would be due to multiple layers put down before the previous had time to fully dry and cure or humidity issues. I think if anything this would have been me getting antsy with wanting to get as much done as quickly as I could and putting on another coat well before I should have. That mistake was sanded out and another coat applied and sat as I continued to work on other aspects of the helmet, in this case the visor.

The materials used for the visor are PETG sheets (1/32"x12"x12"), a frame made to hold the plastic sheet, a convection oven to heat up the plastic, a a shop vac or similar vacuum, and finally a vacuum form table(?). I am not sure exactly that would be called but in the picture below you will see its a sheet of peg board with a wooden sided frame covered in tape to cover all potential spots where air may pull through and there is one hole drilled into the side where we stick a vacuum hose. There are waaaay better setups across the internet that I would encourage someone to look for rather than our idea we made years ago, but it did serve it's purpose. Upgrades are definitely needed in the future, especially if we want to make better props with more efficiency as you can see the frame for the sheets is still being used which involves drilling holes into the sheets and an ungodly amount of screws and nuts. A new frame is being made by my brother at the moment as with this Helldiver visor we were pretty much done with that idea of operation.

1715135985215.png

1715136116096.png

After the sheet is secured we would use a convection oven to heat up to ready for pulling with the vacuum and buck. This oven we did not buy for this purpose, don't worry we don't eat any food from this bad boy. This here is a fine scrap haul, a lot of others have looked for deals at local resale shops or something of the like. Again there are other avenues to do the same job, look into what would suit you best. If you can notice, the inside rack has the middle cut out to account for the drop of the PETG sheet, as the sheet heats up you will see it sag a few inches and for our visors we would run it at 250°F and you most likely will not have that sheet in there for any longer that 3 minutes. Once it has a decent sag of 4 inches or so I pulled it out, set it onto the vacuum table that would have the helldiver visor buck onto it and then turn on the vacuum to pull that sheet onto and around the buck. While it would pull I (while wearing gloves) rubbed my hands along any areas that didn't quite pull like I wanted it to, to help it get more detail and close any gaps. Unfortunately I did not take any pictures of the moment or the setup as I was the one handling the hot plastic. The pictures above are from 2019 but it's the same setup.
Not sure if anyone would care for the information but the convection oven is an OSTER model: TSSTTVXLDG-001 120 VAC 60 Hz 1500 Watt. I never realized that it seems to be a pricey oven.

Once the visor was made I took a blade to cut away the general shape away from the buck as it was pretty well molded close and after that was out I took scissors and cut it to a closer fit. Now it was time for dyeing the visor black. If I had more time I really wanted to dye the visor a light blue for more of an ODST look.

Again I'll update more when I can. Work has been pretty stressful and I have not been on my computer as often, I find it easier to work on threads with a keyboard in front of me rather than my phone. Doesn't help that I get motivation to update this near the time I should be going to bed, instead I update this until my eyes feel heavy. I'll aim to finish the helmet update by the weekend or during, next update will have more pictures for sure.
 
Just a quick picture of the setup before I go to bed and forget. My brother had taken a picture when we were going through the motions and talking about our steps. The helldivers visor buck was taped to the vacuum table to help it stay in place and not shift when I would lay the hot plastic sheet over the top of it.
IMG_6046.jpeg

Please excuse the mess, most of our crafting takes place at the dining room table.
 

Your message may be considered spam for the following reasons:

If you wish to reply despite these issues, check the box below before replying.
Be aware that malicious compliance may result in more severe penalties.
Back
Top