So thanks to this awesome community, and a special shoutout to [SIZE=4]SgtSaint[/SIZE], JSLund, The Tiny Geek, TylerBH2014, WandererTJ, willdillmill, TorrinNorixius, marinesniper, Invidiax4fan, SIERRA720, and especially Rock Lobbster. What I learned from you all got me started me on my 3 month adventure to 3D print my first cosplay outfit. I had been tinkering around with my Bambu X1C since February, teaching myself everything I could about 3D printing and modeling and I was just starting to get a handle on this amazing printer to undertake this rather large task of printing Master Chief's newest armor.
I'll do my best to explain all my steps and what I learned in this post. If you have any questions I'll do my best to answer them.

Why Master Chief Infinite Armor? I have been a fan of Halo when it was announced for the Mac back in like I think 1999. I even got to play an early demo on a Macintosh at a IT convention in 2000. Boy was it a different game back then and NOT at all like the Ringworld books I grew up on. I LOVE Master Chiefs new armor in Halo Infinite. I definitely am partial to the armor in Halo 1-3, but the improvements they made in how the armor looks so much tougher is great! I chose to start printing the 3D armor using the files from the Galactic Armory, Halo Infinite Master Chief Armor - 3D Print Files. The detail of the armor they created was very exact, and I liked the attention to detail in how the armor itself fit together (or so I thought).

Scaling, Modeling and Editing. Upon figuring out how to scale the armor in Armorsmith and looking VERY carefully at how other people have printed or made their Master Chief armor I noticed some fitting issues. Especially around the thighs and belt piece. The Galactic Armory model was a bit too unrealistically accurate so I had to make a lot of cutting to make it so I could actually MOVE comfortably in the armor and like be able to sit down or bend my legs. I cut out the thigh pieces, sliced the belt piece to segments and I also added velcro slip attachments in each of the pieces of armor that needed to fit together like the shoulder piece.
Another problem I soon figured out after making all that modification is that the Galactic Armory models are HEAVY AF when printed. I mean I wanted the armor to be tough, but when I printed half of it I realized that just one shin piece was like 4lbs. Part of the problem was my fixation for toughness with a wall thickness of 7 and a infill % of 15%. Even lowering it down to 4 and an infill of 5% it was still waaay too heavy. So I purchased another set of 3D files from CGTrader, Halo Infinite Master Chief Full Body Armor STL Files | 3D Print Model. That armor was much thinner and had some slight improvements to SOME parts of the armor...specifically the shin and biceps. BONUS was I also got the 3D files for the undersuit, especially the neck portion which I printed in Flexible PLA.
So here, in the end, is how I broke down the armor to 3D print on my Bambu X1C. It was very tricky to slice the large models to use the least amount of supports and to still fit together nicely. I printed pieces at 4 wall thick, 5% gyroid infill, at .08 layer height. Printing at .08 layer height took ALOT longer to print, but it really reduced any layer lines to pretty much nothing.

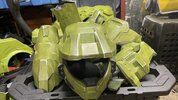
The chest piece weighs around 4kg. NOTE, the Galactic Armory 3D files for the chest piece front portion will not fit the back portion if you use them as is. Make sure you size them correctly which takes ALOT of work in Armorsmith or Blender. I think I got the right fit but it took a lot of time and tons of tinkering and cutting and melting. It was a super amount of hassle. Also, how the front and back piece clasps together sucks. The clasp system the armor has breaks immediately upon first use. I had to print out and attach a special latching system with magnets and velcro. It would have been SOO much better if I had built it into the original model...a warning to anyone else using these models to do that.
Also, I cut out the arm holes out alot. I don't know what I would have done if I HADN'T of done that. Even with enlarging the arm holes it is still pretty restrictive on my movement and my biceps kind of rest on the sides. It still looks good while a little akward. So I highly recommend cutting even more than what I did.

The arms weight a combined 3kg. I used the biceps 3D files from the CGTrader files. I also cut the inside portion out so it would be more comfortable and reduce the grinding against the armor. The trickiest part was figuring out how to connect the bicep and the shoulder piece together. I inserted a bunch of loops into the shoulder piece and the bicep so I can connect them together and then connect them to the chest piece.

The belt piece weighs 1.4kg. The best thing I did was slicing the belt into pieces. How is ANYONE supposed to put it on if it was all one piece. Like come on guys. I also got some clues from looking at how Sinisterpropz Master Chief armor looked. He did a great job modifying his Galactic Armory pieces too. I put velcro straps loops in each of the pieces so they can all connect together. I have them attached to a cool climbing harness which I will detail later.

The legs weigh a combined 4.2kg. I am bummed I had to ditch the shin piece I already printed from Galactic Armory and switch to the CGTrader one but again, the new shin piece weighed like less than a kg and was easier to slip on. I kept the thigh piece, while heavy was very comfortable AND crazily enough while ginormous was not much heavier than the CGTrader model. I did do ALOT of modifications slicing out the inner thigh portion and hollowing it out a bit to make it lighter but it just looks so good.

The boots weigh a combined 2.5kg. They are huge, but they do have to fit my giant size 13 steel toe boots. I cut the inside out so my boot sole can rest on the ground. I was scared of keeping the original sole of the model. Either the PLA+ would be crushed or I would slip. The added height advantage was not worth the risk. And I also noticed that all the other Master Chief cosplayers did this too. Probably for comfort as well. I also added straps to the models themselves so I can run velcro and elastic paracord to hold it altogether. The Halo Master Chief Infinite boots are the best looking out of all the versions BY FAR. That was my one critique of Halo 1-3, the boots looks dumb.
 copy.jpg")
The helmet I did NOT 3D print. I was going to but after watching all the DIY videos on just how painful building the visor is and how much $ it was going to cost to 3D print and wire up...I was like NOPE. I purchased a refurbished Jazzware Master Chief Helmet from Amazon for like $40. It fit my giant head perfectly so I got very lucky. I just had to take it apart and repaint it. It was a hassle but man the visor it comes with is AWESOME and the helmet itself is very comfortable.
TOTAL ARMOR WEIGHT: ~19kg (around 41lb) with all the straps, under armor, boots, fans, speaker and batteries.
3D Printing Time Breakdown. 3D printing almost non-stop took about 3 months. It could have been ALOT faster but I printed at a very fine layer height of .08-.1mm and I also slowed down some of the X1C printing speeds for the outerwall for extra fine quality. Not sure how much it helped. The pieces came out very smooth.
Item Breakdown. Here is the total breakdown of my item cost. It is of course higher than I expected the whole project to be. Alot of it was because I am still learning. And stuff I probably won't need to buy again and can reuse for other projects. I will mention that the Starbond glue is AMAZING and well worth the cost because it works great and you get SOOOOOOOO much of it. This is the BEST glue for PLA hands down and the most affordable. Next is working with Bondo SUCKS. I regret ever using the stuff. It is SUPER hazardous and the dust gets EVERYWHERE. If you can help it don't do it. Just don't. It is super toxic, smells horrible, and cleanup is like a toxic waste site after using it. I just gets everywhere. Next time I'll just use a heavier version of the Starbond glue to fill in seams.
Special Mention. I was going to build a strap under suit using the great instructions found here on this site, but after doing a lot of searching I found this, Muddy Magnum Pro Harness Black, UNITS, a climbing harness. It is the cheapest climbing harness used by hunters you can buy. BUT it works amazingly well for holding heavy armor on your body comfortably. It is amazing.
Sanding, Spray Painting and Weathering. I actually enjoyed a little bit of the sanding part...except using Bondo and the taking FOREVER. When I finally realized I didn't need to see myself in the reflection of the PLA...what was I thinking...it went a lot quicker. The spray painting part was also scary at first and then became easier and easier when I realized how smooth spray paint really goes on...especially if you take it super slow.

I sanded everything by hand. I didn't have to do much sanding, mainly the seams where the pieces had to be glued together. If I didn't have to do those dumb seams I barely would have had to sand. Did I mention how much I hated using Bondo.


The Weathering part was the most relaxing and fun part of the whole sanding and coloring part. I could do it inside my home without a burly respirator on with fans blasting since I was just working with watered down black acrylic and silver pens.

And seeing the final result from that bright green to the more battle worn look was super rewarding.
Weapons, weapons and more weapons. So I am including this into the walkthrough as well because even though Master Chief is himself a weapon, he has to have cool weapons.
MA40 Rifle
.JPG")
Taking inspiration from the 405th I purchased the M40a Nerf gun and and working on respraying it. So many tutorials on how to paint this thing and I watched them all. I went with the easiest color scheme. I just need to add some weathering and graphic to it for that extra touch and that will be done. I created a custom shortened ammo clip for anyone here to download, Halo MA40 Nerf Ammo Clip - Flush by zeckkoa. It fits nicely for that authentic look instead of the Nerf guns version which sticks out way too much.
W/AV M6 G/GNR "Spartan Laser"


And you can't have Master Chief without the Spartan Laser. I am also working on printing and painting my Halo 5 Spartan Laser found on Thingiverse by misterchiefcostuming. Amazing free model. I made some adjustments to make it stronger and cut it up to fit my printer which you can find here, Spartan Laser - Halo 5 - Remix for the X1C by zeckkoa BONUS is I included the 405th emblem engraved into the Spartan Laser. I was worried about it being too small when I was printing it out. Boy was I wrong when I put it all together. It is taller than my 7 year old son. My only problem is the Spartan Laser weighs like 3.4kg so carrying it around for too long is going to be tough.
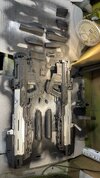
UNSC Magnum


And because I have pretty large hands especially while wearing the suit I needed the largest Halo pistol I could find that closely resembled my favorite pistol from Halo 1. Again another free and excellent model from misterchiefcostuming from Thingiverse. Still working on graphite coasting and final touchups but very happy how it looks. Of course it would have been cool if the trigger worked but man, those models are waaaaaay more complicated than I wanted to attempt in this run anyway. I still need to figure something out on attaching all these weapons to myself. I see some people use burly magnets. Not sure which route I will take.
Seattle 2023 PAX. I am still working on the armor and I am probably 95% of the way there. I still need to do a bit more weathering and then I need to varnish the crap out of everything to hopefully protect a little from the battle damage of just wearing the armor. Then I need to install all the straps, velcro, buckles, and magnets. I should be done by this weekend. I will be attending the Seattle 2023 Seattle PAX and maybe hopefully the Halo World Championship. So please, please, please, if any of you see me, don't hesitate to pester me with every question you can imagine, because I know I'll have as many for you too.
MORE PHOTOS AND UPDATES COMING SOON!

I'll do my best to explain all my steps and what I learned in this post. If you have any questions I'll do my best to answer them.
Why Master Chief Infinite Armor? I have been a fan of Halo when it was announced for the Mac back in like I think 1999. I even got to play an early demo on a Macintosh at a IT convention in 2000. Boy was it a different game back then and NOT at all like the Ringworld books I grew up on. I LOVE Master Chiefs new armor in Halo Infinite. I definitely am partial to the armor in Halo 1-3, but the improvements they made in how the armor looks so much tougher is great! I chose to start printing the 3D armor using the files from the Galactic Armory, Halo Infinite Master Chief Armor - 3D Print Files. The detail of the armor they created was very exact, and I liked the attention to detail in how the armor itself fit together (or so I thought).
Scaling, Modeling and Editing. Upon figuring out how to scale the armor in Armorsmith and looking VERY carefully at how other people have printed or made their Master Chief armor I noticed some fitting issues. Especially around the thighs and belt piece. The Galactic Armory model was a bit too unrealistically accurate so I had to make a lot of cutting to make it so I could actually MOVE comfortably in the armor and like be able to sit down or bend my legs. I cut out the thigh pieces, sliced the belt piece to segments and I also added velcro slip attachments in each of the pieces of armor that needed to fit together like the shoulder piece.
Another problem I soon figured out after making all that modification is that the Galactic Armory models are HEAVY AF when printed. I mean I wanted the armor to be tough, but when I printed half of it I realized that just one shin piece was like 4lbs. Part of the problem was my fixation for toughness with a wall thickness of 7 and a infill % of 15%. Even lowering it down to 4 and an infill of 5% it was still waaay too heavy. So I purchased another set of 3D files from CGTrader, Halo Infinite Master Chief Full Body Armor STL Files | 3D Print Model. That armor was much thinner and had some slight improvements to SOME parts of the armor...specifically the shin and biceps. BONUS was I also got the 3D files for the undersuit, especially the neck portion which I printed in Flexible PLA.
So here, in the end, is how I broke down the armor to 3D print on my Bambu X1C. It was very tricky to slice the large models to use the least amount of supports and to still fit together nicely. I printed pieces at 4 wall thick, 5% gyroid infill, at .08 layer height. Printing at .08 layer height took ALOT longer to print, but it really reduced any layer lines to pretty much nothing.
The chest piece weighs around 4kg. NOTE, the Galactic Armory 3D files for the chest piece front portion will not fit the back portion if you use them as is. Make sure you size them correctly which takes ALOT of work in Armorsmith or Blender. I think I got the right fit but it took a lot of time and tons of tinkering and cutting and melting. It was a super amount of hassle. Also, how the front and back piece clasps together sucks. The clasp system the armor has breaks immediately upon first use. I had to print out and attach a special latching system with magnets and velcro. It would have been SOO much better if I had built it into the original model...a warning to anyone else using these models to do that.
Also, I cut out the arm holes out alot. I don't know what I would have done if I HADN'T of done that. Even with enlarging the arm holes it is still pretty restrictive on my movement and my biceps kind of rest on the sides. It still looks good while a little akward. So I highly recommend cutting even more than what I did.
The arms weight a combined 3kg. I used the biceps 3D files from the CGTrader files. I also cut the inside portion out so it would be more comfortable and reduce the grinding against the armor. The trickiest part was figuring out how to connect the bicep and the shoulder piece together. I inserted a bunch of loops into the shoulder piece and the bicep so I can connect them together and then connect them to the chest piece.
The belt piece weighs 1.4kg. The best thing I did was slicing the belt into pieces. How is ANYONE supposed to put it on if it was all one piece. Like come on guys. I also got some clues from looking at how Sinisterpropz Master Chief armor looked. He did a great job modifying his Galactic Armory pieces too. I put velcro straps loops in each of the pieces so they can all connect together. I have them attached to a cool climbing harness which I will detail later.
The legs weigh a combined 4.2kg. I am bummed I had to ditch the shin piece I already printed from Galactic Armory and switch to the CGTrader one but again, the new shin piece weighed like less than a kg and was easier to slip on. I kept the thigh piece, while heavy was very comfortable AND crazily enough while ginormous was not much heavier than the CGTrader model. I did do ALOT of modifications slicing out the inner thigh portion and hollowing it out a bit to make it lighter but it just looks so good.
The boots weigh a combined 2.5kg. They are huge, but they do have to fit my giant size 13 steel toe boots. I cut the inside out so my boot sole can rest on the ground. I was scared of keeping the original sole of the model. Either the PLA+ would be crushed or I would slip. The added height advantage was not worth the risk. And I also noticed that all the other Master Chief cosplayers did this too. Probably for comfort as well. I also added straps to the models themselves so I can run velcro and elastic paracord to hold it altogether. The Halo Master Chief Infinite boots are the best looking out of all the versions BY FAR. That was my one critique of Halo 1-3, the boots looks dumb.
The helmet I did NOT 3D print. I was going to but after watching all the DIY videos on just how painful building the visor is and how much $ it was going to cost to 3D print and wire up...I was like NOPE. I purchased a refurbished Jazzware Master Chief Helmet from Amazon for like $40. It fit my giant head perfectly so I got very lucky. I just had to take it apart and repaint it. It was a hassle but man the visor it comes with is AWESOME and the helmet itself is very comfortable.
TOTAL ARMOR WEIGHT: ~19kg (around 41lb) with all the straps, under armor, boots, fans, speaker and batteries.
3D Printing Time Breakdown. 3D printing almost non-stop took about 3 months. It could have been ALOT faster but I printed at a very fine layer height of .08-.1mm and I also slowed down some of the X1C printing speeds for the outerwall for extra fine quality. Not sure how much it helped. The pieces came out very smooth.
Item Breakdown. Here is the total breakdown of my item cost. It is of course higher than I expected the whole project to be. Alot of it was because I am still learning. And stuff I probably won't need to buy again and can reuse for other projects. I will mention that the Starbond glue is AMAZING and well worth the cost because it works great and you get SOOOOOOOO much of it. This is the BEST glue for PLA hands down and the most affordable. Next is working with Bondo SUCKS. I regret ever using the stuff. It is SUPER hazardous and the dust gets EVERYWHERE. If you can help it don't do it. Just don't. It is super toxic, smells horrible, and cleanup is like a toxic waste site after using it. I just gets everywhere. Next time I'll just use a heavier version of the Starbond glue to fill in seams.
Special Mention. I was going to build a strap under suit using the great instructions found here on this site, but after doing a lot of searching I found this, Muddy Magnum Pro Harness Black, UNITS, a climbing harness. It is the cheapest climbing harness used by hunters you can buy. BUT it works amazingly well for holding heavy armor on your body comfortably. It is amazing.
| ITEM | COST |
| FILAMENT | |
| 2SUNLU 3D Printer Filament Bundle 10KG, PLA Plus Filament 1.75mm, Neatly Wound PLA+ Filament for Most 3D Printer, 2 Colors, 1kg Spool, Black | $250.00 |
| MISC | |
| LANON PVC Chemical Gloves, Thick Rubber Work Gloves, Heavy-Duty, EN 374/388, Acid, Alkali and Oil, Non-Slip, XXL | $14.13 |
| 3M Professional Multi-Purpose Respirator, Medium | $39.56 |
| Jorgensen 2-Piece Steel Bar Clamp Set, Light Duty F-Clamp, 8-inch & 12-inch | $20.00 |
| Hobby Knife Blades #18 Chisel Blades Wood Chisel Blade Precision Knife, 1/2 Inch Carbon Steel Heavy Duty Craft Knives for Chiseling, Shaving or Cutting Layers 100 Pieces | $11.99 |
| Amartisan 14-Piece Retractable Box Cutter, Utility Knifes for Boxes, Cartons, Cardboard Cutting, 18mm & 9mm Wide Blade Cutter, Very Suitable for Office and Home Use. | $8.99 |
| GLUE | |
| Starbond 4 oz. Medium CA Glue (Premium Cyanoacrylate Super Glue) for Quick Glue-ups, Woodworking, Woodturning, Hobby Models | $19.57 |
| PAINT | |
| Krylon K05547007 COLORmaxx Acrylic Clear Finish for Indoor/Outdoor Use, Flat Crystal Clear, 11 Ounce (Pack of 1) | $18.00 |
| Rust-Oleum 249128 Painter's Touch 2X Ultra Cover Spray Paint, 11 oz, Metallic Aluminum | $6.19 |
| Bondo Glazing and Spot Putty, Fills Pinholes, Scratches, Minor Dings & Hairline Cracks, 16 oz, 1 Tube | |
| Rust-Oleum 257418 Painter's Touch 2X Ultra Cover Spray Paint, 12 oz, Satin Eden | $28.00 |
| Pure Graphite Powder Quart | $18.99 |
| Rust-Oleum 249127 Painter's Touch 2X Ultra Cover Spray Paint, 12 oz, Flat Black | $6.19 |
| Rust-Oleum 249418 Automotive Sandable Primer Spray Paint, 12 Ounce, Black, 12 Fl Oz | $45.00 |
| Makeup Sponge, Larbois 3-Pack Foundation Blender Beauty Sponge, Professional Make up Blending Sponge Dry & Wet Use for Powder Cream or Liquid (Red+Black+Purple) | $4.34 |
| Apple Barrel Gloss Acrylic Paint in Assorted Colors (2-Ounce), 20662 Black | $2.00 |
| Copco 255-0186 Non-Skid Pantry Cabinet Lazy Susan Turntable, 18-Inch, White/Gray - 2555-0186 | $10.00 |
| 800 Grit Sandpaper,Dry or Wet Sanding,9 x 3.6" for Wood Furniture Finishing,Metal Sanding and Automotive Polishing,Pack of 36 | $5.00 |
| 36Pcs Sandpaper,400 Grit Assorted Sanding Paper,Wet Dry Waterproof Sand Paper for Wood Furniture Finishing,Automotive Polishing,9x3.6 Inches | $5.00 |
| 45PCS Sandpaper,Atosun Premium Wet Dry Waterproof Sand Paper, 120 to 5000 Assorted Grit Sanding Paper for Wood Furniture Finishing, Metal Sanding and | $10.00 |
| Rit Dye 88150 All Purpose Liquid Dye, Black, 8 Fl Oz | $3.67 |
| FROGTAPE 1358464 Multi-Surface Painter's Tape with PAINTBLOCK, Medium Adhesion, 1.88" Wide x 60 Yards Long, Green | $10.36 |
| ARMOR & UNDERARMOR | |
| HALO Master Chief Deluxe Helmet with Stand - LED Lights on Each Side - Battle Damaged Paint - One Size Fits Most - Build Your Halo Universe, Green | $46.00 |
| NoCry Supportive Sports and Gardening Knee Pads for Women and Men; Unique Adjustable Straps; Gardening and Cleaning; Durable Gardeners Knee Pads; Volleyball Knee Pads for Men | $18.99 |
| Zune Lotoo Tactical Gloves TPR Protective Airsoft Gloves Touchscreen Military Gear Shooting Gloves for Men | $19.99 |
| Bodyprox Elbow Protection Pads 1 Pair (Medium), Elbow Guard Sleeve | $16.00 |
| Muddy Magnum Pro Harness Black, UNITS | $31.18 |
| Height Increase Adjustable Elevator Shoe Lift Insoles for Men - 1 or 1.5 Inch Taller Heightening Liftkits - Size Large | $10.00 |
| Cienfy 3D Hip Protection Eva Butt Pads Protective Padded Shorts Crash Pad Impact Gear for Skiing Skating Snowboarding Skateboarding (Large) | $24.23 |
| ELECTRONICS | |
| Bietrun Voice Amplifier with Microphone Headset, 20W Rechargeable Mini Portable Voice Amplifier for Teachers, 6H Working Time, Bluetooth, AUX, TF Card Input, for Teaching, Coach, Classroom, Instructor | $27.19 |
| Noctua NF-A4x10 5V PWM, Premium Quiet Fan with USB Power Adaptor Cable, 4-Pin, 5V Version (40x10mm, Brown) | $16.27 |
| AC Infinity MULTIFAN S5, Quiet Dual 80mm USB Fan, UL-Certified for Receiver DVR Playstation Xbox Computer Cabinet Cooling | $15.99 |
| STRAPS & MAGNETS | |
| Black Elastic Bands for Wigs, 1 Inch 12 Yard High Elasticity Knit Spool Sewing Band for Waistbands Pants Clothes and Crafts DIY, Airisoer | $4.34 |
| 1 inch Buckle Strap Set with 10 Yards Nylon Webbing, 8 Pcs Metal D Rings, 8 Pcs Quick Side Release Plastic Buckles, 16 Pcs Tri-glide Slide Clip for DIY Luggage Strap, Backpack Replacement Repairing | $10.87 |
| Universal Replacement Helmet Padding Kits Motorcycle Outdoor ACH Football Batting Helmet Foam Pads Padding Set Helmet Accessories Mats for Fast Mich ACH USMC PASGT Helmet Padding Kits | $15.91 |
| EVA Foam Cosplay - 8mm (1mm to 10mm) - Black or White - 14" x 39" Sheet - Ultra High Density 85 kg/m3 - by The Foamory | $22.99 |
| Matenf Double-Sided Hook and Loop Straps, Self-Gripping, 1 Inch Wide, Cut to Length, Heavy Duty, Quick Wrap Cable Straps, Hook & Loop Roll for Bundling Fastening Storage and Organization, 1'' x 16' | $9.78 |
| Magnetpro Neodymium Rectangular Magnets 44 lbs Force 40 x 13.5 x 5 mm with Countersunk Hole and Capsule, Strong Household and Industrial Rare Earth Magnet with Mounting Screws Pack of 8 | $16.31 |
| TRYMAG Small Strong Magnets, Rare Earth Magnets, 3 Size 30pcs, Small Neodymium Magnets Black Fridge Magnets for Whiteboard, Billboard, Hobbies, Office, Round Button Magnets | $7.61 |
| ROUGH TOTAL | $850.63 |
Sanding, Spray Painting and Weathering. I actually enjoyed a little bit of the sanding part...except using Bondo and the taking FOREVER. When I finally realized I didn't need to see myself in the reflection of the PLA...what was I thinking...it went a lot quicker. The spray painting part was also scary at first and then became easier and easier when I realized how smooth spray paint really goes on...especially if you take it super slow.
I sanded everything by hand. I didn't have to do much sanding, mainly the seams where the pieces had to be glued together. If I didn't have to do those dumb seams I barely would have had to sand. Did I mention how much I hated using Bondo.
The Weathering part was the most relaxing and fun part of the whole sanding and coloring part. I could do it inside my home without a burly respirator on with fans blasting since I was just working with watered down black acrylic and silver pens.
And seeing the final result from that bright green to the more battle worn look was super rewarding.
Weapons, weapons and more weapons. So I am including this into the walkthrough as well because even though Master Chief is himself a weapon, he has to have cool weapons.
MA40 Rifle
Taking inspiration from the 405th I purchased the M40a Nerf gun and and working on respraying it. So many tutorials on how to paint this thing and I watched them all. I went with the easiest color scheme. I just need to add some weathering and graphic to it for that extra touch and that will be done. I created a custom shortened ammo clip for anyone here to download, Halo MA40 Nerf Ammo Clip - Flush by zeckkoa. It fits nicely for that authentic look instead of the Nerf guns version which sticks out way too much.
W/AV M6 G/GNR "Spartan Laser"
And you can't have Master Chief without the Spartan Laser. I am also working on printing and painting my Halo 5 Spartan Laser found on Thingiverse by misterchiefcostuming. Amazing free model. I made some adjustments to make it stronger and cut it up to fit my printer which you can find here, Spartan Laser - Halo 5 - Remix for the X1C by zeckkoa BONUS is I included the 405th emblem engraved into the Spartan Laser. I was worried about it being too small when I was printing it out. Boy was I wrong when I put it all together. It is taller than my 7 year old son. My only problem is the Spartan Laser weighs like 3.4kg so carrying it around for too long is going to be tough.
UNSC Magnum
And because I have pretty large hands especially while wearing the suit I needed the largest Halo pistol I could find that closely resembled my favorite pistol from Halo 1. Again another free and excellent model from misterchiefcostuming from Thingiverse. Still working on graphite coasting and final touchups but very happy how it looks. Of course it would have been cool if the trigger worked but man, those models are waaaaaay more complicated than I wanted to attempt in this run anyway. I still need to figure something out on attaching all these weapons to myself. I see some people use burly magnets. Not sure which route I will take.
Seattle 2023 PAX. I am still working on the armor and I am probably 95% of the way there. I still need to do a bit more weathering and then I need to varnish the crap out of everything to hopefully protect a little from the battle damage of just wearing the armor. Then I need to install all the straps, velcro, buckles, and magnets. I should be done by this weekend. I will be attending the Seattle 2023 Seattle PAX and maybe hopefully the Halo World Championship. So please, please, please, if any of you see me, don't hesitate to pester me with every question you can imagine, because I know I'll have as many for you too.
MORE PHOTOS AND UPDATES COMING SOON!