Teifu
New Member
Hello! My new years resolution this year was to get more projects done, so i decided to start by focusing on one thing, instead of multiple, smaller things. This "thing" is a 3D Printed Spartan build from Halo Reach! I've already mostly finished, but i want to go through each part individually and try to share what I've learned. The 405th Forum was an immense help, i spent plenty of time combing through threads, trying new things, going my own way and figuring out what truly worked. Some of these threads were almost 10 years old! That was incredible to me, and i want to leave behind info so that maybe a decade from now, someone else can find what works for them.
I want to start with the helmet, from Aguilar Workshop. This is one of the coolest 3D print files I've ever seen! The way it's designed to be printed, and actually worn is so good. If he ever puts out a set of Reach armor files I'd buy them and reprint my entire costume in a heartbeat haha, can't praise his work enough!
Side notes:
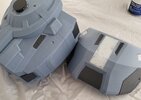
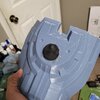
This is a dry fit shot of the helmet, no post processing aside from support removal.

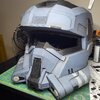
Next, a shot of the helmet after being glued, and sanded! I used a cheap 3D pen to fill in a few gaps, which were errors on my part.

After that, I taped off the lines on the helmet and painted them with Apple Barrel Granite Gray acrylic. After a bit of drying, i lightly sanded the lines to simulate wear.

Then i took it outside to the painting tent. Two coats of Rust-oleum 2x Matte Clear clearcoat hid most of the sanding artifacts. It's not perfectly smooth, but a lot of encouragement from my friends made me appreciate how subtle print lines can add to a print, make it look more "Real".

Next: first weathering pass! I mixed a little gray, black and brown and then thinned it with water to do the base layer of "dirt"

After that i thinned some brown and added more "dirt" in the crevices of the helmet and let it all dry.

Finally, i did some dry brushing with silver, let it dry, and hit it with two more final coats of Rust-oleum matte clear. After that i cut the visor strips, (you can see how that works on the site for the helmet file) and it's done! (mostly..)

Thanks for taking a look at the first part! I'm going to try and post once a day, or when i have free time.
I want to start with the helmet, from Aguilar Workshop. This is one of the coolest 3D print files I've ever seen! The way it's designed to be printed, and actually worn is so good. If he ever puts out a set of Reach armor files I'd buy them and reprint my entire costume in a heartbeat haha, can't praise his work enough!
Side notes:
- I decided i didn't want to paint or prime any more than i had to, so i printed this entire cosplay in the dominant color, which meant buying about 10 rolls of Hatchbox gray blue PLA!
- I didn't use any expensive paint, everything i chose can be bought for around 50 cents at Walmart.
- I'm bad with an airbrush! I paint everything by hand.
- I own a CR-10, an FLSUN QQSPro, and an Anycubic Vyper. The Vyper came into play after most of the helmet was finished.
- Halo Reach armor references were shockingly hard to find. I sort of just "Winged" it when it came to painting details and went with what i liked best!
- The armor files are from NerdForgeDesigns on Etsy. Almost a week after i bought them, the files were unlisted. I messaged them with some help on the magnets and they offered to send me an updated file, but i had already printed it and didn't want to do it again.
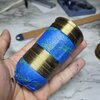
This is a dry fit shot of the helmet, no post processing aside from support removal.
Next, a shot of the helmet after being glued, and sanded! I used a cheap 3D pen to fill in a few gaps, which were errors on my part.
After that, I taped off the lines on the helmet and painted them with Apple Barrel Granite Gray acrylic. After a bit of drying, i lightly sanded the lines to simulate wear.
Then i took it outside to the painting tent. Two coats of Rust-oleum 2x Matte Clear clearcoat hid most of the sanding artifacts. It's not perfectly smooth, but a lot of encouragement from my friends made me appreciate how subtle print lines can add to a print, make it look more "Real".
Next: first weathering pass! I mixed a little gray, black and brown and then thinned it with water to do the base layer of "dirt"
After that i thinned some brown and added more "dirt" in the crevices of the helmet and let it all dry.
Finally, i did some dry brushing with silver, let it dry, and hit it with two more final coats of Rust-oleum matte clear. After that i cut the visor strips, (you can see how that works on the site for the helmet file) and it's done! (mostly..)
Thanks for taking a look at the first part! I'm going to try and post once a day, or when i have free time.