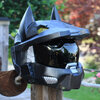
Do you wish your helmet could relay how excited you are to get dressed up and go to a convention? Have you always wanted an animated grunt shooting a covvy pistol on your face? Are you ok with minor visibility issues? Have you always wanted to pose with the anime folks but never had an icebreaker? Do you want to advertise your social media handles... on your face? Well, do I have a post for you!
INTRODUCING the highly simplistic but hilariously fun build you no doubt have not been waiting for! Oh... nobody asked for this, that is for sure! But here you go anyways!
Step 1) Have a previously built helmet. No helmet, no problem... build one or order one!
Step 2) Make sure your helmet is painted and finished and wonderful... I certainly won't walk you through that whole process.

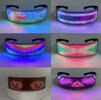
Step 3) Buy a pair of "Shining Glasses" from somewhere like here. They have a built in app, you can even make your own customized animated and static designs! Creativity sold separately. Screen size is 12 pixels by 36 pixels.

Step 4) Wait for them to show up in the mail. Do nothing else, wait by the door... they will show up eventually!
Step 5) Open them... notice that the glasses themselves won't fit in your visor... oh no! Time to improvise! Rip those bad boys apart... be careful of the internal battery, don't puncture it, it will explode and cause house fires and stuff.
Step 6) Once you have it disassembled ensure that it still works and charges. You are going to want to keep the rubber mat that goes over top of it and the circuitry. Handle this with care because if you bend it too far you can break connections making for dead pixels... nobody wants that.
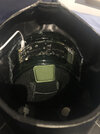
Step 7) Measure out the centre of your visor as it sits inside your helmet. You are going to want to hot glue this on, applying minimal glue to your visor (depending on the visor type this might show through... so be careful to only use a small amount on the visor itself. Don't start gluing quite yet you'll want to make sure...
Step 8) ... that your power button is facing up! If your power button is facing down you'll have to do all of your doodles in the app upside down... and that is just silly. Power button = UP! Now start lightly gluing from the middle to the outer edges keeping a nice tight seal to your visor. The closer and more even you can get it, the better it will shine through.

Step 9) Ok... it is installed... now what. Give that little power button a push... boot it on! Time to take it for a test spin. Use the app, have some fun! That is it... charge it up now and then, be gentle on the cord, or glue it like I did, to ensure that the components stay in place and don't get too rattled/ broken.

INTRODUCING the highly simplistic but hilariously fun build you no doubt have not been waiting for! Oh... nobody asked for this, that is for sure! But here you go anyways!
Step 1) Have a previously built helmet. No helmet, no problem... build one or order one!
Step 2) Make sure your helmet is painted and finished and wonderful... I certainly won't walk you through that whole process.

Step 3) Buy a pair of "Shining Glasses" from somewhere like here. They have a built in app, you can even make your own customized animated and static designs! Creativity sold separately. Screen size is 12 pixels by 36 pixels.

Step 4) Wait for them to show up in the mail. Do nothing else, wait by the door... they will show up eventually!
Step 5) Open them... notice that the glasses themselves won't fit in your visor... oh no! Time to improvise! Rip those bad boys apart... be careful of the internal battery, don't puncture it, it will explode and cause house fires and stuff.
Step 6) Once you have it disassembled ensure that it still works and charges. You are going to want to keep the rubber mat that goes over top of it and the circuitry. Handle this with care because if you bend it too far you can break connections making for dead pixels... nobody wants that.
Step 7) Measure out the centre of your visor as it sits inside your helmet. You are going to want to hot glue this on, applying minimal glue to your visor (depending on the visor type this might show through... so be careful to only use a small amount on the visor itself. Don't start gluing quite yet you'll want to make sure...
Step 8) ... that your power button is facing up! If your power button is facing down you'll have to do all of your doodles in the app upside down... and that is just silly. Power button = UP! Now start lightly gluing from the middle to the outer edges keeping a nice tight seal to your visor. The closer and more even you can get it, the better it will shine through.

Step 9) Ok... it is installed... now what. Give that little power button a push... boot it on! Time to take it for a test spin. Use the app, have some fun! That is it... charge it up now and then, be gentle on the cord, or glue it like I did, to ensure that the components stay in place and don't get too rattled/ broken.
