Convince me not to. Mk6 1st build

billeybob250

New Member
So, i got to hit 50 posts somehow figure i should try to make it authentic.

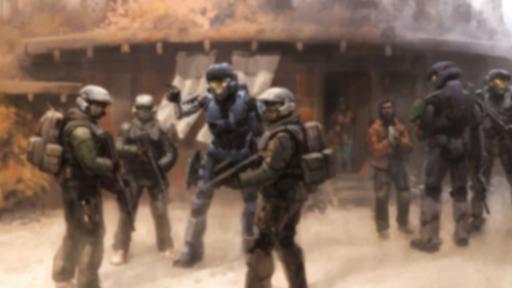
I'm very new to the world of forums iv never been much of a reddit person and iv never been confident in my reading and writing skills so iv always felt out of place. All that aside. Halo has been 45% of my childhood with RuneScape and CoD being the rest. I recently stumbled upon these thing averse files and went "Welp im doing this now". then i stumbled upon the 405th and after the wife's approval (we both 3d print and Shes my painter) so i didn't want to hog the printer and her time without her approval. im going to print the mark 6 and i am super excited.
https://www.thingiverse.com/thing:2951069/files
https://www.thingiverse.com/thing:2739764


I am naturally a very cautious person iv already read and watched some of the tutorials around here (all amazing by the way). So i have a few questions.

1) convince me not to do the helmet 1st, it would be such a dopamine rush I want to do it 1st but all the guides say not to.
2) Are these files still good? are there better (preferably free but i may be able to to be convinced to spend) out there?

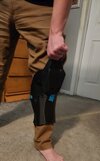
While I'm rather new to the world of electrical wiring i do have some experience. (pictures below) I have also taken classes a while ago in electricity and circuits so I get the basics.

printed and wired mask Wired portion of the mask

Wife thinks I should start with the boots, gauntlets or shins 1st as they are likely to be the ones that cause me the most discomfort in wearing them.

What are your guy's opinions? I have the energy and time to start printing stuff right now.

Also, colors. My favorites are blue and green i am for some reason compelled to do a blue suit even tho the iconic green looks so good.

Thank you for the help and nice to meet you all.
 
Any files from Moesizzlac are going to be solid. They are a member of this community and have gone above and beyond to provide high quality files free of charge.

If you are looking for more options, especially free, browse the Free 3D Model Index:

The advice of starting with your Boots or another armor piece is solid. There is no one right way to go about building your costume, but, since you say you are a cautious person, boots and shins will tend to be the most heavily weathered or distressed pieces of your costume, and that can hide a lot of mistakes. That means you can work out the kinks in your printing settings and your post process smoothing and sanding techniques on a piece that is less noticeable and will be covered in weathering and distressing, before going on to the piece hat tends to be the focal point of your costume, your helmet.
 
So I jsut had another crazy idea. I saw a Facebook reel of someone who made the CoD zombies mystery box. i wonder if i can make one light enough to carry it on my back.

I have a lot of free time at work
 
Welcome to the 405th!

Don't feel pressured to accomplish everything all at once.

When I started down my costuming path 3D printing was still new enough that what is largely commonplace now would be in the tens of thousands of dollars range. and the mechanisms, practices, and programs to build and create our costumes were in their infancy.

I made my helmet first. and despite trying to be careful I improperly scaled it twice. I know most of the forum will recommend Armorsmith for scaling and proportioning; it is a wonderful tool.

I would always recommend a smaller part before taking a plunge. gauntlets are easy enough and they can carry a lot of excitement since they don't often require a lot of work to make wearable. They can help get scale and proportioning down without the potential disappointment of a helmet that is either too large or too small. They are also often easier to print since you can either spring in full (depending on your available z axis) or in just 2 parts.

From there you can jump into nearly any other part of the armor with ease. the major difficulty with doing the helmet first are making a viable visor and any electronics/fans/lights that you may want/need for longer-term usage.

And don't feel limited by color either. while the olive green that the Chief has is very iconic, many people here often create colorful mash-ups that reflect their own personal tastes.

I look forward to your build!

Good luck!
 
Ok well i cant get it to save any of my files but i was able to scale my armor so I'm currently printing my left shin pieces. hopefully tomorrow i can figure out saving and maybe get both shins done.
 
So i just got armorsmith. This is really the best we have to work with? its about 5 years un updated correct?
I mean, yes, ArmorSmith is a program that a great many of our users swear by and has saved a lot of folks a lot of money on wasted prints. It sounds like the original creator is no longer actively supporting it, but it has been it has been updated in the past 5 years. There also seems to be no other real alternative to the program, or one designed with Costumers in mind like ArmorSmith.

If you are having issues there is an Armorsmith channel of the 405th Discord server where you can get quick response feedback.

There is also a dedicated Armorsmith group on Facebook with around 3,000 members that can also quickly answer questions and provide specialized support about this program.
 
The discord link Cadet send didn't work. it looks like its a channel link and not an invite link.

and i did post my question in the ArmorSmith Facebook page.

I do think i got at least 1 of my issues figured out now.
 
My apologies. You can use this link to join the 405th's Discord Server. Make sure to set your server nickname to your Forum Account name:
 
Ok so 1st 2 prints are done. I would love some opinion on size and fit. I feel like it's to short and a little to big.
1000007066.jpg
1000007069.jpg
1000007068.jpg
1000007065.jpg


My main concern is it long enough? I don't quite know the connection between. The boot covers and the shin peices. These pics show the shine peice in 2 different spots and with my knee bent and straight.

Let me know what you think.
 

Attachments

  • 1000007065.jpg
    1000007065.jpg
    981.9 KB · Views: 12
Ok so i had to reprint the bottom half of the shin i added 3 extra inches in height to it (Apparent i have long lower legs). currently working on the Thigh portion
1739675330962.png
1739675346499.png
1739675361353.png
 
Hey there!
I see your build is going well, and you're asking a lot of important questions. Please remember to wear less-baggy cloths when asking for fitting advice! It is hard to tell if your armor fits or not with the photos you keep posting. :)

Good luck!
 
Ok so 1st 2 prints are done. I would love some opinion on size and fit. I feel like it's to short and a little to big. View attachment 357490 View attachment 357486View attachment 357488View attachment 357492


My main concern is it long enough? I don't quite know the connection between. The boot covers and the shin peices. These pics show the shine peice in 2 different spots and with my knee bent and straight.

Let me know what you think.
Like Kae said, it can be a bit hard to judge with baggy clothes; however, from what I can tell, I think you would benefit from it being a bit longer. Probably 3-5%? I'd try that in armorsmith (if you could get your file to save) and see how it looks.

Edit:

Your last post with it being longer didn't show for me. The new size looks great, but I'd take a 1/2 inch back out of it.
 
Before printing out another shin; why not go ahead and print out a boot once you estimate a good size? Sometimes it can be difficult to tell how long your shin needs to be without a boot and thigh to go along with it. While making my own Reach spartan, I made the thigh first, then the boot, and then figured out the space I needed to adjust for the shin. The final result on my end turned out better than expected.
 
Before printing out another shin; why not go ahead and print out a boot? Sometimes it can be difficult to tell how long your shin needs to be without a boot and thigh to go along with it. While making my own Reach spartan, I made the thigh first, then the boot, and then figured out the space I needed to adjust for the shin, and it worked out great.
Thigh currently in process (hopefully printing the lower half of it tonight) as for the boot. Iam honestly verified of it. The modle dosnt look like it fits my armorsmith modle. So I am scared of having to reprint the boot multiple times
 
Thigh currently in process (hopefully printing the lower half of it tonight) as for the boot. Iam honestly verified of it. The modle dosnt look like it fits my armorsmith modle. So I am scared of having to reprint the boot multiple times
I am glad to hear that the thighs are being printed, but I also understand your concern about the boots. For myself; sizing has always been the hardest part of making a costume. Photos of your sizing compared to your boot in Armorsmith would be very helpful to us as a means of helping you out.

When I was trying to decide what boot size I needed, I printed out the size of the boot sole (using Pepakura), traced it onto cardboard, and attached it to my shoe. You can also manually measure the length and width of the boot and compare it to your shoe as well. And last but not least; you could print a sample out of spare filament to identify how big the boot may be at this stage.
 
ok so shin/knee pic with "tighter cloths" (just removed the pants because i don't have tight cloths). and then i added my thigh reference and sizing straps.
1739756701432.png

1739756730997.png
The black bands on the thgigh represent the circled red area and the gap is the heigth of that part (5.75 inches approximatly.)
1739756754136.png

1739756816990.png
1739758258019.png


My goal is to print both the lower portions of the thigh in 1 print and both the upper parts in 1. less blue filler and bondo.

What do you all think?
 
You were asking about my boot on shin. here is the best mokup i have so far. my feet are sized as if i am wearing my prefered walking shoe (a composit toed sneaker).
1739758498936.png
1739758579495.png


1739758612483.png


let me know if any other angles may be helpful.
 

Your message may be considered spam for the following reasons:

If you wish to reply despite these issues, check the box below before replying.
Be aware that malicious compliance may result in more severe penalties.
Back
Top