1st Build First Armor Build Mk Vb

Barbcelona

New Member
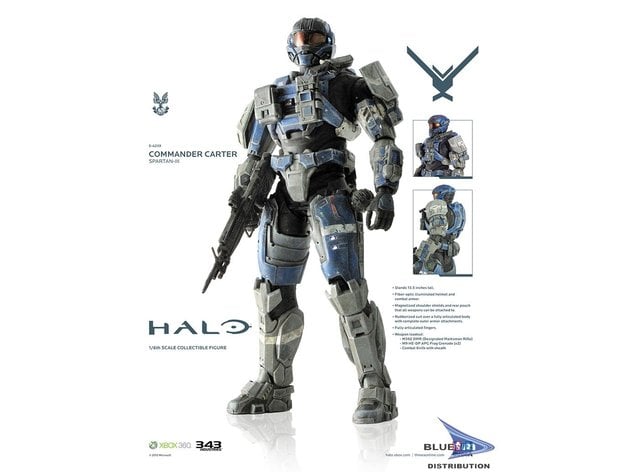
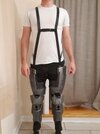
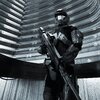
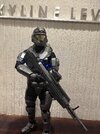
Documenting my first build and first attempt at any kind of cosplay.
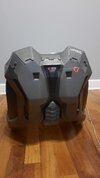
Everything I have made has been 3d printed so far.
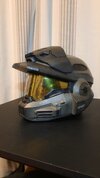
I made my helmet with an Ender 3 V2 but then upgraded to a BambuLab P1P.

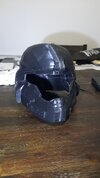
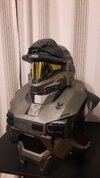
The files I am using are the Noble 6 file set created by Moesizzlac on Thingiverse.
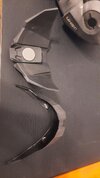
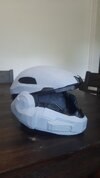
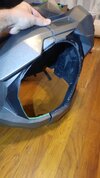
I split the helmet into 8 pieces in order to fit onto the Ender's print bed.
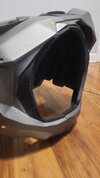
I superglued the pieces together then finished with some Bondo and a lot of sanding.
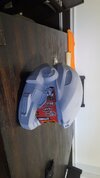
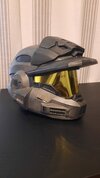
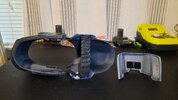
The visor is made of thin plastic and one-way window tint.
I made a template out of paper then cut the visor to shape.

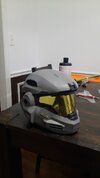
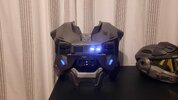
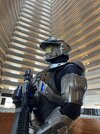
I took the up-armor visor attachment from the Armory from here on the 405th:

I made some tweaks to it in Blender and then scaled it to my helmet.
Both attachments are held in place with magnets.

I will likely make my own vacuum former to create a better visor in the future.
 

Attachments

  • 20240624_183944.jpg
    20240624_183944.jpg
    1.4 MB · Views: 71
  • Snapchat-217646514.jpg
    Snapchat-217646514.jpg
    463.1 KB · Views: 69
  • Snapchat-487803382.jpg
    Snapchat-487803382.jpg
    331.3 KB · Views: 66
  • Snapchat-1587377521.jpg
    Snapchat-1587377521.jpg
    492.4 KB · Views: 76
  • Snapchat-2122604942.jpg
    Snapchat-2122604942.jpg
    348.9 KB · Views: 77
  • 20240624_184830.jpg
    20240624_184830.jpg
    702.5 KB · Views: 88
For the chest, I also printed in 8 pieces with the help of the aforementioned BambuLab P1P (highly recommended).
Same process, super glue and then Bondo/sanding.

First of all these models are great, something I could never make on my own.
But, I did realize too late that the chest piece had some inaccuracies.
If anyone wants to use the mentioned files, I would recommend using the chest from the Noble 1 (Carter) file set. It is more accurate.

So instead of scrapping the project, I wanted to get creative.

The front piece was mirrored and didn't have the square holes for the armor lights. So, I grabbed the front piece from Noble 1 and cut out of my own chest piece. I then glued in the new piece and painted it to match the rest.

I also printed the additional "buttons" piece (not really sure what to call it) from the Noble 1 set and glued it onto my armor since the Noble 6 set was missing it.

Compare the front chest in the attached pics.

Also, check out how I did the lighting here:

I then decided to cut off some of the sleeve parts to allow for more arm mobility.
I added a thin strip of 5mm foam around the edges afterwards.

I made some templates for the decals on a vinyl cutting machine, then painted them on the back.
 

Attachments

  • 20240624_184025.jpg
    20240624_184025.jpg
    724 KB · Views: 83
  • 20240624_183750.jpg
    20240624_183750.jpg
    1.2 MB · Views: 57
  • 20240622_200718.jpg
    20240622_200718.jpg
    750.5 KB · Views: 64
  • 20240620_171208.jpg
    20240620_171208.jpg
    1.4 MB · Views: 76
  • 20240602_210650.jpg
    20240602_210650.jpg
    827.4 KB · Views: 73
yooo thats so sick. Where'd you get the files for the chest?
Here is the link to the Noble 1 armor set:

The creator has some other great files as well.
 
For the body under suit section.

Inspired by this thread, which is way better than mine:

I made this out of 2mm foam sheets and covered them with some vinyl fabric from Hobby Lobby.
Since I do not have a sewing machine, I used fabric adhesive and wrapped the vinyl around the foam.

To get the shapes, I looked at in-game screenshots and honestly eyeballed it.
Not 100% accurate but better than no under suit.

I glued on some Velcro strips to each side so it detaches into two pieces.
After the two pieces were made I glued on the 3d printed back pieces.

Fits under the chest piece nicely and doesn't seem to slide around.
 

Attachments

  • 20240629_215450.jpg
    20240629_215450.jpg
    1.6 MB · Views: 79
  • 20240629_215522.jpg
    20240629_215522.jpg
    1.7 MB · Views: 73
  • 20240629_220410.jpg
    20240629_220410.jpg
    1.8 MB · Views: 76
  • 20240629_220419.jpg
    20240629_220419.jpg
    1.3 MB · Views: 77
  • 20240629_215923.jpg
    20240629_215923.jpg
    1.7 MB · Views: 72
  • 20240629_220049(2).jpg
    20240629_220049(2).jpg
    840.2 KB · Views: 80
Progress update, finished up the legs.
Again 3d printed from the files mentioned before.
Painted, weathered, and then added some foam in the thighs and shins so they wouldn't spin/slide around.

To hold the pieces in place I created a "carrier" to hold the weight and to keep the armor pieces from sliding down.
Made of 1" Nylon webbing and buckles from Amazon.
I took some rough measurements for my body and then added around 6" because it is made to be adjustable.
I then hand sewed the webbing together for proper strength.

The pieces attach with buckles as follows:
Carrier -> thighs -> shins

Each piece can be separated for easier storage/transportation.
And as mentioned, each piece has the ability to be independently height adjusted.

Hoping to finish in time for DragonCon2024.
 

Attachments

  • Legs1.jpg
    Legs1.jpg
    711 KB · Views: 56
  • Legs2.jpg
    Legs2.jpg
    742.3 KB · Views: 54
  • Legs3.jpg
    Legs3.jpg
    697.6 KB · Views: 52
Another update.
Painted up the arms and waist section.

These were really easy since all I had to do was print, paint, and make a belt out of Nylon webbing and some buckles.
I made the waist section in 4 pieces and as an adjustable belt for ease of putting on/taking off. Plus it makes it easier to store/move.

For the arms I just put some foam on the inside to make a snug fit.

Now all I have left is the gloves and boots.
Almost there!!
 

Attachments

  • Arms.jpg
    Arms.jpg
    1.3 MB · Views: 47
  • ArmsBelt1.jpg
    ArmsBelt1.jpg
    1.1 MB · Views: 40
  • Belt1.jpg
    Belt1.jpg
    1 MB · Views: 36
  • Belt2.jpg
    Belt2.jpg
    1.1 MB · Views: 38
Small update.
Finished the hands.

I found some cheap gloves on Amazon that had a type of "armored" look to them.
After a quick print of the hand pieces, I hot glued them to the gloves; we'll see how they hold up.
As simple as that.

I have the pieces for the boots printed, just gotta figure out how to rig them up.
Hope to get them finished this weekend.
 

Attachments

  • Hands.jpg
    Hands.jpg
    1.4 MB · Views: 42
Finished up the boots.
For the actual shoes I got some cheap tennis shoes from Walmart in case I needed to glue/modify them (I did).
I also figured they would be comfortable than boots to walk around in as well.

The lace cover is held in place with Velcro that is glued to the covers and to the tongue of the shoe.
Makes it easy to tie them up and then place the cover over top.

For the main pieces, I attached them together with hot glue and elastic bands so that they can flex and be taken off of the shoes if needed.
The tension holds the pieces to the shoes nicely so no kind of "hard mounting" was needed.

For the hazard stripes I just cut out some vinyl in the necessary shapes and then stuck each piece on.
Then just painted up and weathered.
 

Attachments

  • Shoes (1).jpg
    Shoes (1).jpg
    2.8 MB · Views: 30
  • Shoes (2).jpg
    Shoes (2).jpg
    2.4 MB · Views: 32
  • Shoes (3).jpg
    Shoes (3).jpg
    2.5 MB · Views: 30
  • Shoes (4).jpg
    Shoes (4).jpg
    2.6 MB · Views: 24
So I did end up making a DIY vacuum former to make a better visor.
I basically did it the way that N8TEBB has on YouTube.

The only difference is the way mine is tinted.
I chose not to do the dye and chrome method because I don't have an airbrush to do the chroming effect.
Instead I used 2 visor layers to create the effect.

The visor itself is just a clear vacuum formed piece of plastic.
Then behind it is a tinted flat piece of plastic cut to fit behind it. Much like my original visor but a little smaller.

I used one-way window tint for that.
I tried to tint the formed visor but with no matter how much I heated and tried to wrap it there were wrinkles.
So the flat piece was just a way easier option.

The details on my formed piece aren't the most profound, but you can tell they are there, much better than a flat visor.

And overall, the visibility is pretty good, the last pic shows what it looks like through the helmet.
 

Attachments

  • NewVisor (1).jpg
    NewVisor (1).jpg
    576.1 KB · Views: 30
  • NewVisor (2).jpg
    NewVisor (2).jpg
    611.1 KB · Views: 28
  • NewVisor (3).jpg
    NewVisor (3).jpg
    567.8 KB · Views: 27

Your message may be considered spam for the following reasons:

If you wish to reply despite these issues, check the box below before replying.
Be aware that malicious compliance may result in more severe penalties.
Back
Top