TheBigC
New Member
So I finished the build in early 2024 but never officially recorded it so wanted to make a post here with the process to hopefully learn from and help some others. I mostly solo cosplay and just worked on the suit on my own taking some random advice from Reddit and Youtube cosplay making.
I apologize in advance for a lot of blurry pictures, most of my documentation is screenshots from videos I took of myself because I did not have a mirror to work with
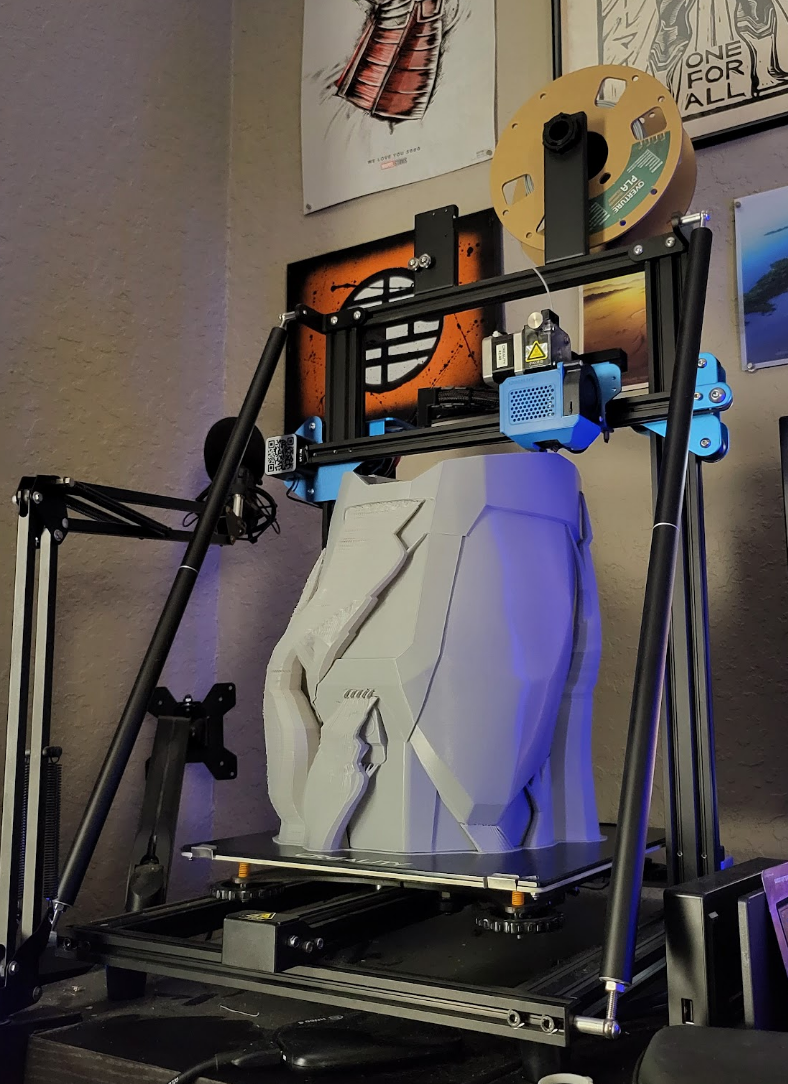
PRINTING
I got the files from @the_makyr on Instagram (unfortunately his account has since been deleted and I'm unsure if he has other socials). Everything was printed on a Creality CR10 V3 and by the end it was STRUGGLING so I'm excited to get a new printer soon.
POST PROCESSING
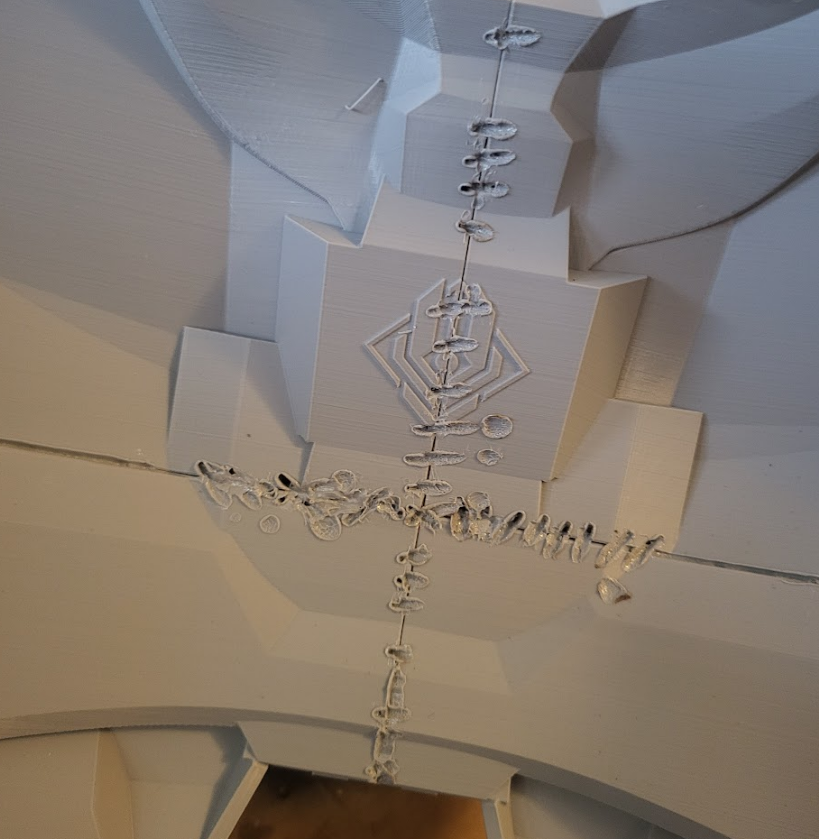
Since my build is so large (most pieces were scaled up to 120%) a lot of them needed to be split and welded together. The welding looks rough on the inside but it holds like it was printed all in one piece. I hate bondo with a passion so I elected to just use wood filler and sandable primer to smooth things out and while they don't offer quite as much structural integrity as bondo, I felt like the welding would be enough here.
PAINT AND WEATHERING
Decided to use the Krylon Satin Olive paint color for the armor. I know it's slightly darker than the game representation but it's a popular color amongst Master Chief builds and I like how it gives a more rugged tactical look.

Pre weathered piece. I just really like how the darker green goes with the black in this build.

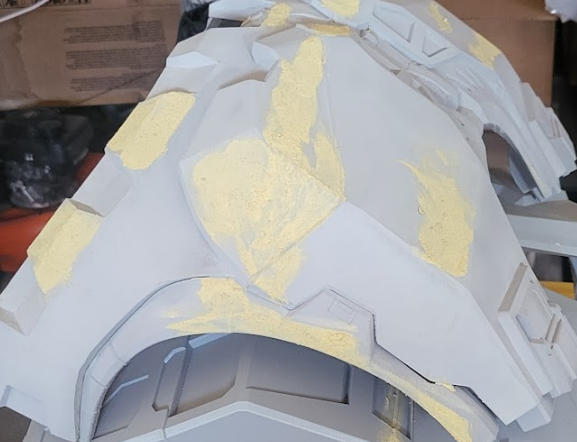
I don't have any pictures of the weathering process as it is incredibly messy but I just did a black wash with an equal ratio of black acrylic paint and water. After letting that dry I used a palm sander to grind away some of the pain layers to look like natural scratches. The ordering of gray pastic/primer into blak undercoat into the green paint made for some cool layering when grinding them down.
Grinding that was done before the black wash

Post weathered pieces

STRAPPING SYSTEM
This was easily the weirdest part of the build as I wasn't 100% sure how to go about it but I think I ended up with a system that works for me. I tried to make as many pieces as possible go off of my shoulders so they wouldn't pull on my clothes and it's just easiest to shoulder all the weight. I started by working on the legs and ended up on a system where I had large loops that went cross body and over my shoulder. It took a while to really dial in the exact length I needed but what I like about this is that the legs can still be supported but move freely as the strap has room to slide as I walk.
I also set up straps that just connect from the thigh to the shin to hold them up. When made short enough it almost tightens the shin piece onto my leg and moves perfectly as I move around.


The next piece that had to go from my shoulders is obviously the whole torso. I just have it resting on my shoulders (with some padding inside) and have straps that go from the top of the back to hold up the shoulder piece. There is a strap going from the shoulder piece to the bicep piece. It's a lot of straps but it allows me to not only move freely but all the pieces get to stay at a set spot while all being supported by my shoulders.

That was honestly all of the strapping that was needed. The rest was just lots of velcro. Forearm pieces were wedged tight enough to my forearms that they didnt move around. Then the hand and boot armor all had velcro to stay attached to my gloves and boots.
MISCELLANEOUS
The boots I wanted to add a little extra height to hit 7' in the armor (I'm 6'7 normally) and ended up just gluing/taping a few layers of EVA foam onto the bottom of my boots. It's almost unnoticeable when looking from above.


The gun was just a really quick last second build with minimal post processing. Mostly just a placeholder while I work on a full sized gravity hammer

STILL TO DO
There are still a few things I would like to make better and update. I have VERY basic ab wrap right now made of eva foam that isnt even worth posting on here. I want to redo it with vinyl wrapping individual pieces and stitching them together.
Id like to get some LED strips to connect on the outside of the armor to make an "energy shield" look but I want to wait and get through some repairs first.
Finally a full sized gravity hammer is my next build but that's moreso an accessory than part of the Master Chief build specifically.
COMPLETED PICTURES
I know it's not super in depth with photos for every step but I plan on making a better post once I start redoing some of the pieces and can really be efficient with documenting everything I've done. But here are some completed pictures!


I apologize in advance for a lot of blurry pictures, most of my documentation is screenshots from videos I took of myself because I did not have a mirror to work with
PRINTING
I got the files from @the_makyr on Instagram (unfortunately his account has since been deleted and I'm unsure if he has other socials). Everything was printed on a Creality CR10 V3 and by the end it was STRUGGLING so I'm excited to get a new printer soon.
POST PROCESSING
Since my build is so large (most pieces were scaled up to 120%) a lot of them needed to be split and welded together. The welding looks rough on the inside but it holds like it was printed all in one piece. I hate bondo with a passion so I elected to just use wood filler and sandable primer to smooth things out and while they don't offer quite as much structural integrity as bondo, I felt like the welding would be enough here.
PAINT AND WEATHERING
Decided to use the Krylon Satin Olive paint color for the armor. I know it's slightly darker than the game representation but it's a popular color amongst Master Chief builds and I like how it gives a more rugged tactical look.
Pre weathered piece. I just really like how the darker green goes with the black in this build.
I don't have any pictures of the weathering process as it is incredibly messy but I just did a black wash with an equal ratio of black acrylic paint and water. After letting that dry I used a palm sander to grind away some of the pain layers to look like natural scratches. The ordering of gray pastic/primer into blak undercoat into the green paint made for some cool layering when grinding them down.
Grinding that was done before the black wash
Post weathered pieces
STRAPPING SYSTEM
This was easily the weirdest part of the build as I wasn't 100% sure how to go about it but I think I ended up with a system that works for me. I tried to make as many pieces as possible go off of my shoulders so they wouldn't pull on my clothes and it's just easiest to shoulder all the weight. I started by working on the legs and ended up on a system where I had large loops that went cross body and over my shoulder. It took a while to really dial in the exact length I needed but what I like about this is that the legs can still be supported but move freely as the strap has room to slide as I walk.
I also set up straps that just connect from the thigh to the shin to hold them up. When made short enough it almost tightens the shin piece onto my leg and moves perfectly as I move around.
The next piece that had to go from my shoulders is obviously the whole torso. I just have it resting on my shoulders (with some padding inside) and have straps that go from the top of the back to hold up the shoulder piece. There is a strap going from the shoulder piece to the bicep piece. It's a lot of straps but it allows me to not only move freely but all the pieces get to stay at a set spot while all being supported by my shoulders.
That was honestly all of the strapping that was needed. The rest was just lots of velcro. Forearm pieces were wedged tight enough to my forearms that they didnt move around. Then the hand and boot armor all had velcro to stay attached to my gloves and boots.
MISCELLANEOUS
The boots I wanted to add a little extra height to hit 7' in the armor (I'm 6'7 normally) and ended up just gluing/taping a few layers of EVA foam onto the bottom of my boots. It's almost unnoticeable when looking from above.
The gun was just a really quick last second build with minimal post processing. Mostly just a placeholder while I work on a full sized gravity hammer
STILL TO DO
There are still a few things I would like to make better and update. I have VERY basic ab wrap right now made of eva foam that isnt even worth posting on here. I want to redo it with vinyl wrapping individual pieces and stitching them together.
Id like to get some LED strips to connect on the outside of the armor to make an "energy shield" look but I want to wait and get through some repairs first.
Finally a full sized gravity hammer is my next build but that's moreso an accessory than part of the Master Chief build specifically.
COMPLETED PICTURES
I know it's not super in depth with photos for every step but I plan on making a better post once I start redoing some of the pieces and can really be efficient with documenting everything I've done. But here are some completed pictures!
