Galactic Armory Halo 3 BR

Gordon

Member
Process of making the Galactic armory halo 3 BR so far. I have everything printed and just need to get all glued and sanded. Then paint.
 

Attachments

  • 20240917_205328.jpg
    20240917_205328.jpg
    959.7 KB · Views: 68
Looks great. What were your print settings for it? I’m going to make Oddworks’ DMR when my armor is done and it’ll take two weeks with all the different parts.
 
Looks great. What were your print settings for it? I’m going to make Oddworks’ DMR when my armor is done and it’ll take two weeks with all the different parts.
I print at 250mms due to having a k1 max which is a higher speed printer, make sure the filament can take the punishment your printer dishes out, instructions on the settings to use for your filament is usually posted on the side of the roll.
 
1000101120.jpg
JB weld is a miracle when your normal glue doesn't want to cooperate. I get to wait a day or two for it to cure however but for now I'm letting it rest as I did some damage getting it together.... woops. The stock was very difficult to get together just cause the pieces were so precise, and me being impatient I didn't want to sand and make it fit together better. But can't wait to sand and paint!! All the "broken" bits are actually hidden behind a butt plate so I'm lucky on that.
 
I print at 250mms due to having a k1 max which is a higher speed printer, make sure the filament can take the punishment your printer dishes out, instructions on the settings to use for your filament is usually posted on the side of the roll.
OMG 250!!! Yeah I can’t imagine. I have a Prusa mk3s and go at 18mms for external perimeters Trying to let the machine do most of the work. BR looks awesome. Lucky about the breaks!
 
OMG 250!!! Yeah I can’t imagine. I have a Prusa mk3s and go at 18mms for external perimeters Trying to let the machine do most of the work. BR looks awesome. Lucky about the breaks!
It can go up to 600mms and I haven't pushed it past 500mms, it does really well printing that high too, like the prints come out really well!
 
I print at 250mms due to having a k1 max which is a higher speed printer, make sure the filament can take the punishment your printer dishes out, instructions on the settings to use for your filament is usually posted on the side of the roll.
A little off topic, but how is the K1 Max? I’ve been shopping around for larger printers and I keep seeing mixed things about it.
 
View attachment 352746fully printed and glued, now onto sanding.
I’ve been preparing to print my DMR after I get all my armor done and I’ve been wondering if it would be easier to prime and sand before connecting all the pieces together. Larger surfaces to sand together all at once versus ease of rotating and handling individual parts. I’d love to hear about your experience! Stoked to see the finished product.
 
I’ve been preparing to print my DMR after I get all my armor done and I’ve been wondering if it would be easier to prime and sand before connecting all the pieces together. Larger surfaces to sand together all at once versus ease of rotating and handling individual parts. I’d love to hear about your experience! Stoked to see the finished product.
Just do it all in one piece, who knows what mistakes could happen if you did it separately.
 
Ah the bondo has found its way onto the BR. As it should.

I actually quite enjoy my K1 Max but my desk isn't too stable, so I print around 75mm/s.

Also in PETG which I partially regret due to my raw print not looking nearly as good as yours does! Much less post processing though then again the camera could be hiding some of the work. I like the black filament because of how well it shows any imperfections and layer lines.
I hit my props with 80 grit first, then 120, then I put on the bondo, I enjoy the k1 max when it works, but only when it works. I made a wooden table for it to sit on, still wobbles a bit sadly. Your print not looking good raw may be a result of which brand you're using, I'm using elegoo rapid petg. Even I don't get all the imperfections out myself, don't be afraid to do some sanding!!!
 
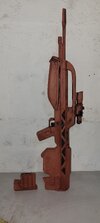
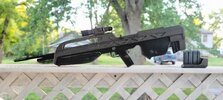
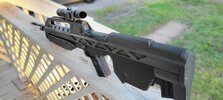
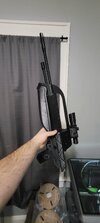
I am finally done with my BR, now enjoy some lore dump about the Rifle.

The BR55 Heavy Barrel Service Rifle (BR55HB SR), also known as the "Mammoth Stomper," is a select-fire rifle utilized by the United Nations Space Command and manufactured by Misriah Armory. It is a heavy-barreled version of the BR55 Service Rifle.

The BR55HB SR entered service in 2548, serving alongside the standard BR55 Service Rifle. For decades, the BR55 had steadily gained favor over the long-serving M392 Designated Marksman Rifle. The introduction of the BR55HB SR led to an immediate increase in the BR55's popularity, prompting all branches of the United Nations Space Command armed forces, except the Army, to replace the M392 with the newer weapon.
 

Attachments

  • 20241003_182634.jpg
    20241003_182634.jpg
    4.9 MB · Views: 47
  • 20241003_182618.jpg
    20241003_182618.jpg
    4.6 MB · Views: 43
This thread is more than 5 months old.

Your message may be considered spam for the following reasons:

  1. This thread hasn't been active in some time. A new post in this thread might not contribute constructively to this discussion after so long.
If you wish to reply despite these issues, check the box below before replying.
Be aware that malicious compliance may result in more severe penalties.
Back
Top