Hey 405th!
So, now that the MkVI is (nearly) complete, I have a confession to make. Halo 3, I’ve been cheating on you! Reach is my one true love, and we have a connection you just could never understand!
As much as I love Halo 3 and always will, Reach became my favorite game from the very moment I loaded it up. Not just because the campaign began on my 566th birthday, but the game and gameplay overall. Combat felt more fluid, the world was beautiful, and I was really part of a team. Add to it the DMR (my new favorite weapon) and that all the combat felt much more tactical since it was entirely against Covenant and not flood, and it was everything I wanted in a Halo game.
Had I not been so far along in my H3 build already I would have dropped it and began on Reach immediately. However, in hindsight I’m glad I didn’t do that. Having a completed (or at least wearable) suit, I now have the opportunity to take all the time I want to work on a Reach build and get the most I can out of every step of the process. Studying construction methods and trying new ideas will be very important in this build too, as I want to try to improve on what I’ve done before and contribute some ideas to the community if possible.
--
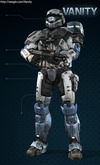
The Goal:

I’m not able to add it in Vanity but I’ll be using the UA attachment for the helmet as well. I tried to take a realistic approach to this and plan out the armor as it would be most functional. Since I’m right-handed, my left arm will be forward on any weapon I used, hence the buckler and larger/more protective shoulder on the left side. The right just got my favorite shoulder attachment.
A Spartan with a loadout such as this would most likely be on the front lines, as opposed to a sniper or designated marksman. I’ll be building an MA-37 to go along with this build, as it’s by far my favorite AR from the series. The M6G I have for the MkVI build will be used, and eventually I’ll construct an M-392 DMR as well.
This will be another pepakura build, and I’m using files from a variety of sources. Some are freely available from the 405th 4shared database, or from members via their own posting pages. However, I did make a donation to Dawn Under Heaven and will be using some of their pepakura files as well. As a note, if I say I’ve re-scaled the model, it in no way implies that it’s my model or that any of the geometry has been changed. I’ve merely imported it into Blender and changed the X/Y/Z values to make it a better fit for my body.
Each piece will receive one exterior and one interior coat of resin, then an interior slush coat of thin (50/50) rondo, then 2-3 layers of fiberglass cloth. As I’m using the HD pep files, the slush coat will be helpful for setting up a smooth surface over which to apply the cloth. I’ve had lots of issues in the past with air bubbles and lack of adhesion to the paper when trying to apply fiberglass over detailed pieces and don’t want to repeat that. I’ll be taking my time and working in small sections to be sure each one is free of rough edges that’ll catch clothing later on. I also add a small amount of food coloring to the second/third layers of fiberglass resin so I can tell it apart from the first coat and be sure to not miss any spots. The last layer on the inside is brush-on plasti-dip, which helps to tame any rough fiberglass edges as well as give it a nicely-textured matte finish.
--
The Parts:
Helmet
Source: 4shared Reach Database
Filename: Mk.V (Reach Helm unfolded by BMcClain).pdo

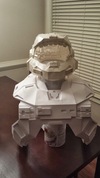
I liked Rundown’s helmet because the model itself was very smooth, which should save a lot of time in the bondo steps. I wasn’t looking forward to pepping the domed sections over each ear, so having a nice flat surface here instead gives me the freedom to make them however I would like. Also, I pepped this helmet months ago, so being done with that stage weighs heavily in its favor.
The UA attachment is from the Dawn file, even though I find some details lacking from the reference shots. It’s fairly simple to build and as long as it scales correctly to the helmet I have now, will be easy to add said details.
Torso
Source: L3X’s file thread
Filename: Reach Male Torso V4 by L3X (Main Torso by L3X BLU3RIV3R - mkshane81 unfold)


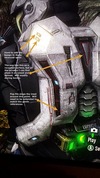
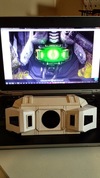
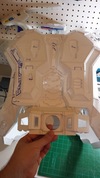
I ended up choosing this one over the torso from Dawn Under Heaven, since it seemed to recreate almost exactly the proper proportion and shape of the Mk V B torso (as shown in the second picture). I will be pulling in the lower back piece of the Dawn file, though, as it has a section of the armor that I haven’t seen another pattern for yet.
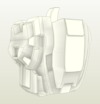
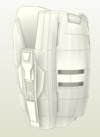
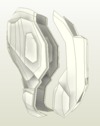
Shoulders
Source: Dawn Under Heaven
Right Attachment: UA-MultiThreat
File: UA-Multi threat (Ruze789 FJPARA Shoulder).pdo
Left Attachment: Commando
File: Dawn Under Heaven

This is by far the most detailed and accurate shoulder I’ve been able to find. Despite the need to re-scale the model since it’s a bit awkward on someone my size (the right height and depth leave it about ⅔ the width it needs to be to be comfortable), I think the extra effort will be well worth it in the end.

The UA-MultiThreat permutation from Ruze789 was simple and fun to build without losing detail from the screenshots I have. The little bits that are missing will be simple enough to add.
For the commando, I had originally planned to use the BMcClain unfold file from the Reach Database also, but after getting about halfway through building it I found it to be a little complicated for my taste. After looking through a bunch more reference screenshots, I found that the Dawn file could be modified after building to have the required details, as well as being much simpler to put together. It also had the benefit of a piece built into the back that will cover what protrudes beyond the actual shoulder.
Forearms
Source: Dawn Under Heaven

The only piece I’ve found lacking on the Dawn forearms are the three faces that lay side-by-side in the indentation on the side. Other than that, the model looks great, apart from the scaling, where it suffers the same issues as seen with the shoulders. I’ve already imported them into Blender, tweaked the scale a bit and re-unfolded the pieces. Fit remains to be seen but judging by dimensions, they should be good.
Cod
Source: TBD
I need to do more research on the codpiece before making a final decision. The reference shots I have are showing several variations, so I’ll need to narrow down what variant I should have, then find the most suitable file for that.
Thighs
Source: ForgedReclaimer’s deviantArt page
Filename:

I was torn between the Dawn and ForgedReclaimer’s thighs, as the files are very similar. Both have strong points, but in the end I decided to use ForgedReclaimer’s thigh. It’s an extremely accurate file, and hopefully won’t have the scaling issues that I keep running into with the Dawn pieces.
Shins
Source: Dawn Under Heaven

I’m excited about the Dawn shins being a two-part build. My MkVI shins refuse to go on or off easily and have scraped my foot to the point of bleeding on several occasions. While I realize I could split any file into two pieces, this one is built to do so and already has a lip/edge in the correct place to fit the two pieces together. There’s only one detail bit I’ve found so far that’s missing, which I’ll easily add during the pep process.
Boots
Source: Dawn Under Heaven

These boots are very detailed, but also one solid piece. They’ll have to be broken down somehow to be flexible, as well as soled to accommodate movement. This will be one of the larger challenges I’ve identified so far, but I have a few ideas on how to get past it.
--
I know that was a pretty long intro, but I've been doing my best to plan out most phases of this build before beginning so I can have the best result possible. The next couple posts will be reserved for progress and completed pieces, then the actual build log will start.
I hope you'll all enjoy this build as much as I will!
So, now that the MkVI is (nearly) complete, I have a confession to make. Halo 3, I’ve been cheating on you! Reach is my one true love, and we have a connection you just could never understand!
As much as I love Halo 3 and always will, Reach became my favorite game from the very moment I loaded it up. Not just because the campaign began on my 566th birthday, but the game and gameplay overall. Combat felt more fluid, the world was beautiful, and I was really part of a team. Add to it the DMR (my new favorite weapon) and that all the combat felt much more tactical since it was entirely against Covenant and not flood, and it was everything I wanted in a Halo game.
Had I not been so far along in my H3 build already I would have dropped it and began on Reach immediately. However, in hindsight I’m glad I didn’t do that. Having a completed (or at least wearable) suit, I now have the opportunity to take all the time I want to work on a Reach build and get the most I can out of every step of the process. Studying construction methods and trying new ideas will be very important in this build too, as I want to try to improve on what I’ve done before and contribute some ideas to the community if possible.
--
The Goal:
I’m not able to add it in Vanity but I’ll be using the UA attachment for the helmet as well. I tried to take a realistic approach to this and plan out the armor as it would be most functional. Since I’m right-handed, my left arm will be forward on any weapon I used, hence the buckler and larger/more protective shoulder on the left side. The right just got my favorite shoulder attachment.
A Spartan with a loadout such as this would most likely be on the front lines, as opposed to a sniper or designated marksman. I’ll be building an MA-37 to go along with this build, as it’s by far my favorite AR from the series. The M6G I have for the MkVI build will be used, and eventually I’ll construct an M-392 DMR as well.
This will be another pepakura build, and I’m using files from a variety of sources. Some are freely available from the 405th 4shared database, or from members via their own posting pages. However, I did make a donation to Dawn Under Heaven and will be using some of their pepakura files as well. As a note, if I say I’ve re-scaled the model, it in no way implies that it’s my model or that any of the geometry has been changed. I’ve merely imported it into Blender and changed the X/Y/Z values to make it a better fit for my body.
Each piece will receive one exterior and one interior coat of resin, then an interior slush coat of thin (50/50) rondo, then 2-3 layers of fiberglass cloth. As I’m using the HD pep files, the slush coat will be helpful for setting up a smooth surface over which to apply the cloth. I’ve had lots of issues in the past with air bubbles and lack of adhesion to the paper when trying to apply fiberglass over detailed pieces and don’t want to repeat that. I’ll be taking my time and working in small sections to be sure each one is free of rough edges that’ll catch clothing later on. I also add a small amount of food coloring to the second/third layers of fiberglass resin so I can tell it apart from the first coat and be sure to not miss any spots. The last layer on the inside is brush-on plasti-dip, which helps to tame any rough fiberglass edges as well as give it a nicely-textured matte finish.
--
The Parts:
Helmet
Source: 4shared Reach Database
Filename: Mk.V (Reach Helm unfolded by BMcClain).pdo
I liked Rundown’s helmet because the model itself was very smooth, which should save a lot of time in the bondo steps. I wasn’t looking forward to pepping the domed sections over each ear, so having a nice flat surface here instead gives me the freedom to make them however I would like. Also, I pepped this helmet months ago, so being done with that stage weighs heavily in its favor.
The UA attachment is from the Dawn file, even though I find some details lacking from the reference shots. It’s fairly simple to build and as long as it scales correctly to the helmet I have now, will be easy to add said details.
Torso
Source: L3X’s file thread
Filename: Reach Male Torso V4 by L3X (Main Torso by L3X BLU3RIV3R - mkshane81 unfold)
I ended up choosing this one over the torso from Dawn Under Heaven, since it seemed to recreate almost exactly the proper proportion and shape of the Mk V B torso (as shown in the second picture). I will be pulling in the lower back piece of the Dawn file, though, as it has a section of the armor that I haven’t seen another pattern for yet.
Shoulders
Source: Dawn Under Heaven
Right Attachment: UA-MultiThreat
File: UA-Multi threat (Ruze789 FJPARA Shoulder).pdo
Left Attachment: Commando
File: Dawn Under Heaven
This is by far the most detailed and accurate shoulder I’ve been able to find. Despite the need to re-scale the model since it’s a bit awkward on someone my size (the right height and depth leave it about ⅔ the width it needs to be to be comfortable), I think the extra effort will be well worth it in the end.
The UA-MultiThreat permutation from Ruze789 was simple and fun to build without losing detail from the screenshots I have. The little bits that are missing will be simple enough to add.
For the commando, I had originally planned to use the BMcClain unfold file from the Reach Database also, but after getting about halfway through building it I found it to be a little complicated for my taste. After looking through a bunch more reference screenshots, I found that the Dawn file could be modified after building to have the required details, as well as being much simpler to put together. It also had the benefit of a piece built into the back that will cover what protrudes beyond the actual shoulder.
Forearms
Source: Dawn Under Heaven
The only piece I’ve found lacking on the Dawn forearms are the three faces that lay side-by-side in the indentation on the side. Other than that, the model looks great, apart from the scaling, where it suffers the same issues as seen with the shoulders. I’ve already imported them into Blender, tweaked the scale a bit and re-unfolded the pieces. Fit remains to be seen but judging by dimensions, they should be good.
Cod
Source: TBD
I need to do more research on the codpiece before making a final decision. The reference shots I have are showing several variations, so I’ll need to narrow down what variant I should have, then find the most suitable file for that.
Thighs
Source: ForgedReclaimer’s deviantArt page
Filename:
I was torn between the Dawn and ForgedReclaimer’s thighs, as the files are very similar. Both have strong points, but in the end I decided to use ForgedReclaimer’s thigh. It’s an extremely accurate file, and hopefully won’t have the scaling issues that I keep running into with the Dawn pieces.
Shins
Source: Dawn Under Heaven
I’m excited about the Dawn shins being a two-part build. My MkVI shins refuse to go on or off easily and have scraped my foot to the point of bleeding on several occasions. While I realize I could split any file into two pieces, this one is built to do so and already has a lip/edge in the correct place to fit the two pieces together. There’s only one detail bit I’ve found so far that’s missing, which I’ll easily add during the pep process.
Boots
Source: Dawn Under Heaven
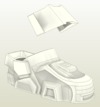
These boots are very detailed, but also one solid piece. They’ll have to be broken down somehow to be flexible, as well as soled to accommodate movement. This will be one of the larger challenges I’ve identified so far, but I have a few ideas on how to get past it.
--
I know that was a pretty long intro, but I've been doing my best to plan out most phases of this build before beginning so I can have the best result possible. The next couple posts will be reserved for progress and completed pieces, then the actual build log will start.
I hope you'll all enjoy this build as much as I will!
Attachments
-
 Vanity_Reach_v3.png545.6 KB · Views: 365
 -
 9-12-2013+2-17-15+PM+%25281%2529.png62.4 KB · Views: 327
 -
 2013-09-06_0031.png103.6 KB · Views: 319
 -
 torso_compare.png781.2 KB · Views: 333
 -
 2013-09-26_2312.png113.2 KB · Views: 297
 -
 shoulder_permutations.png130.4 KB · Views: 288
 -
 2013-09-26_2359.png104.2 KB · Views: 365
 -
 2013-09-06_0032.png91.5 KB · Views: 304
 -
 9-12-2013+2-45-02+PM.png65 KB · Views: 307
 -
 9-12-2013+2-43-37+PM.png77.2 KB · Views: 316


