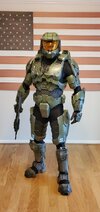
GIANT UPDATE ALERT
I glued and put the first coat of primer on the torso sections. I was doing the bondo, but then ran out and thought that spot putty would work. Spoiler alert, it did not.
Next, I glued, epoxied, bondoed, sanded, primed, sanded, primed sanded, sanded, sanded, primed, and sanded the forearm pieces. After all of that, there's still more to do since I had a broken nozzle at the time on my printer and did not know.
After that I did the same pricess on the bicep pieces. They look like this:
And of course, still more to do on those.
Next up the calf pieces. Those have been an adventure. This is when the bad nozzle truly presented itself causing me to have 3 failed prints on one leg. (Why I didnt check the nozzle earlier I don't know)
These have more work to be done on them still to work out all of the print lines.
Another dilema that I have with the leg pieces is that this part really gets in the way being rigid plastic instead of EVA or rubber.
I'm trying to find a good way to deal with it. I'm hoping to cut them out without reprinting the entire piece. Then I just have to figure out what to build them out of. I may do neoprene since it's pretty easy to work with and is pretty durable.
Now off the the shins. I really had to do some scaling work on this one. I am 6' 4" with a size 15 foot. I printed the origional file to test and it's TINY. (Yes I know that I should have rescaled before anything, but this is why it's my first project) So, I resized the piece to fit on my leg and added a cutout on the back of the piece. It looks a little somthing like this.
Here's a shot of when I taped it together for a test fit:
I started working on the boots yesterday. However, I have run into a small problem. The problem is that I have skis for feet. Here's what the files look like when I put them over my boot:
It's comically small. I compared it to a refrence photo and it just looks hilarious. These are not the final boots, but they are the same size and shape, so they work for test fitting.
A few miscellaneous images and fun things:
I got a giant pelican case for all of my armor
I've also used an absolute crap load of filament. This is half of the boxes.
I also began experimenting with finishes. I came across somthing called rapter liner. It's a truck bed liner, but they sell a tintable version that can be used for whatever you want, so I bought a kit of it and started experimenting.
The mixing instructions say to use 10% of their pigment, but after some research, I found that any pure pigment compound works. I went to my local auto paint store and bought the closest color that I could find to the MK6.
Here's my first try on a missscaled bicep piece.
I think the texture and color look fantastic. It's super close to the game and reference pictures that I have.
While I do love this finish there is something that I would LOVE to create. I want to try and see how well I can do the green color, but with an iridescent quality. In the books it constantly said iridescent green, and I would assume that from the heat reflective coating that they put on the armor. I'm working with my paint guy and a chemist that I know to see what I can do.
With all that being said, I have some questions that I would love for people who have done this before to answer.
1) What's the best way to pad the inside of the armor? Is it EVA foam? Upholstery foam? Some pictures of how you did your torso armor piece would be great.
2) How did you rig up your harness to attach everything to?
3) What's the best way to accomplish what I am trying to do in my calf armor section?
Thanks guys!
Edit:
I also am going to try and do better and more frequent updates.


