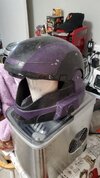
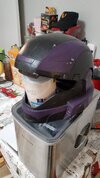
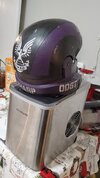
1st Build Halo 3 odst 3d print build.

This is my kinda jerry rigging! And it looks like it glued up nice. Can't wait to start working on my ODST helmet again.
Well I had a previously failed glue job that I just had to melt the plastic so the joint would close up and gifted that to a friend. They where stoked and I didn't have to deal with the issues I created for myself with it. They even gifted me the filiment to make another so win win!
 
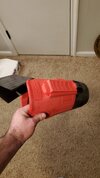
So got the forearm printed out, but gollie, has anybody used these from galactic armory?
The thing got some blood drawer right in the elbow pit, with it on have the mobility of a barbie doll haha. Can't even reach up to the helmet with it in, definitely gonna be sawing and dremeling to make some more comfort.

I hope constructive criticism is ok for the folks that make the stl's cause my goodness if I scaled it down I couldn't get my hand in the thing! So that option isn't on the table, just slicing the blood sucker 9000 off and regaining my mobility.

Put some padding on before I got too deep into the finishing process and suddenly am hit with fitting issues.
 

Attachments

  • 20240108_024219.jpg
    20240108_024219.jpg
    947.7 KB · Views: 99
Great build so far! I just recently acquired a cricut, they’re so much fun! Any tips for transferring to a curved surface?

Although I love gloss as much as the next guy, you can’t go wrong with matte or satin. Matte will always look good in any environment, where as gloss can sometimes appear so shiny that you can’t properly make out the weathering or details.
 
Great build so far! I just recently acquired a cricut, they’re so much fun! Any tips for transferring to a curved surface?

Although I love gloss as much as the next guy, you can’t go wrong with matte or satin. Matte will always look good in any environment, where as gloss can sometimes appear so shiny that you can’t properly make out the weathering or detail.
Slow and steady! And if you have an extra pair of hands available to hold stuff still even better!
Some time the transfer take is a bit too grubby, you might have to hold down a corner to make sure it sticks.

Any tips with weathering?
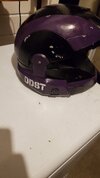
I was trying to get that sweet sweet grime on the helmet with a oil/mineral spirits wash but after the wipe down and everything dried it looked like it was moldy and I'm trying to figure out why, maybe I'm using the wrong spirits as the ones I'm using are really cloudy and white like watered down milk, but boy does it smell like spirits so I'm not sure.
 
Tried weathering, but just looks like mold, it's on the top of the helmet, gonna try again later, also other bits are geting there!
 

Attachments

  • 20240109_203435.jpg
    20240109_203435.jpg
    1,023.2 KB · Views: 98
  • 20240109_203441.jpg
    20240109_203441.jpg
    1.3 MB · Views: 93
  • 20240109_203642.jpg
    20240109_203642.jpg
    1.2 MB · Views: 95
Last edited:
Heya Sharpfang, got any photos of your weathering so we can see how your first run went, and offer feedback?
 
Tried weathering, but just looks like mold, it's on the top of the helmet, gonna try again later, also other bits are geting there!
I think if you leave the black or brown wash on just a bit longer and dab it off with a paper towel it should look better.
 
Any tips with weathering?
I don’t do anything fancy. I use plain ol’ black acrylic paint watered down to a 50%paint 50%water mixture. I’ll spread that all over the piece making sure to get it in the crevasses and creases where dirt would naturally collect over time, and then I dab most of it off with an old rag. What’s left behind is a nice coat of what looks like grime and general dirt, being lighter on large flat areas and built-up near in the corners.

I have some pictures of my weathering in this post of my build thread:
N8TEBB's Mk 7 Build!!!!!
 
Dont know if you went and did it yet but I'd all suggest the matte or satin finish. The matte will definitely look more like like a camo finish that traps most of the light and not reflect it, but the satin has a smoother look to me. I've done both and liked how they came out. Also I'd recommend the clear coat before grime and weathering that way you can remove any weathering you dont like with little to no damage to the base paint.
 
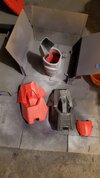
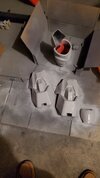
Waiting on most everything else to print haha, it's a patient hobby!
I have one larger form factor printer a cr 10 and a snappy and fast k1 but I sore of regret not going for the max when it was on the black Friday sale.
That thing is a beast! And has amazing print quality.
Ok non sponsored shill time over haha.
 
Went over with the wash again, I think I'm gonna use water for the rest rather than spirits, but it's looking dusty now!
Ahhhhh! I didn't catch that you were using spirits. Most of my acrylics are not very happy then I try and mix then in with something as harsh as spirits.
 
Ahhhhh! I didn't catch that you were using spirits. Most of my acrylics are not very happy then I try and mix then in with something as harsh as spirits.
I was told, that if it's dry spirits won't really effect it.
Future note, don't take that advice again haha.
 
For acrylics, water is generally all you need as a thinner. Spirits are more for oil paints, though I like using water soluble oil paints. They take longer to dry than acrylics so you get more control over them (but you gotta allow for dry time), and for better or worse (depending on your surface) it falls into tiny textures better.
 
For acrylics, water is generally all you need as a thinner. Spirits are more for oil paints, though I like using water soluble oil paints. They take longer to dry than acrylics so you get more control over them (but you gotta allow for dry time), and for better or worse (depending on your surface) it falls into tiny textures better.
Super appreciate the in sight! Thank you!
 

Your message may be considered spam for the following reasons:

If you wish to reply despite these issues, check the box below before replying.
Be aware that malicious compliance may result in more severe penalties.
Back
Top