- Member DIN
- S188
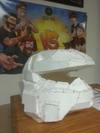
Built this during Oct. 2013 for a friend. I found using the largest size available in the pepakura designer is the best course of action when making a helmet, because you can always add a lot of padding on the inside. Used the same technique I did when I built my armor, in which I did not use Bondo on the outside and instead added an extra layer of fiberglass resin then proceeded to sand it down before painting. This method is cheaper, but upon very close look flaws can be seen. I recommend using Bondo if you're going for a very detailed look, however.

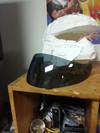
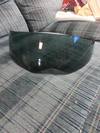
The visor I got on ebay for $30.00. Just a standard motorcycle replacement visor. I also ordered 15% darken window tint for it, but ended up not needing it as the visor became less see through when installed onto the helmet.

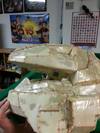
My method for a solid build (to which I thank everyone who posted tutorials on this website =D), starts with a fiberglass resin coating on the outside:

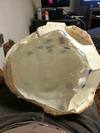
Then, fiberglass mat coated with resin on the inside:

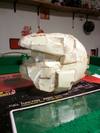
Then another fiberglass resin coat on the outside, sanded down using a Dremel with various sanding and grinding attachments (If you don't have a Dremel, it's a very good investment)

I used a Dremel to etch out the visor's shape for the helmet and attached it using a hot glue gun with a lot of glue. Then further secured it with a two-part epoxy:

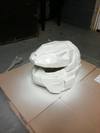
Next, added a primer coat:

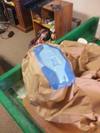
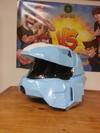
Next, added cyan....aqua?.....turquoise?.....lightish blue paint, with white secondary color:

At last in was complete. Just had to size his head and put the foam pad in after to make sure it fit him right. Best part was, he could still wear his glasses with it on:

The visor I got on ebay for $30.00. Just a standard motorcycle replacement visor. I also ordered 15% darken window tint for it, but ended up not needing it as the visor became less see through when installed onto the helmet.
My method for a solid build (to which I thank everyone who posted tutorials on this website =D), starts with a fiberglass resin coating on the outside:
Then, fiberglass mat coated with resin on the inside:
Then another fiberglass resin coat on the outside, sanded down using a Dremel with various sanding and grinding attachments (If you don't have a Dremel, it's a very good investment)
I used a Dremel to etch out the visor's shape for the helmet and attached it using a hot glue gun with a lot of glue. Then further secured it with a two-part epoxy:
Next, added a primer coat:
Next, added cyan....aqua?.....turquoise?.....lightish blue paint, with white secondary color:
At last in was complete. Just had to size his head and put the foam pad in after to make sure it fit him right. Best part was, he could still wear his glasses with it on:
Attachments
-
 Greg1_zpsb6795e24.jpg55.5 KB · Views: 248
 -
 Greg2_zps3f32789b.jpg59.7 KB · Views: 215
 -
 Greg4_zps206a4ff6.jpg73.3 KB · Views: 233
 -
 Greg5_zpsde712f34.jpg76.4 KB · Views: 239
 -
 Greg6_zpsa69211c6.jpg82.6 KB · Views: 234
 -
 Greg9_zps6a2dfdb8.jpg135.6 KB · Views: 240
 -
 Greg8_zps50caee8b.jpg45.4 KB · Views: 233
 -
 Greg10_zpsdebe1632.jpg74.2 KB · Views: 212
 -
 Greg11_zpsba4ce3d8.jpg64.5 KB · Views: 231