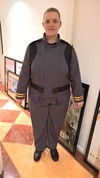
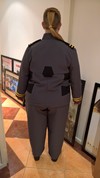
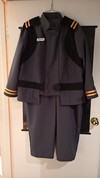
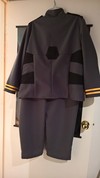
Sorry this is a bit late getting up, been busy with other commitments, real life and all that jazz. Better late than never though right?

I’ve taken photos of all the pieces against a black tablecloth so that they stand out better.
NOTE: I have a pretty good sewing machine. I worked out at times in some places it was going through at least 8-10 layers of fabric and it wasn’t even breaking a sweat (it’ll do 8 layers of heavy calico like its nothing). Cheap sewing machines, like the one I used to have, would struggle to do that so make sure you go slow through the thick sections and take it easy with your machine.
So these were the two patterns I used to make this outfit.


The first is McCalls M6361 fitted pants with waistband, zip up the front and pockets. I pretty much made this pattern up as they instructed, with the exception that I didn’t make them with pockets, and I added belt loops. Pretty much any pant pattern of a similar style could be used, I had another at home as well but this was an easier and better pattern.
The second is Butterick B5927 women’s lined semi fitted jacket in four different styles. I basically combined styles C and D. The front side and back sections were common to both, I used the sleeves from C and I used the front middle section from D as I needed that overlap look, as well as the collar from D. I think initially I added a bit extra to the front middle centre width, then took off an inch. I added about four inches to the total length. Either way in the end I got about what I wanted

For both pants and jacket I used panama mechanic stretch fabric, and for the lining in the jacket I used very cheap cotton, though in hindsight I would have probably used a stretch fabric as I ran into a couple of issues with the non stretch cotton, though it will also mean that the jacket can’t pull out of shape anywhere. The jacket is lined in both the torso and the sleeves. I traced my pattern pieces out onto greaseproof/ tracing paper because I knew I’d be doing a lot of adjusting and didn’t want to do that on the original pattern.
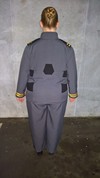
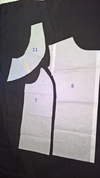
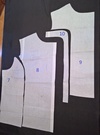
To start with I made the pattern up as it was for the cotton lining for the torso only to get the size and fit correct. I adjusted it where it was needed and noted this on my pattern. *HINDSIGHT NOTE* should have left a little bit more width across the back of the shoulders than what I did! From there I put that aside, then laid out the back pattern piece and started looking at reference pictures. I drew the general idea of what I wanted onto the back of the pattern piece, then using these lines traced out and made a back top piece (piece 1 in the photo), lower back middle piece (3) and lower back side piece (2) to get the right look for the main grey jacket. Added seam allowances of about 1.5cm before cutting out the pattern. Then I used these new pieces, my earlier planning and my reference pics to make pattern pieces for the black contrast sections (Upper contrast piece 4; Lower belt style contrast 5).

Cut out the base pieces in the grey panama fabric, and cut out the black contrast sections in black panama fabric: piece 1- 1x grey fabric, pieces 2 and 3- 2x grey fabric, piece 4- 2x black fabric, piece 5- 4x black fabric. The upper side contrast sections(4) were sewn onto the lower side pieces (2) first. Then each pair of two belt style contrast pieces (5) were sewn along the long edges right sides together then turned back out. These were stay stitched in the right place to the edge of lower side back piece (2) then pinned to keep them out of my way. Sewed them all together and with a bit of fiddling tada, success! Then I traced the shape I wanted for the middle back black section (6), added 1cm seam allowance, cut it out, ironed the seam allowance over (NOTE this stuff will melt if your iron is too hot, make sure it is turned down to a polyester setting), then carefully sewed that to the back.

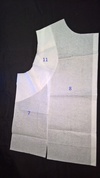
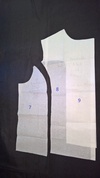
Then I worked on making my extra front pieces. First I cut out the front side (7) and middle (8) pieces in grey fabric (cut 2 of each) and sewed them together as the pattern said. Using the front middle pattern piece (8) I looked at my reference pictures and traced the shape I wanted for that extra overlapping section on the front of the uniforms (kind of creates a tabard look) to create pattern piece 9, then made a facing piece for 9 (10). Both got an added seam allowance of 1.5cm before cutting the pattern in grey fabric (x2 of each 9 and 10). These I sewed right sides together, cut notches where needed around the curves to make them side flat, turned them so they were right way out, ironed flat then sewed these pieces (9 and 10) to the front middle piece (8) about 5mm in from the edge to make it look like it’s an extra layer.


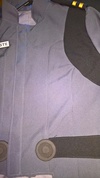
I took my front middle (8) and side pattern pieces (9) and pinned them together, then looking at my reference pics worked out how to make the front black contrast piece, then traced that, added seam allowance, cut the pattern piece out (11). Cut 2x piece 11 out of black fabric, pinned the edges around the shoulder and arm into place onto the grey fabric pieces (pieces 7, 8, 9 and 10), carefully folded the seam allowance under and pinned into place along the long curved edge. Then I pinned the front sections to the back sections and very carefully put it on (since it somewhat resembled a pin hedgehog) to make sure everything was sitting how I wanted and that the front and back black contrast sections lined up under the arm. They were a little out so I unpinned, realigned and repinned until everything was right. Then sewed the front contrast piece (11) to the front pieces.


Front and back sections were sewn together across the shoulder and down each side making sure to line up the contrast sections, then the lining and fabric were sewn together down the front edge and along the bottom edge, obviously right sides together then trim, cut notches etc where needed before turning right side out and ironing flat. As you can see the front middle section is shorter than the main length, so this was sewn this way at this point, then the extra cut off, notches made etc in order to turn it right way out and have it sit flat. It is also at this point that I figured out exactly what width I needed each front piece so it sits in about the right position with the right amount of overlap. Remember the contrast piece number 5 which I referred to as the belt style contrast? This appears to be something like a belt in the game except it is attached at the back to the jacket and so is part of it. I didn’t want the hassle of that getting in the way so I stitched it flat into place along each edge, trimming then folding over the front ends so they tucked slightly under the extra layer pieces (9 and 10).
Next was the collar and epaulettes. The collar piece had to be adjusted from the original pattern so that it had the gap in the centre, instead of the large overlap that jacket style D has. Using the original centre back and centre front lines on the pattern I just pinned it back to what I guessed would be around the right length, and fluked getting it right

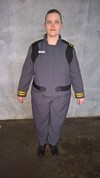
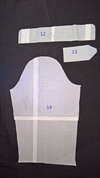
Cut 2x grey fabric plus 1x fairly heavy weight interfacing for the collar (12). Sewed them together right sides together, trimmed then cut notches and turned right way out before ironing then sewing a few mm in from the edge to make the edge sit nicer. I then attached it to the jacket torso (fabric first, then folded the edge of the lining back, pinned that to the inside collar then sewed) after cutting a good 1.5cm off the bottom of the collar because it initially sat way too high. The epaulettes (13) I just made up from looking at reference pics from both Halo 3 and of officers uniforms and adding a seam allowance. *HINDSIGHT NOTE* I cut these triangular at the ends (if you look at the very first picture I posted they can be seen sticking up) before realising that in Halo they seem to be squared off and right up to the edge of the collar, as opposed to looking like a sleeve over it that’s buttoned/ studded into place. I purposely made these too long. Cut x4 out of fabric, sew right sides together, cut notches and trim before turning right side out, ironing flat then pinned and stay stitched into place on the shoulder at the sleeve.

Finally the sleeves (14) were done. Cut x2 fabric plus x2 lining, and because I was feeling really slack I sewed them into the jacket together. Roll up sleeve hem and sew. Cut off excess epaulette fabric. Main jacket done!
The sleeve stripes are satin bias binding in gold. I thought this looked nicer than the satin ribbon and was a better colour than cotton bias binding (which I have used to sew stripe detailing all over one of my Jedi robes before. Don’t ask, I am obviously insane!). This was a simple case of carefully sewing the bias binding along both edges very close to the edge. I used my tape measure to keep them even to the edges (laid the tape measure flat around the sleeve, laid the bias against this, sew first edge, take tape measure away then sew second edge down), then did the same thing again to get the even distance between the two stripes. I didn’t pin these but did it freely. The same bias binding is used on the epaulettes. I cut two rectangles of black fabric and one the same size of interfacing for each epaulette, sewed them together, added the bias binding stripes using my tape measure to give that even gap again, finished the edges then slid them onto the grey epaulette pieces. Pinned them flat then did about 1cm length of zigzag stitch back and forth a few times at the centre near the neck going through both layers of epaulette, jacket fabric and jacket lining (or you could just do a few hand stitches, I hate hand stitching).

Finally the zip. This is a plastic jacket zip, and is fitted much the same way as you fit pant/ jean zips. I did however first pin the zip in place to both sides then tried it on and made sure it all fitted right (not too tight, not too loose) before I sewed it down. Conveniently the stitching for the zip on the outer overlap piece lined up perfectly with the centre front

Added a press stud to the top of the zip to hold it flat (I’m going to add a second to make the front top and collar sit more flat) and done!

The round detail things that look a bit like oversized buttons on the front were run up really quickly from 3mm and 6mm black craft foam and superglue and had some safety pins glued to the back so they are removable for washing. They will get replaced later with something a bit better. The name badge is just a printed sticker, stuck to some foam with a safety pin glued to the back

again, I’ll make something better later.
Hope this helps some people. Any more questions or need clarification on something, feel free to ask.
 As a result I have gone back to my costume making roots and pulled out my sewing machine.
 still a lot to go, but it at least looks like a jacket now! I also have pants made to match but they are kinda boring looking coz they are just grey pants
  This has never been designed to be 100% accurate, but in my typical fashion I made it look more accurate as I went lol. It started from a very simple lined, semi fitted jacket pattern I bought and has evolved a great deal from that, very much making it up as I go along coz thats the way I tend to work
  More pics will come tomorrow when I finish it.


