(Halo 4 armor build progress) Newb question about foam thickness

SomeDumbGamer

New Member
Edit: I have figured out the original question to this thread but since people seemed interest in the progress of my build I decided to keep updating the thread with progress updates.

Original post:
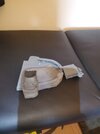
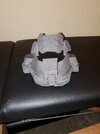
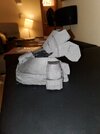
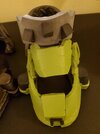
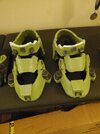
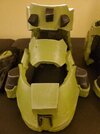
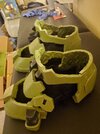
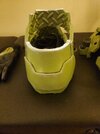
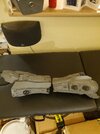
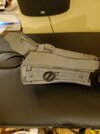
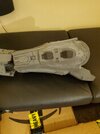
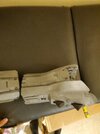
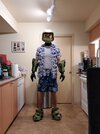
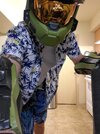
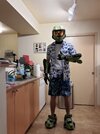
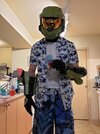
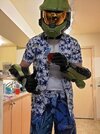
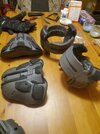
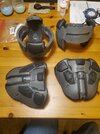
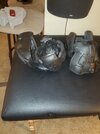
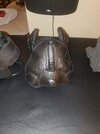
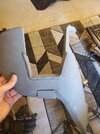
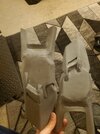
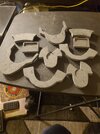
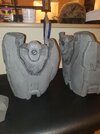
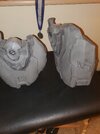
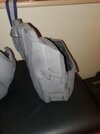
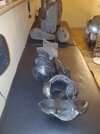
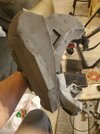
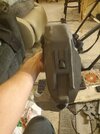
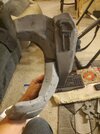
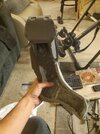
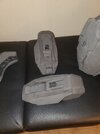
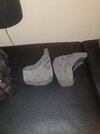
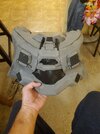
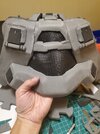
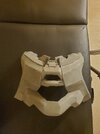
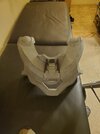
I'm doing my first EVA foam build and decided to jump into the deep end with a master chief armor build. I know that is a big first project but I figured what the heck. I'm a disabled OIF Vet that gets full disability and really only goes to the gym and plays video games so I have plenty of time to work on it. I'm also trying to get it done by Halloween but don't expect to finish by then. I will start with the gloves, boots, shins and forearms, and I bought a decent helmet, and if I don't finish the whole thing by Halloween I will just wear all that, a pair of board shorts, Hawaiian shirt, and say I'm Master Chief on vacation. I have done 2 non halo "costumes" in the past, first being a Payday outfit that was just premade stuff put together into a full outfit and the second being God of War Kratos from the newer games which was about half premade stuff and half stuff made by me with materials from Hobby Lobby.

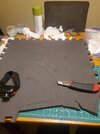
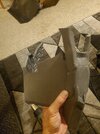
I have so many questions as I have never worked with foam before, or used PDOs and have opened pepakura less than a dozen times to just get my feet wet. But to start out how do you determine what thickness foam to use for each pattern and/or part? I figured that the PDO files would have that in it but not really. I figured out that I could used the measure tool to see how thick the pattern is in the viewer but between scaling and the pattern themselves they seem to be weird thicknesses and even in the same piece can vary from one side to the other. Once piece might be 12.77 mm on one end and taper to 9.21 at the other.

So....is there a decent way of choosing what thickness of foam to use for each part? Or do I just need to wing it? I bought some 1mm, 2mm, and 5mm craft EVA foam and after I learned about the puzzle floor matts for thicker pieces I'm getting some 1/2inch, 3/4 inch and 1 inch of those today along with some paint and misc supplies. Any other advice is also appreciated. Thanks!
 
Last edited:
Congrats on starting the first build, I'm sure it'll turn out great!

To answer your question, it depends, the thickness is entirely up to you. For structural parts such as main sections, I usually use 6-10mm foam, as its strong but not to stiff, which is nice to work with. In terms of details, anything below 5mm is good, but again, up to you!

One month is an incredibly tight timeframe, but your "Master Chief on vacation" idea is brilliant lol. Good luck with the build, and post some pictures once its done!
 
I would recommend checking out The Foam Guide:

And then take some time to read through some Tutorials found in our Tutorial Index:
 
Lots of people will choose different thicknesses for different reasons. For myself, I just use EVA floor mats from the hardware store because they're fairly cheap and they're easy to get my hands on. My chief armour is entirely made from 1/2" EVA foam floor mats.

You actually remind me of my first build. I went straight into the deep end by making an entire chief suit right away when I first started cosplaying. If you want, here's the build thread for my project: 1st Build - MJOLNIR MK VI Master Chief Armour (Halo 3)
 
Thanks for the replies, info, and encouragement. I have checked out the provided links as well as other tutorial threads and an absurdly large amount of YouTube videos. I'm starting to get the hang of things and have most of the build process figured out, I now just need repetitions and time to increase my skill, though I'm sure I'll never stop learning and picking up tips and tricks. So any more are always welcome.

I'll probably do some sort of new builder guide/tips post at some point to help out with little peices of advice that most guides overlook but here are a couple things I learned.

I MASSIVELY underestimated the time and effort involved in building the armor. When I started I estimated a month to do the whole build. I am now revising that to at least 3-5 months. So probably a good rule of thumb is at least 3x what you expect for build time starting out.

As soon as you say your building armor and start producing recognizable peices expect all your friends (assuming you have any, we are nerds) to instantly ask you to make things for them with zero appreciation of the time, effort and cost involved. I already have been asked for a planetside helmet and 40k mechanicus tech priest outfit.

Practice first if you can. I had no idea how vital making vertical cuts are. I cut out all the peices for the boots first only to go fit them (also dry fit first before gluing) only to discover the they didn't fit because my cuts were slanted. Had to throw everything out and start over. Also angled edge cuts are a pain but with practice get easier. Figure out how plastidip actually applies as well at the paint your using and then practice on peices; seal, coat, paint, detailing, weathering and battle damage.

Anyways I current have the gloves and boots pretty much done. The forearms are build and just need to be coated and painted. My deadline for completion (wearable) is Saturday night so I'm positive I won't get the shins done in time which is a shame. But I'll make it work.

Here are some progress photos. And I will post the full costume when done.
 

Attachments

  • 20231020_135604.jpg
    20231020_135604.jpg
    1,016.1 KB · Views: 102
  • 20231020_232835.jpg
    20231020_232835.jpg
    1.1 MB · Views: 107
  • 20231020_232856.jpg
    20231020_232856.jpg
    1.4 MB · Views: 101
  • 20231023_230441.jpg
    20231023_230441.jpg
    1.7 MB · Views: 98
  • 20231023_230504.jpg
    20231023_230504.jpg
    1.6 MB · Views: 105
  • 20231024_215736.jpg
    20231024_215736.jpg
    1.8 MB · Views: 111
  • 20231024_215743.jpg
    20231024_215743.jpg
    1.8 MB · Views: 106
  • 20231024_215753.jpg
    20231024_215753.jpg
    1.4 MB · Views: 104
  • 20231024_215830.jpg
    20231024_215830.jpg
    2 MB · Views: 94
  • 20231026_213323.jpg
    20231026_213323.jpg
    1.7 MB · Views: 111
  • 20231026_213328.jpg
    20231026_213328.jpg
    1.7 MB · Views: 90
  • 20231026_213332.jpg
    20231026_213332.jpg
    1.7 MB · Views: 100
  • 20231026_213335.jpg
    20231026_213335.jpg
    1.6 MB · Views: 96
  • 20231026_213339.jpg
    20231026_213339.jpg
    1.7 MB · Views: 102
your friends instantly ask you to make things for them with zero appreciation of the time
SO TRUEEEE, especially with 3D printing.
Usually, if they want something foam I hit em with "you already have all the tools you need, you can make it yourself!" And then they realize how big of an ask it is haha

Your progress looks great! Excellent work so far.
 
Thanks for the replies, info, and encouragement. I have checked out the provided links as well as other tutorial threads and an absurdly large amount of YouTube videos. I'm starting to get the hang of things and have most of the build process figured out, I now just need repetitions and time to increase my skill, though I'm sure I'll never stop learning and picking up tips and tricks. So any more are always welcome.

I'll probably do some sort of new builder guide/tips post at some point to help out with little peices of advice that most guides overlook but here are a couple things I learned.

I MASSIVELY underestimated the time and effort involved in building the armor. When I started I estimated a month to do the whole build. I am now revising that to at least 3-5 months. So probably a good rule of thumb is at least 3x what you expect for build time starting out.

As soon as you say your building armor and start producing recognizable peices expect all your friends (assuming you have any, we are nerds) to instantly ask you to make things for them with zero appreciation of the time, effort and cost involved. I already have been asked for a planetside helmet and 40k mechanicus tech priest outfit.

Practice first if you can. I had no idea how vital making vertical cuts are. I cut out all the peices for the boots first only to go fit them (also dry fit first before gluing) only to discover the they didn't fit because my cuts were slanted. Had to throw everything out and start over. Also angled edge cuts are a pain but with practice get easier. Figure out how plastidip actually applies as well at the paint your using and then practice on peices; seal, coat, paint, detailing, weathering and battle damage.

Anyways I current have the gloves and boots pretty much done. The forearms are build and just need to be coated and painted. My deadline for completion (wearable) is Saturday night so I'm positive I won't get the shins done in time which is a shame. But I'll make it work.

Here are some progress photos. And I will post the full costume when done.
Wow! Your first pieces are really good! That’s a lot cleaner than my first, keep up the great work!

Estimating time is always the worst part lol, cuz unless you’ve done it before you have no benchmark at all XD! 3-5 months is a good goal, but please for the love of god take your time with it! What’s an extra month when the suit will look so much better. Anyway, good luck with the rest of the build!
 
Again thanks for the words of encouragement. Finished the forearms but didn't get to the shins which is disappointing since I think it would really help pull the look together. With the rushed time-frame of building these parts (probably over a hundred hours over 2 weeks, barely ate or slept) I'm not completely happy with the peices. I'll probably redo the boots or at least go back and really modify them. They feel off and aren't the most comfortable and secure to walk in. I'm doing a pub crawl tonight from 5pm to 8pm and then off to a bar until 2 am for a costume contest, so here's hoping that they hold up.

Oh and another thing I learned with this build is that girls ARE impressed but more in the "oh wow that's neat, you must have alot of free time" and less in the "omg your so cool can I be your girlfriend" lol.

Here's pics of the finished costume for tonight.
 

Attachments

  • 20231028_154206.jpg
    20231028_154206.jpg
    634 KB · Views: 103
  • 20231028_154230.jpg
    20231028_154230.jpg
    799.2 KB · Views: 103
  • 20231028_154240.jpg
    20231028_154240.jpg
    721.3 KB · Views: 100
  • 20231028_155048.jpg
    20231028_155048.jpg
    815.5 KB · Views: 104
  • 20231028_155120.jpg
    20231028_155120.jpg
    931.3 KB · Views: 120
I know this thread is dead but since I am the OP I figured it is appropriate to necro it to post update.

Well after my marathon build last year I was honestly burnt out and needed a break. Plus I got a girlfriend and other life stuff started sucking up time. But I began working on the suit again here and there and recently have been putting in alot of time and making steady progress. I almost have everything built except the butt peice, cod peice and half of the chest peice (I didn't size it right and made a complete one before realizing it was probably too small smh). I also need to modify the shin peices to fit my knobby feet through and I need to plastic dip and paint most of the peices still, but it's getting there. Progress photos incoming....
 
20240612_150442.jpg
 

Attachments

  • 20240612_150457.jpg
    20240612_150457.jpg
    1.8 MB · Views: 17
  • 20240612_150509.jpg
    20240612_150509.jpg
    1.7 MB · Views: 25
  • 20240612_195236.jpg
    20240612_195236.jpg
    1.8 MB · Views: 21
  • 20240612_195250.jpg
    20240612_195250.jpg
    1.5 MB · Views: 15
  • 20240612_195242.jpg
    20240612_195242.jpg
    1.5 MB · Views: 17
  • 20240707_152107.jpg
    20240707_152107.jpg
    1.6 MB · Views: 18
  • 20240707_152111.jpg
    20240707_152111.jpg
    1.8 MB · Views: 17
Thigh peices, still need to be sealed and painted but I currently have them strapped
20240619_153448.jpg
 

Attachments

  • 20240619_153514.jpg
    20240619_153514.jpg
    2 MB · Views: 24
  • 20240619_153543.jpg
    20240619_153543.jpg
    2.3 MB · Views: 20
  • 20240620_111758.jpg
    20240620_111758.jpg
    1.5 MB · Views: 20
  • 20240620_111835.jpg
    20240620_111835.jpg
    1.9 MB · Views: 15
  • 20240620_111911.jpg
    20240620_111911.jpg
    2.2 MB · Views: 20
  • 20240620_112046.jpg
    20240620_112046.jpg
    2 MB · Views: 21
More
 

Attachments

  • 20240707_152208.jpg
    20240707_152208.jpg
    1.5 MB · Views: 19
  • 20240707_152214.jpg
    20240707_152214.jpg
    1.3 MB · Views: 18
  • 20240707_152219.jpg
    20240707_152219.jpg
    1 MB · Views: 16
  • 20240707_152250.jpg
    20240707_152250.jpg
    1.6 MB · Views: 19
  • 20240719_142512.jpg
    20240719_142512.jpg
    2.4 MB · Views: 20
Back of chest peice, sized too small so it will either be one I used for when I don't wear a tech suit or I will turn it into the chest peice for my girlfriends cortana spartan build I'm planning...
 

Attachments

  • 20240829_141906.jpg
    20240829_141906.jpg
    1.7 MB · Views: 19
  • 20240829_141903.jpg
    20240829_141903.jpg
    2 MB · Views: 19
  • 20240829_141854.jpg
    20240829_141854.jpg
    1.8 MB · Views: 22
  • 20240829_141851.jpg
    20240829_141851.jpg
    1.9 MB · Views: 17
  • 20240707_152136.jpg
    20240707_152136.jpg
    1.4 MB · Views: 25
  • 20240707_152131.jpg
    20240707_152131.jpg
    1.4 MB · Views: 21
Front of too small chest peice
 

Attachments

  • 3753c1b9-484c-40b9-aa8c-85afd5e1398e.jpg
    3753c1b9-484c-40b9-aa8c-85afd5e1398e.jpg
    2.1 MB · Views: 23
  • 5aa30ab0-2eab-4ada-b337-4c6882f42255.jpg
    5aa30ab0-2eab-4ada-b337-4c6882f42255.jpg
    1.5 MB · Views: 15
  • 20240829_141844.jpg
    20240829_141844.jpg
    1.8 MB · Views: 17
  • 20240829_141841.jpg
    20240829_141841.jpg
    1.8 MB · Views: 22
  • 20240828_213022.jpg
    20240828_213022.jpg
    1.4 MB · Views: 22
  • 20240828_213005.jpg
    20240828_213005.jpg
    1.3 MB · Views: 23
WOW progress looks great! You're doing a great job on that foam work. Has it really been 10 months?? Sometimes I'm surprised when I see an old thread come to the top of the new recruits section and I've already replied to it haha. Congrats on the girlfriend too!

For your next update, I wanted to let you know it is possible to embed photos inside you post, like you might do in a word processor. You may find it's easier to do so on desktop rather than mobile though. To make the thread easier to follow, consider using the "insert thumbnail/Full image" feature and writing updates in one post rather than multiple rapid posts.
Screenshot 2024-09-05 145229.png
It keeps the admins happy too ;)
 
WOW progress looks great! You're doing a great job on that foam work. Has it really been 10 months?? Sometimes I'm surprised when I see an old thread come to the top of the new recruits section and I've already replied to it haha. Congrats on the girlfriend too!

For your next update, I wanted to let you know it is possible to embed photos inside you post, like you might do in a word processor. You may find it's easier to do so on desktop rather than mobile though. To make the thread easier to follow, consider using the "insert thumbnail/Full image" feature and writing updates in one post rather than multiple rapid posts.
It keeps the admins happy too ;)
Thank! I'm a bit of a boomer so I'll test the embedding right now. Also thanks for the feedback and words of encouragement from you and spartan114x !

The fully (ish) built front and back chest that are too small... and a nearly done resized front chest, for comparison.
20240907_192136.jpg20240907_192140.jpg20240907_192149.jpg20240907_192154.jpg20240907_192207.jpg

Thigh peice heat treated and strapped, ready for kwik seal caulking and plastidip.
20240907_192233.jpg

Calf peice heat treated but I can't fit my big feet into without significant pulling and I'm afraid I will damage it. So I have to maybe try splitting a seam and installing velcro or something to open it enough to safely put on and off lol. Wish me luck.
20240907_192250.jpg

Cutting out resized templates for the chest peice, that mistake cost me 4 or 5 sheets of foam and about a week of work smh.
20240907_192339.jpg
 
Calf peice heat treated but I can't fit my big feet into without significant pulling and I'm afraid I will damage it. So I have to maybe try splitting a seam and installing velcro or something to open it enough to safely put on and off lol. Wish me luck.
This is what I did on my mk VI suit! You can make a slit somewhere at the back and use Velcro to join it so that you can get your foot in and out.
IMG_5530.JPGIMG_5531.JPG

Cutting out resized templates for the chest peice, that mistake cost me 4 or 5 sheets of foam and about a week of work smh.
Been there. It's not fun. It's all part of making costumes though, practically unavoidable. It will 100% be worth the trouble in the long run though!
 

Your message may be considered spam for the following reasons:

If you wish to reply despite these issues, check the box below before replying.
Be aware that malicious compliance may result in more severe penalties.
Back
Top