zealotops

New Member
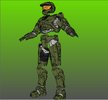
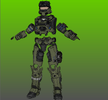
Halo Infinite Armor Unfolds

Here I will be uploading and updating the unfolds for foam that I made to make them easier to find and have a better order

(Click the image for download, only green is finished)

Yoroi
1729495303623.png


Rakshasa
1729495823879.png


Marine V1

1729496458768.png


Esparza V 2.0
1734225885927.png


Mark IV (Redoing the Unfold)
1740590300149.png


Mark V CE

1729491886660.png

Mark V B (in progress)
1740194663581.png


Mark VI G1
1740590223919.png


Mark VI G3 (Applied Retopology, Unfold in progress)
1740590155745.png


Mark VII (Unfold not initiated, Broken textures)

1729118400147.png


Mirage IIC
1731803982602.png

Eagle Strike

Chimera

Hazmat

Agryna

Mark VI G3 Fred 104
1740532909054.png


Mark VI G3 Kelly 087
1740532941851.png


Mark VI G3 Linda 058
1740532984291.png
 

Attachments

  • 1729116313926.png
    1729116313926.png
    440.2 KB · Views: 564
  • 1729116611691.png
    1729116611691.png
    328.3 KB · Views: 572
  • 1729117991528.png
    1729117991528.png
    442.7 KB · Views: 554
Last edited:
*I'll be impatient bro, definitely.

Basically I only need the torso to have my mirage suit, somehow I manage to make the other pieces, some have end up alright but others end up a little weird but I don't want to mess up the torso, I repeat, I'll be waiting anxiously for your work but, do your best in the university.
 
Last edited:
I need those Mirage files, My Banana spartan depends on them!
 
10/10 would recommend MNKr if you need any help unfolding these projects, he has been our resident unfolder on the forum for years. zealotops alongside ODCA
 
Hey man I am pretty sure it was your post on Facebook with the free Mirage foam template I commented on a few weeks back, if you have some time, can I pick your brain on some things like how exactly to assemble the pieces for example the mirage after its been cut out and a few questions relating to getting the STL models from STL to a usable Pepakura foam export? For some reason, I just can't wrap my head around turning the cutout foam into the "functional" armor piece. For example, I started with the mirage forearms. I thought maybe because the mirage has less detail to it, I could envision it to assemble it better with something a tad more intricate, so I tried converting the Mark IV forearms from GalacticArmory's files into a foam template, but I always end up with a jumbled mess of triangles across several pages in pepakura like I had mentioned struggling with in the past on FB and all the guides i've found online have not been any help getting past this as they all use models that seem to be pre "simplified" for pepakura, one of the guides I had found used a celestial nighthawk helmet from destiny as their example and prepped it in blender first but when I tried it nothing seemed to work in the current version of blender in the same manner as it did in their tutorial so I could not just follow along and shifted to trying to simplify the stl using 3D builder before throwing it into pepakura which did work better but lead to either a mess of connected triangles still just significantly less or the same but even less and pieces missing that were probably lost during the simplifying process from over simplifying. At this point, I think I've resigned myself to the fact I will have to use a template someone else already made, which isn't the end of the world, but making my own is a skill I will probably need in the future, and I haven't been able to find a pre-made foam template for the standard Mark IV identical to the one I started 3D Printing from GA. In your experience, do you have any wisdom you can impart to help me with this? (or can you point me to where I should make a forum post asking? I am having a hard time figuring out where exactly such a post belongs and I do not want to put it in the wrong place and be a bother)
 
Hey man I am pretty sure it was your post on Facebook with the free Mirage foam template I commented on a few weeks back, if you have some time, can I pick your brain on some things like how exactly to assemble the pieces for example the mirage after its been cut out and a few questions relating to getting the STL models from STL to a usable Pepakura foam export? For some reason, I just can't wrap my head around turning the cutout foam into the "functional" armor piece. For example, I started with the mirage forearms. I thought maybe because the mirage has less detail to it, I could envision it to assemble it better with something a tad more intricate, so I tried converting the Mark IV forearms from GalacticArmory's files into a foam template, but I always end up with a jumbled mess of triangles across several pages in pepakura like I had mentioned struggling with in the past on FB and all the guides i've found online have not been any help getting past this as they all use models that seem to be pre "simplified" for pepakura, one of the guides I had found used a celestial nighthawk helmet from destiny as their example and prepped it in blender first but when I tried it nothing seemed to work in the current version of blender in the same manner as it did in their tutorial so I could not just follow along and shifted to trying to simplify the stl using 3D builder before throwing it into pepakura which did work better but lead to either a mess of connected triangles still just significantly less or the same but even less and pieces missing that were probably lost during the simplifying process from over simplifying. At this point, I think I've resigned myself to the fact I will have to use a template someone else already made, which isn't the end of the world, but making my own is a skill I will probably need in the future, and I haven't been able to find a pre-made foam template for the standard Mark IV identical to the one I started 3D Printing from GA. In your experience, do you have any wisdom you can impart to help me with this? (or can you point me to where I should make a forum post asking? I am having a hard time figuring out where exactly such a post belongs and I do not want to put it in the wrong place and be a bother)
The programs I use to make templates for EVA foam are a mix between Metasequoia and Blender

And to exemplify a process that if I do I will use the stl of the ODST viewer that is in the forum armory


And to adapt an STL model what I would do is import the STL model to Blender and pass it to OBJ to work on it in MetaSeqoia since it leaves the files almost directly for use in Pepakura
1740790567017.png
1740790587726.png


Metasequoia has tools that allow you to simplify the models, although if you can apply this process in Blender much better

The mesh of the STL is usually very heavy for Metasequoia due to the number of polygons it has, preventing them from loading well and in the unfold, releasing many triangles that are very tedious to join
1740790753476.png


and if it is about reducing the mesh, it leaves a disaster of polygons in the model


1740790772748.png


One of the advantages of MetaSequoia is that it allows you to work on an existing mesh by being able to superimpose new faces on a high-poly object (just make sure to create the new faces on a new object)
1740790930305.png


Once you have a mesh that you like the way it looks and is simple, you can apply a mirror effect to it and with the edit tools modify the mesh to join the mirror object with the normal one
1740790997330.png

Once you have the mesh like this you can add or remove axes with the Edge tool (W)

in this way being able to add details that the model has in high polygonage
1740791353369.png


With the letter E on the keyboard, you can highlight those same details
1740791448745.png


Once you have a result that you like you can do the other side of the mesh by hitting SEL OBJ, selected, mirror and select the axis that fits best
1740791608619.png


Once you have the object mesh complete, I do recommend joining edges by hitting Object, Join Closed Vertices, and setting the value to one that does not reduce the polygons
1740791729657.png


And so you would get a model comfortable enough to work in pepakura, it is a bit tedious and time-consuming to make them since they do not always come out the first time, but it assures you that it is possible to work it in EVA foam and even in the papercraft mode
1740791961484.png


I saw that manual conversion trick from STL to EVA rubber template in this video (which does it directly in Blender)

Another very easy way is to look for the model in the form of a Game Asset since it has a reduced mesh and at the same time it already has the same separate ones, which is usually what I do
 
The programs I use to make templates for EVA foam are a mix between Metasequoia and Blender

And to exemplify a process that if I do I will use the stl of the ODST viewer that is in the forum armory


And to adapt an STL model what I would do is import the STL model to Blender and pass it to OBJ to work on it in MetaSeqoia since it leaves the files almost directly for use in Pepakura
View attachment 358219View attachment 358220

Metasequoia has tools that allow you to simplify the models, although if you can apply this process in Blender much better

The mesh of the STL is usually very heavy for Metasequoia due to the number of polygons it has, preventing them from loading well and in the unfold, releasing many triangles that are very tedious to join
View attachment 358221


and if it is about reducing the mesh, it leaves a disaster of polygons in the model


View attachment 358222


One of the advantages of MetaSequoia is that it allows you to work on an existing mesh by being able to superimpose new faces on a high-poly object (just make sure to create the new faces on a new object)View attachment 358223


Once you have a mesh that you like the way it looks and is simple, you can apply a mirror effect to it and with the edit tools modify the mesh to join the mirror object with the normal one
View attachment 358224
Once you have the mesh like this you can add or remove axes with the Edge tool (W)

in this way being able to add details that the model has in high polygonageView attachment 358225


With the letter E on the keyboard, you can highlight those same details
View attachment 358226

Once you have a result that you like you can do the other side of the mesh by hitting SEL OBJ, selected, mirror and select the axis that fits bestView attachment 358227

Once you have the object mesh complete, I do recommend joining edges by hitting Object, Join Closed Vertices, and setting the value to one that does not reduce the polygons
View attachment 358228

And so you would get a model comfortable enough to work in pepakura, it is a bit tedious and time-consuming to make them since they do not always come out the first time, but it assures you that it is possible to work it in EVA foam and even in the papercraft modeView attachment 358229

I saw that manual conversion trick from STL to EVA rubber template in this video (which does it directly in Blender)

Another very easy way is to look for the model in the form of a Game Asset since it has a reduced mesh and at the same time it already has the same separate ones, which is usually what I do
Thanks soooo much man! I will give it a try using Metasequoia to simplify it!
 

Your message may be considered spam for the following reasons:

If you wish to reply despite these issues, check the box below before replying.
Be aware that malicious compliance may result in more severe penalties.
Back
Top