HellHound – ODST Canine Handler Armor

Cadet

Executive Officer
Division Staff
Community Staff
Member DIN
S111
After using the same, from a Ship of Theseus point of view, Halo: CE Mark V/Season 2 Caboose costume since 2007, I have been wanting to branch out and do another Halo universe costume for a while now. I’m not done with or retiring Caboose, I’ve just had the desire to do another Halo costume for a while. Having gotten my start in costuming with the 501st in 2003, my skills have always tended towards Plastic Kit Assembly, hence why my armor evolved from Fiberglass pepakura to its final Vacuum Form styrene iteration. As such, I have been thinking about getting an ODST kit from Sean for a while. Late last year I was able to pick one up second hand for a good deal.

Points of Interest:
Inspiration
Backpack/Hardcase Attachment
Etsy Foam Helmet Review and Detail
First Full Suit Up
Leather Thigh Gaskets
NERF Assault Rifle Repaint and Weapon Charm Attachment
HellHound and UNSC Working Dogs Logo


Inspiration
I had thought about various ODST appearances, and which one I would want to do over the years. I waffled between doing a Rookie (to go along with my own long standing Nickname), one of the ARK ODSTs as they seem to be under represented, or even entertained the idea of doing an ODST inspired by Delta Squad’s Scorch from Republic Commando. Although, the Scorch inspired ODST would work best if you could get a group of four together and do the UNSC version of Delta Squad.


Anyway, I received the armor, and the previous owner had done an all black with Purple secondary color scheme. I had initially wanted to try and get the costume back into a wearable shape for GalaxyCon back in December and was trying to decide how I might go about that with minimal repainting needed (which precluded my initial 3 ideas for an ODST) in the Ohio winter weather. When I was looking at the paint application areas, I was struck that if I simply swapped in a mahogany for the current purple, you would actually get a close approximation of the color scheme of a Rottweiler. This was on my mind as our beloved Rottie passed away in 2021 to an aggressive cancer after having just recovered from Pancreatitis. In addition to that, an important part of my life has become my work assisting on a program that facilitates the training of explosive detection dogs across the country. I remembered a piece of concept art from Halo 5 that featured an ODST and a dog:
H5G_ODST_Doggo_Concept.jpg

That lead to the realization that an ODST unit nicknamed the “HellHounds” that worked with dogs would fit in perfectly with the “Hell Jumper” moniker.

So I decided to do a canine Handler ODST with a Rottweiler inspired paint job. While I was able to repaint most of the armor before GalaxyCon, I was not able to make the costume fully wearable due to having to rework and repair some of the previous owner's strapping and attachment methods. I also had painted everything with acrylics owing to the cold weather, but shortly after Christmas here in Ohio we had a heat wave and I went ahead and repainted the chest with Rattle cans in order to prep a beter surface for the Vinyl decals I wanted to use to replicate the ODST chest markings.

Here’s the current state of the chest plate. I had the Dog Skull and crossbones decal already from a previous training Op, and realized it fit perfectly on the chest and kind of mirrored Dutch’s Jolly Rodger. MrJamin was kind enough to provide the other vinyl decals for the other chest plate details, as I don't have a CirCut myself.
20230107_105028.jpg


Up next, attaching the Back pack.
 
Last edited:
So first off, that's amazing and I'm loving the inspiration. Second, does this mean a potential pooch with armor? My pup is def not well behaved enough for cons or the like, but the photo opportunities..... Either way, one helljumper to another, Feet First!
 
Second, does this mean a potential pooch with armor?
As I mentioned, our little girl passed away in October of 2021 after pancreatitis followed by aggressive cancer, so, unfortunately not. Maybe one day we'll get another Rottie, but for now the suit will also function as my own memorial to her in a way.

Backpack/Hardcase Attachment

So, I got this kit second hand. When I received it, there were no shoulder straps, but there were parachute buckles or quick release clips attached to the backpack. There were some spots were strapping remained on the interior of the kit, and some places where it appears to have been previously mounted but removed at some point prior to the sale. The extra rivets on the chest plate, for example, are attached to pieces of elastic that have been cut off at the rivet. I was able to figure out what most of the strapping was for and where it connected but had no clear matching pieces for the clips on the backpack. I surmised the piece of strapping must have been tied into the either the missing shoulder straps or one of the pieces of removed strapping. Or both.

324724668_850020302919206_6565801197026123403_n.jpg


So, I needed to come up with a strapping system. My experience with the jetpack on an ESB Boba Fett was that an isolated strapping system was best, with no weight tied into any other part. I also remembered some Republic Commandos on the Clonetrooper Detachment coming up with ways to alleviate the backpack issues they face. When an RC attempted to just attach their hard case directly to their back plate it always caused an issue where the weight of the pack pulled the back plate down, and the chest plate up, and occasionally would cause the whole system to start putting pressure on the throat of the member. The same thing can happen with Boba if you don’t mount the pack to the internal frame correctly, the weight gets transferred to the collar armor via the bolts that hold back and collar together and you get choked by your own collar armor. That’s why you’ll often see a Boba (even in production behind the scenes shots) with their hands resting on their collar armor on the front, literally pulling it down away from their throat.

Some of these RCs had devised a system of attaching a set of backpack straps to the inside of their armor, mounted only to the back plate. With these under the armor, the weight was transferred from the armor to the straps and placed on the wear’s shoulders, rather than distributed to the armor itself. I decided that this was the best approach here. I would rig up a system to wear under the armor so the weight of the pack would be on me, not pulling on the armor itself.


First thing I did was get a set of clips that worked with the existing ones on the back pack. Those existing clips were well mounted and I saw no need to redo all that work, and I lucked out and found what appeared to be the same brand used by the previous owner at a Fabric store and they were compatible. After that, I needed some straps to attach those clips to. My initial thought was to just go to a Goodwill and get a cheap used backpack whose straps I could just salvage. I wanted to use real backpack straps to increase the possible comfort of the system. I was afraid that just using one inch nylon would dig too much into my shoulders and get uncomfortable fast. I went to two different Goodwills on my day off and neither one actually had any backpacks. I was surprised as normally in our Canine training program if we need to quickly fill out a Classroom or Sports venue scenario we just run to the local Goodwill and buy out all their bags. Around me, however, there seemed to be just purses and duffel bags. So I went on Amazon and for $11 found a replacement set of backpack straps.


324873005_556437022803623_2967933811702535407_n.jpg


They were designed to be mounted to an exiting backpack with clips, which worked out fine as I just made loops of Nylon with a D-Ring attached to the clip.

324714388_1513268345851551_7686729267111574024_n.jpg


324869451_3440843006239088_2561690537223848172_n.jpg


I cut a slit in each shoulder strap right under where I had mounted one of Sean’s cast buckles at the appropriate height to match up as best I could with the reference of where the pack sits on the ODST back. The D-ring end was fed through the strap and the buckle was left on the outside.

324892115_849353316289288_4005246356334523891_n.jpg

325123156_1313930672783244_6787139384317848431_n.jpg


Under the armor the back pack straps were attached to the D-Ring at the top, and at the bottom of the armor I made loops out of some existing unused (by me) pieces of webbing. In this way the weight of the pack is almost completely taken off the armor, especially off the chest and collar armor, and put onto either my shoulders, or if it pulls on the armor at all, will be on the rear of the backplate which should in theory only pull the bottom of the backplate tighter to my body, rather than pulling the collar armor against my neck.

324397659_846142793328710_440246181659850057_n.jpg


I’ve done a few test fittings without anything in the pack and it holds fine and it actually is pretty comfy, all things considered.
 
Great write-up on how you did the backpack. Gotta bookmark it for reference in the future. I'm excited to see where this suit ends up when you're done too.
 
I’ll be coming back to this when I start my ODST this year, great work Cadet!!

Seems 2023 truly is the resurgence of the ODST.

Also I love the doggo ODST concept I’m very hyped about it :love:
 
Glad the decals worked out!

I have a full raw Sean Bradley kit and I am hoping to get started on it this year. I'll keep watching for your updates to see your progress.
 
First off, woohoo more concept armor! I'm excited to see you working on a new set of armor!

If you're looking for a comfy ODST strap that can be used a great base for conversions or even just keeping as is I bought these lawnmower straps for my build and they're just fantastic.
Was able to rivet them directly to the rear armor and they have straps & buckles hanging off for attachments plus they're just so comfy!
 
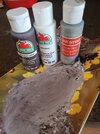
Is that real mud?
All acrylic paints. In this case mixes of white, dark brown, and gray, applied in layers. It's basically the same as Colt's "mud PAinting Tutorial" you can find in the tutorial index.


I basically get a piece of scrap cardboard and mix colors until they feel right, brush, dab or wipe them on, let it dry for a second, then remove the excess with a wet paper towel.

324862542_715497300158874_7143707003094949762_n.jpg


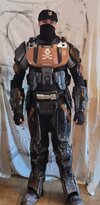
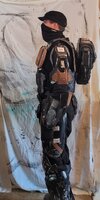
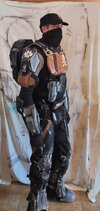
I was also able to do a full suit up today with the back pack attached. Suit didn't come with a helmet, and I have one the way, but for the moment I just put a UNSC pin on a black patrol cap, like the Sgt Johnson Firefight skin.
322605129_826698738428436_3106383495160602510_n.jpg
322864345_720071313053942_6120892967683860477_n.jpg
324108159_830345148675247_3177843785210488663_n.jpg
 
All acrylic paints. In this case mixes of white, dark brown, and gray, applied in layers. It's basically the same as Colt's "mud PAinting Tutorial" you can find in the tutorial index.


I basically get a piece of scrap cardboard and mix colors until they feel right, brush, dab or wipe them on, let it dry for a second, then remove the excess with a wet paper towel.

View attachment 326932


I was also able to do a full suit up today with the back pack attached. Suit didn't come with a helmet, and I have one the way, but for the moment I just put a UNSC pin on a black patrol cap, like the Sgt Johnson Firefight skin.
View attachment 326928
View attachment 326929
View attachment 326930
Your armor looks outstanding! I can't wait to see it with a helmet on!
 
Had the opportunity to wear the complete set up (minus bucket) at a local Anime Con last weekend with my buddy in his Destiny 2 Warlock. Wore the whole set up for around 6 hours, with multiple water bottles in the hardcase and never noted any major discomfort or slippage. So, I think my set up worked well for stability and transferring the weight off the armor and onto me.

Honestly my only issue was one you can kind of see in the last image. The shins kind of slipped out of position and slid around. I was using the previous owner’s cotton webbing straps, so, I’m not sure if switching to nylon webbing or maybe elastic strapping would provide a tighter hold on the shins and keep them together and in place better than the cotton webbing. I’m also thinking about possibly putting some Velcro in the areas where they overlap in order to help hold them together better.

327120307_1162458687995922_2769200590394477563_n.jpg


326248608_545426657649058_7096697177550020267_n.jpg
 

Your message may be considered spam for the following reasons:

If you wish to reply despite these issues, check the box below before replying.
Be aware that malicious compliance may result in more severe penalties.
Back
Top