- Member DIN
- S207
Ok I’ve been super bad about posting about this here since I’ve kind of been rushing to get it done before con season started. So I apologize for the dump all at once.
So after seeing Benton188 made a ring replica at torg last year, I wanted to do one as well. Not as big but with some LEDs and stuff like that. So I started my planning once torg ended. I did some digging around printable and thingiverse and found some rings. But none of them were quite what I was looking for. So I pulled a file and modded it to make it work for what I wanted.

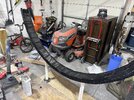
This ring here was only about 18” in full diameter if I printed it as is. That wasn’t good enough for me. Go big or go home. So I blew it up to have a 6ft and 1in diameter! Boom! But no one can print some that big in one go… so I did some math and made 15° segments.

Fortunately those fit on my Elegoo Neptune 3 max and I knew what I had to do. Make it cooler. Put some LEDs in that thang. Give it a nice glow. So I hollowed it and opened it up.


Now I was ready to print. Took weeks. I mean… weeks! To print allllll 16 sections of this. But then I ran into a design issue… how was I going to display this mamajama when it was finally built. A super cool stand of course… but how. So I did some more math and measuring and modded 2 sections to hold 2” pvc


Once that was figured out, assembled started. And I underestimated the task I had cursed myself with… this thing is big. Bigger than I thought, but I was too deep to turn back. Slow process but it was moving along


Now I didn’t just glue one solid ring together. I made a large half ring section for the base mount. Then 2 quarter pieces for the top half. That way it’s easy to build and break down for travel. Plus I still need to get the LEDs in the thing. Which, luckily, I’m a finish electrician by trade. So I had access to lots of options. I though chose 5000k high density 24v tape light. I used 2pin connectors at each section to complete the loop all the way around. Roughly about 30ft of tape to hit the whole circumference. Now if you are not aware, led tape does use a certain amount of watts per foot of tape, depending on your density use. And you have to have a compatible driver that can handle that total. Well… the tape I used is 4 watts per foot. But I only had access to 60watt drivers… welp… time to stack. lol. Jumping ahead a little bit (and missing pictures…) I built a box base for the stand to give it a UNSC military feel. And added lights to it too. So now there are 3 drivers running the whole get up. Haha.
Next was terrain planning. I found a guy on printables that helped get me a PDF of the terrain. Problem was again, that it wasn’t the right scale. So I talked to this awesome guy JTF4 fpr some help. He resized and printed it on one giant sheet for me. Which thank you so much for that. After fiberglassing the seams to make the ring more sturdy, I went into modge podge. Cut the terrain into strips and laid them out.


And then the painting began. I nice steely grey with some blue overspray and black wash. Giving it that old metal glow look.


Because I am bad about logging everything that I do.. I don’t have pictures of the start to finish progress of the display stand box. But I wrapped the pvc in led tape, then custom made some hexagon sleeves that would hide the pixie and tape. Printed them in a translucent blue for that hologram effect. Once all of that was done… I think it was ready. The final test.
so now I’m going to work on some nice details for the box to give it that set piece look. Add some UNSC symbols and tagging.
Tell me what you think
So after seeing Benton188 made a ring replica at torg last year, I wanted to do one as well. Not as big but with some LEDs and stuff like that. So I started my planning once torg ended. I did some digging around printable and thingiverse and found some rings. But none of them were quite what I was looking for. So I pulled a file and modded it to make it work for what I wanted.
This ring here was only about 18” in full diameter if I printed it as is. That wasn’t good enough for me. Go big or go home. So I blew it up to have a 6ft and 1in diameter! Boom! But no one can print some that big in one go… so I did some math and made 15° segments.
Fortunately those fit on my Elegoo Neptune 3 max and I knew what I had to do. Make it cooler. Put some LEDs in that thang. Give it a nice glow. So I hollowed it and opened it up.
Now I was ready to print. Took weeks. I mean… weeks! To print allllll 16 sections of this. But then I ran into a design issue… how was I going to display this mamajama when it was finally built. A super cool stand of course… but how. So I did some more math and measuring and modded 2 sections to hold 2” pvc
Once that was figured out, assembled started. And I underestimated the task I had cursed myself with… this thing is big. Bigger than I thought, but I was too deep to turn back. Slow process but it was moving along
Now I didn’t just glue one solid ring together. I made a large half ring section for the base mount. Then 2 quarter pieces for the top half. That way it’s easy to build and break down for travel. Plus I still need to get the LEDs in the thing. Which, luckily, I’m a finish electrician by trade. So I had access to lots of options. I though chose 5000k high density 24v tape light. I used 2pin connectors at each section to complete the loop all the way around. Roughly about 30ft of tape to hit the whole circumference. Now if you are not aware, led tape does use a certain amount of watts per foot of tape, depending on your density use. And you have to have a compatible driver that can handle that total. Well… the tape I used is 4 watts per foot. But I only had access to 60watt drivers… welp… time to stack. lol. Jumping ahead a little bit (and missing pictures…) I built a box base for the stand to give it a UNSC military feel. And added lights to it too. So now there are 3 drivers running the whole get up. Haha.
Next was terrain planning. I found a guy on printables that helped get me a PDF of the terrain. Problem was again, that it wasn’t the right scale. So I talked to this awesome guy JTF4 fpr some help. He resized and printed it on one giant sheet for me. Which thank you so much for that. After fiberglassing the seams to make the ring more sturdy, I went into modge podge. Cut the terrain into strips and laid them out.
And then the painting began. I nice steely grey with some blue overspray and black wash. Giving it that old metal glow look.
Because I am bad about logging everything that I do.. I don’t have pictures of the start to finish progress of the display stand box. But I wrapped the pvc in led tape, then custom made some hexagon sleeves that would hide the pixie and tape. Printed them in a translucent blue for that hologram effect. Once all of that was done… I think it was ready. The final test.
so now I’m going to work on some nice details for the box to give it that set piece look. Add some UNSC symbols and tagging.
Tell me what you think