It has begun -- First Build x2

OrangeCrush

New Member
The story: We (Wife & 2 daughters) have been going to Dragon Con for over a decade. They do stuff. Me, well, not so much.
That's should change in 2025. Go big or go home, right?
For the past 3-4 years, I was thinking about a 3d printer. This year, right after Dragon Con 2024, I asked Emily (daughter): If you will do a full halo kit with me, I will get the printer.
She said Yes!
I got the printer. K1-Max in late September.
Practice time = making lots of little simple stuff
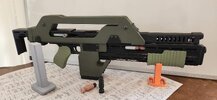
Then my first "Project". Aliens Pulse Rifle (From Aliens Pulse Rifle ) Considering it was a skill building exercise I think it came out OK. (Pics below)
And now.... The real project begins!

We love Halo, but we are remarkably casual fans. Emily has never played the game. I played it when it first came out, but that's about it.
we've seen the movies and the recent TV series. Because we don't know that much detail, we chose the Galactic Armory Halo kit.
We are planning a Red vs. Blue concept, She's Blue, I'm Red. And we have some ideas for some possible mods. More on that later.

With 10 months until the Con, the goal is avoid a mad rush in the weeks before the Con. Anyone want to take the over under on that one? LOL (Kidding)
 

Attachments

  • 20241102_115532.jpg
    20241102_115532.jpg
    541.3 KB · Views: 37
I forgot to post the first part. The Build really has begun.
The left Calf. It's taped together. The parts fit snug, and it fits me. Yay!

It weighs 625 grams, about 1 lb 6 oz. Is that a lot?
Filling Priming & Painting will add another couple oz. 'ish
I know the suit will be heavy.
I'm thinking some parts need to be Stronger than others.

Does it make sense, is it worth the effort, to save 10 to 20 grams here and there?
This is 3 parts. The main part should be strong. Infill 15% the 3 that attach to it, maybe not so much.
I can save about 30 grams on the other parts using lower infill settings, say 7% or 8%. (Using PETG)
Is it worth the effort to save those extra grams?

Thanks!


20241123_092913.jpg
 
I forgot to post the first part. The Build really has begun.
The left Calf. It's taped together. The parts fit snug, and it fits me. Yay!

It weighs 625 grams, about 1 lb 6 oz. Is that a lot?
Filling Priming & Painting will add another couple oz. 'ish
I know the suit will be heavy.
I'm thinking some parts need to be Stronger than others.

Does it make sense, is it worth the effort, to save 10 to 20 grams here and there?
This is 3 parts. The main part should be strong. Infill 15% the 3 that attach to it, maybe not so much.
I can save about 30 grams on the other parts using lower infill settings, say 7% or 8%. (Using PETG)
Is it worth the effort to save those extra grams?

Thanks!


View attachment 354872
Looks great so far, well done! I read on another thread that someone reduced the infill density to like 5% and increased wall thickness which sped up the prints. Although i think that might make them heavier. The weight isnt something i have thought too much about as its negligible. I use PLA+ instead of PETG. If youre concerned about the weight there are plenty of ways to attach the armour to yourself to make it easier, like my thigh and calf armour are connected with straps to my waist on a belt which makes it super easy to move about in.
 
I forgot to post the first part. The Build really has begun.
The left Calf. It's taped together. The parts fit snug, and it fits me. Yay!

It weighs 625 grams, about 1 lb 6 oz. Is that a lot?
Filling Priming & Painting will add another couple oz. 'ish
I know the suit will be heavy.
I'm thinking some parts need to be Stronger than others.

Does it make sense, is it worth the effort, to save 10 to 20 grams here and there?
This is 3 parts. The main part should be strong. Infill 15% the 3 that attach to it, maybe not so much.
I can save about 30 grams on the other parts using lower infill settings, say 7% or 8%. (Using PETG)
Is it worth the effort to save those extra grams?

Thanks!
600 grams for a leg piece isn't out of the ordinary, so I wouldn't sweat that last 10g-20g because it probably isn't going to cut down the weight or print time enough for you to notice the difference.

For strength I don't worry so much about infill - I rarely go above 10% gyroid infill. What I do is increase the wall/perimeter count - all of my pieces have 5 walls. Definitely going to *add* print time that way, but personally I'm willing to trade that for durability.

Welcome to the club! That rifle looks mint.
 
Last edited:
Progress Update.
The delay, I was out of filament. I'm using CR-PETG, black obviously.
I got the next batch from Amazon (4 pack via subscribe & Save: Total $49.22 = < $12.50 per roll) It was Delivered on the 27th. The printer has been going almost non-stop since, with interruptions for Thanksgiving and College Football.
My Lower legs Finished printing, shown below. I taped them together for the test Fit, which is great.
Emily's are printing now, should be finished by Monday AM'ish.

We were going to start with the feet and work our way up. But, neither of us know what shoes we will wear, so we don't know what size to make them. LOL
Either Arms or Thighs come next. I'm a little nervous about the big thigh pieces because they will be done in parts. That means dealing with major seams. The Pulse Rifle has a few seams, but the thighs will have to endure a lot of weird stress being worn.
I have some PETG Gloop ordered, which should be here soon. I'm hoping that works better than super glue.

1733014235385.png
 
Do you mind a couple observations and advice? If you don't want it, don't open the spoiler

Stop printing long enough to clean up and dial in your settings. All this ringing/echoing is either going to be seen in your final product, or become a lot of human labor to sand and clean up. I tend to say that every hour of dialing in, is at least 5 hours of post processing you save on the back end of your first big project.
2024-12-01_11-20-58.PNG


> I'm hoping that works better than super glue.
Superglue is not an armor assembly glue. I won't even do props with it. And hope is not a strategy. You probably shouldn't be using real parts as testers for your glue and assembly and painting. It really sucks to have 6 parts of your chest fall apart because you used it as a learning part. Make some other smaller things and test your glues, sanding and painting. Its faster and cheaper to take a dozen benchies and glue them together to test your glue strength than it is on a full thigh.

I'd urge you to do more than just glue. Hot staples are a common way to give joins a mechanical bond in addition to a quality 2part epoxy.
1733016631556.png

But even with that, seams take a lot of stress and torque as you've already mentioned you expect. Its not uncommon to back multi-part pieces with a layer of fiberglass matt and resin. The hope is to make it strong enough to not pop the seam filler and paint.
 
Thank you. I appreciate the information.
The ghosting is known. I have a K1 max, and it’s a known issue with the machine.
I’m working on ways to dial it out, but so far not making any progress.

Hot staples, never seen that before. Cool stuff.
 
It's been over a month since the last update. I'm blaming the holidays. But I am still here, working away.
Armor Smith and scaling is tricky.
the good news, I got a sander, incase you can't tell.
I have right & left calves for me and for Emily. That was December's goal. January's goal is Thighs.

I managed to improve the ghosting issue, but it is still a problem.

Half way through January and I have a left thigh, which has been a disaster. Multiple failed overnight prints. I'm blaming the failures on overnight Low temps in the room where I have the printer. (It got down into the teens) Maybe that's right, maybe it isn't. It's the excuse I'm going with.
So I finished a left thigh and it the fit is.... poor. It's Too narrow at the top, and it's too tall. And, The upper half of the outer is effectively a failed print. The slicer said there was a problem with the object and "Repaired" it. I think that may have something to do with why it failed.
Back to Armorsmith, adjust the size of both thighs and export. This time, I'm doing the right thigh. I'll feel like I am making progress even though the left will be fully reprinted.

Question for anyone: When do you Glue? Before the first primer coat? Obviously big parts, like the outer Thigh that must be split have to be assembled before any post processing. If the glue survives all the processing, then it should be good.
But for the Calves, where the seams are natural within the piece of the armor, theses could be done after a primer coat or two. Probably best to assemble before color/final coats though.
I'm leaning towards after sanding the first primer coat.
Any feedback on this is welcome.

One of my thighs, fully sanded and ready for Bondo & Priming. One of Emily's thighs, partially sanded. The bin with lots of calf parts, and the disaster of my left thigh. Please ignore the top part which will be redone.

20250119_104713.jpg
 
My opinion on split parts is that they should be fully assembled into their final full size before moving on to sanding. I mean, you have to hide the seam for one. So you might as well be doing that sanding along with the rest of the part.

I hope you're doing more than just glue.
2024-07-13_21-41-28.PNG


Sorry to read about all the waste from reprints and having to print big parts in little pieces. If you decide you've had enough of that direction and just want them printed as single part, seamless one-job prints give me a shout (DM me): I have machines more than big enough to do single-print legs, chest and even the back.
 
I forgot to post the first part. The Build really has begun.
The left Calf. It's taped together. The parts fit snug, and it fits me. Yay!

It weighs 625 grams, about 1 lb 6 oz. Is that a lot?
Filling Priming & Painting will add another couple oz. 'ish
I know the suit will be heavy.
I'm thinking some parts need to be Stronger than others.

Does it make sense, is it worth the effort, to save 10 to 20 grams here and there?
This is 3 parts. The main part should be strong. Infill 15% the 3 that attach to it, maybe not so much.
I can save about 30 grams on the other parts using lower infill settings, say 7% or 8%. (Using PETG)
Is it worth the effort to save those extra grams?

Thanks!


View attachment 354872
You will be surprised at how heavy it will feel off your body to how light it feel worn. I made an outfit “lord Elron” from lord of the rings and chain mail is 60+ pounds, it feels like a ton when I have it in my hands but it feels like 15 when I wear it. At least for the first 4 hours:)
 
My opinion on split parts is that they should be fully assembled into their final full size before moving on to sanding. I mean, you have to hide the seam for one. So you might as well be doing that sanding along with the rest of the part.

I hope you're doing more than just glue.
View attachment 356023

Sorry to read about all the waste from reprints and having to print big parts in little pieces. If you decide you've had enough of that direction and just want them printed as single part, seamless one-job prints give me a shout (DM me): I have machines more than big enough to do single-print legs, chest and even the back.
Thanks again.
Looks like you are a big fan of the hot staples. I'll have to get one of those as there are places were I think they should be very helpful.
The waste of bad parts and failed prints stinks. However, it gives me parts to experiment with. My poorly sized thigh will likely be used as a test part for the staples. There's probably a learning curve with the staples. I'll probably over burn one intentionally to understand how that works out.

I'm thinking, guessing: Glue the parts. Maybe some light sanding on the seam. If I'm happy with that, then add the hot staples. Then comes the rest of the post sanding and processing & painting. If the seam holds up through all of that, not being gentile of course, the it should be OK. This is for parts that are slicer split and have smooth assembly faces. For the part pieces, like the calf which is 3 parts, I may use an epoxy for those because they don't have smooth joint surfaces like a slicer split.
Do you recommend staples for those assembly joints also?

At one point, I was wondering if 1 inch velcro on each side of each calf part seam, and using a 2" strip to join them. It would allow some flex and generate some noise when moving or walking. Not sure if that would be good or bad.
I have 8 months to get it done, and with my ... life schedule .... I sometimes start to panic.... LOL
 
> Looks like you are a big fan of the hot staples.
I've used them to repair other people's broken armor and some of my grand kids' broken toys (those girls are ROUGH on their gear haha). But I've not needed them for my own armor because all of mine are one-print seamless. I did doing a MK-VI back in all the subparts provided by GA the same as someone with only a small printer would have to do, just to experience what that would be like... so I could speak somewhat knowledgably about it. And honestly: I'd never wish that route on anyone. I get it-we all do what we have to with the tools available to us. But man it adds a lot of extra labor to print small. I went super robust with the stapling and seaming and intellectually I know it was strong but there was always that fear when I would hear it creak if I picked it up by the edges knowing all the weight was leveraging across the joins etc.

So "fan of staples" would be more accurate to say: Fan of every form of strengthening you can find. Rods, pins, interlocking parts, staples, industrial-grade adhesives etc. And still consider a layer of fiberglass lining the inside.


> Do you recommend staples for those assembly joints also?

Joins/seams flex: Period. When they do the paint across them cracks. So the goal is to make every join as solid, rigid and robust as possible. When you are at a con in your armor you're going to take a knee to photo with a kid... pose with other cosplayers... rough house... roll around on the floor.. and so on... generally stressing everything at one point or another. So I'd say, build it to survive a really rough play with your kids, wrestling and chase around the yard. If it can do that, you should be fine at a convention.
 

Your message may be considered spam for the following reasons:

If you wish to reply despite these issues, check the box below before replying.
Be aware that malicious compliance may result in more severe penalties.
Back
Top