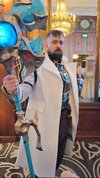
I'm currently elbow-deep in the Con Crunch for Anime Milwaukee next week, and my big new cosplay is Jayce Talis once he has his manly/Daddy glow-up.

As a bearded Cosplayer, I always appreciate bearded characters that aren't joke characters, and Arcane is full of options. As an engineer and a hobbyist blacksmith, Jayce appeals to me quite a bit.
For the build:
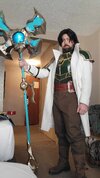
Originally I planned on building this in two different phases. Phase 1 was going to be for AMKE, and it was going to be the casual attire he wears underneath the jacket and breastplate:

Then Phase 2 was going to be learning Blender and designing the armor pieces myself (since the files weren't available anywhere that I could find), with a goal of having it done/ready for C2E2. The intent was to really lean into sewing and sew the dress shirt and vest myself, and even attempt the jacket.
I did buy a basic vest pattern and sewed a practice vest which turned out rough but acceptable:

However, I then procrastinated for way too long on making adjustments to the pattern, so I have pivoted to a different path, and I will instead be altering some items. This is arguably the path I should have started on, since it will be easier to build the sewing skills in bite-sized pieces.
I found this shirt on Amazon:

The color is a decent match (from what I can tell, he's wearing something similar to forest green) and has the type of collar I want for this. Since the vest and shirt are so similar, I bought two of them. I have removed the sleeves and pocket from the one that will become the vest, and I am going to add gold trim/piping and a piece of scarlet floral patterned cloth to the shoulders. I will also remove a few of the upper buttons probably.
For the shirt that will remain the shirt, I have removed the collar and the pocket. I will probably cut away the top 3 buttons or so, to prevent it from showing under the open vest buttons. I will also add some scarlet to the inside of the sleeve cuffs.
I will be making the belt with leather and a 2" strip of scarlet nylon. I'm undecided about how I will make it tighten though.
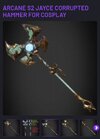
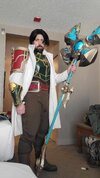
The Corrupted Hammer file was purchased from a designer on Cults3D and most of the pieces (8 for the hammer head alone) were printed on my Neptune 3 Max. That printer has been throwing a tantrum lately, so the prints came out rough but acceptable. Because of the size of this prop, I have purchased some carbon fiber tubes to act as the handle.
The original intent was to make the hex orb light up and the hammer pieces open up with the actuation of the handle lever, but I think that will have to be saved for a "Version 2" of the hammer, because realistically I don't have time for that before AMKE. I also want to cast the handle out of aluminum bronze for strength and a more realistic gold look, though I may also pursue electroplating.
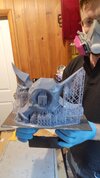
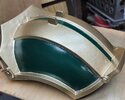
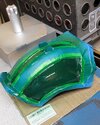
Last night I finally got around to gluing and welding the hammer head pieces together. Due to the size of this thing (over 10 pounds already), I used a combination of CA glue along the large interior flat surfaces, metal staples (a first for me), a 3D pen to fill gaps where prints warped (also a first for me), and a wood burner to weld the pieces together. It feels pretty sturdy, and I'm not worried about the pieces breaking apart. The hex core/orb gets fully enclosed within the head, so I can't attach the two sides until I have the orb done. I ordered some translucent blue resin that I'm going to print it out of, then I'll have to wrap it in something to protect it for when I am painting the rest of the hammer head. Once I get the two halves stapled and welded together, I'll be coating it in UV Resin per my usual finishing process. Thankfully I won't have to do a ton of sanding since this is supposed to be a rough surface finish.

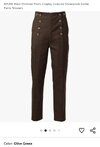
I also ordered a set of pants that should look close enough and a pair of brown boots to go with it. I don't currently plan on making the leg braces.
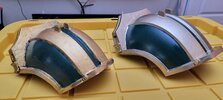
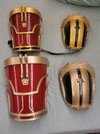
Phase 2 was supposed to wait until after AMKE, however I made the decision to see what kind of price and timeline would be involved with commissioning a Designer to model the armor. I reached out to the Designer that made the hammer file (they had also done the Judgement Paladin files that I bought and made last summer) and found out that it was cheaper and faster than expected, so I now have a set of files for both pauldrons, the wrist armor, and the breastplate. With a week left until AMKE, I think I can knock out a decent full rough draft and then revisit and upgrade some of them in time for C2E2, with a goal of a final version ready for DragonCon.
Unfortunately my printers have ALL decided to work against me, so yesterday I dealt with 9 different print failures across 4 different printers. I am hoping that when I get home today, I will have the first pauldron and half of the upper breastplate waiting for me on their build plates, and not another set of spaghetti.
For the jacket, I ordered this one:

I will probably end up removing the buttons and sewing in a piece of brown fabric or leather to the inside of the lapel area. Then I'll make the belt/straps necessary to hold the pauldrons on.
The goal for the end of the weekend is to get all of the armor pieces printed and the hammer pieces up to the point of being primed and ready to paint. I also want to have the belt done and the vest done. Then next week (Mon-Wed) will be about post processing the armor, assembling the hammer, and handling the rigging.
Plus I still need to look at my other cosplays for the Con and fix whatever is broken.
As a bearded Cosplayer, I always appreciate bearded characters that aren't joke characters, and Arcane is full of options. As an engineer and a hobbyist blacksmith, Jayce appeals to me quite a bit.
For the build:
Originally I planned on building this in two different phases. Phase 1 was going to be for AMKE, and it was going to be the casual attire he wears underneath the jacket and breastplate:
Then Phase 2 was going to be learning Blender and designing the armor pieces myself (since the files weren't available anywhere that I could find), with a goal of having it done/ready for C2E2. The intent was to really lean into sewing and sew the dress shirt and vest myself, and even attempt the jacket.
I did buy a basic vest pattern and sewed a practice vest which turned out rough but acceptable:
However, I then procrastinated for way too long on making adjustments to the pattern, so I have pivoted to a different path, and I will instead be altering some items. This is arguably the path I should have started on, since it will be easier to build the sewing skills in bite-sized pieces.
I found this shirt on Amazon:
The color is a decent match (from what I can tell, he's wearing something similar to forest green) and has the type of collar I want for this. Since the vest and shirt are so similar, I bought two of them. I have removed the sleeves and pocket from the one that will become the vest, and I am going to add gold trim/piping and a piece of scarlet floral patterned cloth to the shoulders. I will also remove a few of the upper buttons probably.
For the shirt that will remain the shirt, I have removed the collar and the pocket. I will probably cut away the top 3 buttons or so, to prevent it from showing under the open vest buttons. I will also add some scarlet to the inside of the sleeve cuffs.
I will be making the belt with leather and a 2" strip of scarlet nylon. I'm undecided about how I will make it tighten though.
The Corrupted Hammer file was purchased from a designer on Cults3D and most of the pieces (8 for the hammer head alone) were printed on my Neptune 3 Max. That printer has been throwing a tantrum lately, so the prints came out rough but acceptable. Because of the size of this prop, I have purchased some carbon fiber tubes to act as the handle.
The original intent was to make the hex orb light up and the hammer pieces open up with the actuation of the handle lever, but I think that will have to be saved for a "Version 2" of the hammer, because realistically I don't have time for that before AMKE. I also want to cast the handle out of aluminum bronze for strength and a more realistic gold look, though I may also pursue electroplating.
Last night I finally got around to gluing and welding the hammer head pieces together. Due to the size of this thing (over 10 pounds already), I used a combination of CA glue along the large interior flat surfaces, metal staples (a first for me), a 3D pen to fill gaps where prints warped (also a first for me), and a wood burner to weld the pieces together. It feels pretty sturdy, and I'm not worried about the pieces breaking apart. The hex core/orb gets fully enclosed within the head, so I can't attach the two sides until I have the orb done. I ordered some translucent blue resin that I'm going to print it out of, then I'll have to wrap it in something to protect it for when I am painting the rest of the hammer head. Once I get the two halves stapled and welded together, I'll be coating it in UV Resin per my usual finishing process. Thankfully I won't have to do a ton of sanding since this is supposed to be a rough surface finish.
I also ordered a set of pants that should look close enough and a pair of brown boots to go with it. I don't currently plan on making the leg braces.
Phase 2 was supposed to wait until after AMKE, however I made the decision to see what kind of price and timeline would be involved with commissioning a Designer to model the armor. I reached out to the Designer that made the hammer file (they had also done the Judgement Paladin files that I bought and made last summer) and found out that it was cheaper and faster than expected, so I now have a set of files for both pauldrons, the wrist armor, and the breastplate. With a week left until AMKE, I think I can knock out a decent full rough draft and then revisit and upgrade some of them in time for C2E2, with a goal of a final version ready for DragonCon.
Unfortunately my printers have ALL decided to work against me, so yesterday I dealt with 9 different print failures across 4 different printers. I am hoping that when I get home today, I will have the first pauldron and half of the upper breastplate waiting for me on their build plates, and not another set of spaghetti.
For the jacket, I ordered this one:
I will probably end up removing the buttons and sewing in a piece of brown fabric or leather to the inside of the lapel area. Then I'll make the belt/straps necessary to hold the pauldrons on.
The goal for the end of the weekend is to get all of the armor pieces printed and the hammer pieces up to the point of being primed and ready to paint. I also want to have the belt done and the vest done. Then next week (Mon-Wed) will be about post processing the armor, assembling the hammer, and handling the rigging.
Plus I still need to look at my other cosplays for the Con and fix whatever is broken.