New Recruit 1st Build Gen 3 MK-VI

ThatADHDad
I totally respect where you're coming from. I only look to inform folks who might not be aware of the journey they're in for. It sounds like you've got a good handle on expectations. I love hearing you're making one for daughter as well.
 
ThatADHDad
I totally respect where you're coming from. I only look to inform folks who might not be aware of the journey they're in for. It sounds like you've got a good handle on expectations. I love hearing you're making one for daughter as well.
I love the advice! I’m trying to be as much as a sponge as my brain allows me to be. I’ve learned so much from this site and the fb group and all you awesome builders in such a short amount of time, it’s insane. You guys definitely make things like this a lot more fun with all the guidance and willingness to help!
 
Update:

Entire family got sick for almost a week which delayed everything and then we found out our dog has a couple months to live. Been a rough time, but gotta push on and be an example for the kids. So, I started back up a couple days ago and been trying to crunch before Planet Anime THIS weekend.

I really wanted to print out and finish an AR or st least finish and paint the pistol, do some sort of under suit, and make the inner thigh pieces out of EVA foam, but unfortunately I will not have time for that.

First thing I got working was the soles cut, glued, and hopefully stuck on my boots. I got the shoes into the boot and all that’s left is figuring out how to get the top piece on and gliding over the rest of the boot when I walk.
IMG_4535.jpeg
IMG_4561.jpeg
IMG_4536.jpeg


Next up I got my harness on and did some lining up. Got the strapping glued in for the COD piece and while it could definitely be more practical, I’m overall happy with how it is. Just need to add padding to it. After that I got the thighs where I thought they should be and used elastic straps to buckle in. I am currently regretting that decision bc it moves around too much. So I might undo that and put the solid strap on. All I have left is that and padding for the thigh and calf. They hit slightly, but not too bad, when I’m going up/down stairs.
IMG_9769.jpeg


Yesterday I started trying to map out where the pads are going to go for my helmet and then made 2 more visors for a total of 4. My golden yellow idye poly is taking forever to get here (should be here tomorrow) and also the lights I ordered from Imperial Tech Shop are like a week late, naturally. But also should be here tomorrow so I’m hoping to do the helmet wiring, padding, and visor Wednesday which will have it done.
IMG_4603.jpeg
IMG_4604.jpeg


Today I went and grabbed some knee and elbow pads to see how those would be (as I saw on Draxes build) and they made it so I might not need padding and straps for the arms. I may end up doing it anyway for security if I have time. Minus some pinching in a place or two, they fit nice. I went ahead and test fit the entire thing again and didn’t like the amount of hitting the biceps and torso did, so I took a head gun and bent the lower part of the torso and that helped a TON.

So, as of right now my biggest issues now are:

1. how to strap up the shoulders so they’re not hitting the torso every time I move
2. How to secure the front and back torso pieces on the bottom
3. Getting the black accents painted
4. Finishing the helmet
5. Padding.

And I have 4 days lol. Here’s the test fit.

IMG_9801.jpeg

IMG_9799.jpeg
 
Last edited:
Update:

Entire family got sick for almost a week which delayed everything and then we found out our dog has a couple months to live. Been a rough time, but gotta push on and be an example for the kids. So, I started back up a couple days ago and been trying to crunch before Planet Anime THIS weekend.

I really wanted to print out and finish an AR or st least finish and paint the pistol, do some sort of under suit, and make the inner thigh pieces out of EVA foam, but unfortunately I will not have time for that.

First thing I got working was the soles cut, glued, and hopefully stuck on my boots. I got the shoes into the boot and all that’s left is figuring out how to get the top piece on and gliding over the rest of the boot when I walk. View attachment 353520View attachment 353521View attachment 353522

Next up I got my harness on and did some lining up. Got the strapping glued in for the COD piece and while it could definitely be more practical, I’m overall happy with how it is. Just need to add padding to it. After that I got the thighs where I thought they should be and used elastic straps to buckle in. I am currently regretting that decision bc it moves around too much. So I might undo that and put the solid strap on. All I have left is that and padding for the thigh and calf. They hit slightly, but not too bad, when I’m going up/down stairs. View attachment 353523

Yesterday I started trying to map out where the pads are going to go for my helmet and then made 2 more visors for a total of 4. My golden yellow idye poly is taking forever to get here (should be here tomorrow) and also the lights I ordered from Imperial Tech Shop are like a week late, naturally. But also should be here tomorrow so I’m hoping to do the helmet wiring, padding, and visor Wednesday which will have it done. View attachment 353524 View attachment 353525

Today I went and grabbed some knee and elbow pads to see how those would be (as I saw on Draxes build) and they made it so I might not need padding and straps for the arms. I may end up doing it anyway for security if I have time. Minus some pinching in a place or two, they fit nice. I went ahead and test fit the entire thing again and didn’t like the amount of hitting the biceps and torso did, so I took a head gun and bent the lower part of the torso and that helped a TON.

So, as of right now my biggest issues now are:

1. how to strap up the shoulders so they’re not hitting the torso every time I move
2. How to secure the front and back torso pieces on the bottom
3. Getting the black accents painted
4. Finishing the helmet
5. Padding.

And I have 4 days lol. Here’s the test fit.

View attachment 353526
View attachment 353527
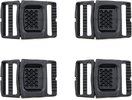
yeah i know what ya mean i could not lift my arms because the shoulders would smack the chest or back and i had no range of movement so i move the shoulders down a little bit and that seemed to work. as far a how to lock the front and back together i would use a flat buckle like the one in the picture im attaching.


i used them on my foam chief they hold really well and pretty cheap to. Now for painting the elements on the back i used a harbor freight airbrush set up and it also makes it easier to weather the armor to.

i will be watching to see how it all comes out it looks great by the way....
 

Attachments

  • 71KZafpI9sL._AC_SX679_.jpg
    71KZafpI9sL._AC_SX679_.jpg
    45.7 KB · Views: 17
Attaching the top plate of the shoe to the bottom using elastic should give you enough wiggle room that walking isn’t terrible

If you’re looking for an AR for Saturday, I do have a MA5B I can lend ya
 
yeah i know what ya mean i could not lift my arms because the shoulders would smack the chest or back and i had no range of movement so i move the shoulders down a little bit and that seemed to work. as far a how to lock the front and back together i would use a flat buckle like the one in the picture im attaching.
I ended up reprinting the biceps and shoulders a little smaller and that helped a lot.

I have several variations of buckles, and none of them are very good for me being able to get the thing on and off by myself. I want to use the strong neodymium magnets I have but these GA files were not made very well in terms of connecting these parts.
 
Attaching the top plate of the shoe to the bottom using elastic should give you enough wiggle room that walking isn’t terrible

If you’re looking for an AR for Saturday, I do have a MA5B I can lend ya
I did end up doing that! Thank you!

And I appreciate you trying to let me use it at the con. Thanks for all your help and Including me in the local events here, I appreciate it!
 
Wayyyy late update on the suit. After I got to the stopping point for Planet Anime and the Halloween events, I took a 3 week break from anything lol! I think it came together nicely at the end.

The first thing I tackled on the previous list was the helmet. The iDye poly never ended up showing up so I had to drive across the city to get it at the only store within a 100m radius that had it in stock. It ended up being a lot of fun to make these and they turned out much better than I thought I would do on my first try. Now I need to figure out what to do with the extra 3 lol. I ended up getting the padding done and wiring done for 2 fans as well as the Imperial Tech Shops lighting. Their harness made the lights stupid easy to install.
IMG_4617.jpeg

IMG_4624.jpeg
IMG_4640.jpeg

IMG_4638.jpeg


Next on the list was getting all the black accents painted. I ended up hand painting these with a special thin matte black acrylic paint. This paint was awesome, made it so the lines didn’t show up when it dried and it dried super fast.
IMG_4650.jpeg


After that I got to work on the rest of the list, padding and strapping. This was something that if I wasn’t so new to this, I would’ve figured out long ago. But, it is what it is and it ended up working out for me. I used wall acoustics foam for the thighs and calves bc of its ease to bend one particular direction. I got glued it all in. Then I use straps from the calf to the thigh, then from the thigh to my harness belt area to keep the legs up. Luckily, the pressure from the padding did most the work and the straps ended up being more of a secondary hold.

I tried so many damn ways to secure the front torso to the rear and I’m still not really satisfied. The galactic armory files are just not well thought out for wearing in my opinion. This shows heavily the belt and torso. But I ended up using straps and buckles and it did alright with the top magnets I threw on months ago holding firm.

The shoulders/biceps were another pain in the ass. But I took some tips from people and merged them all together to make a 3 strap system that kept them where they were but also allowed for them to lean onto me.

The convention was great, met some awesome people from this forum/group, and both my daughter and I made a lifelong core memory.

DSC06454.jpeg
DSC06462.jpeg

DSC06477.jpeg

IMG_9879.jpeg


After that convention, I was HURTING. Bicep parts were pinching at the top and bottom which caused me to bleed, the boots wouldn’t move properly so it made me walk super stiff and rigid, and the torso TORE UP my clavicles. So, I ended up having to make some adjustments and only had a week before the next Halloween event.

I ended up reprinting and painting a new set of biceps and shoulders that were 10% shorter. This helped a ton with not only pinching, but my ability to get my helmet on and off, drink stuff, and move. Next, I had to add a bunch of padding to the torso to spread out the pressure on my shoulders. And it helped a ton. Finally, the boots. I ended up putting a thick piece of padding between the shoe and the top piece which helped it glide over the front part, making it a lot easier to walk.

At this, though, I noticed I was having trouble with visibility. So, i just placed an order for a new visor from Branfuhr Studios and I hope it helps. I may need to invest in stronger fans or re-orient them for better air flow because the lenses were fogging up a lot at both events. I also need to figure out some sort of microphone/speaker system so I can hear people AND people can hear me. I also really need to print out a gun. I also REALLY need to figure out an undersuit all around as well.

Anyway, I’m hoping to make a Con in Oklahoma 12/14-12/15 to meet Steve Downes but I’m not sure if I’ll have a second helmet made by then to have him sign or if can even make it. I’ll update when the visor comes in later this week
 
Wow the suit looks amazing!!

About you visibility- first; I'm sure that your branfur visor will be wonderous compared to the home made ones, even if they are quite fun to make. I have a home-made visor that I used to have fogging issues with. I installed 2 5V blower fans above the visor that blow directly onto it rather than at my face. The blower fans are quite nice as they are able to move the air in more or a predictable direct path right onto the visor which will clear any fog right off. Even if I try to breathe on the visor will all my might, any fog I create will immediately be cleared. If you have fogging with the branfur visor this might help you out too.

Your suit looks great overall man! You killed it! Steve Downes will be impressed for sure.
 
Fantastic Suit!
I'm using the same files. Your detailed explanations really help me understand how this thing will come together. I already have answers to a multitude of questions.

So far, the only part I've printed is the left calf.
Regarding Sizing: (Using armor smith)

Calf parts for me, are 95%, uniform. For Emily they are 94%.

Did you do all of the sizing Uniform, or did you need to do some non-uniform adjustments?
Thanks!
 

Your message may be considered spam for the following reasons:

If you wish to reply despite these issues, check the box below before replying.
Be aware that malicious compliance may result in more severe penalties.
Back
Top