Arithen
Well-Known Member
Hey there! There's a lot of "firsts" in this build as I've never 3D printed, used an airbrush, sewn, or pretty much anything else that would be related to cosplay before.
ODST's always stood out to me because of their Behind-Enemy-Lines missions, and the fact that they're in the same fights Spartans are, but without the same augmentation. I stumbled across Brinks' STL files and started printing about a year ago.
Here's the progress so far. The goal is to be finished painting early September 2024, and hopefully finished everything by October 31, 2024; a deadline I'm not 100% certain I can make, but should still give me enough time if everything goes well.
For those who are interested, this is what it cost to 3D Print everything:
COST
Google Drive Link

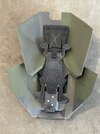
BUILD


A this point I realized the green I went with wasn't what I was looking for, so I repainted it all to the following:


ODST's always stood out to me because of their Behind-Enemy-Lines missions, and the fact that they're in the same fights Spartans are, but without the same augmentation. I stumbled across Brinks' STL files and started printing about a year ago.
Here's the progress so far. The goal is to be finished painting early September 2024, and hopefully finished everything by October 31, 2024; a deadline I'm not 100% certain I can make, but should still give me enough time if everything goes well.
For those who are interested, this is what it cost to 3D Print everything:
COST
Google Drive Link
BUILD
A this point I realized the green I went with wasn't what I was looking for, so I repainted it all to the following:
Last edited:
") I believe all the painting should be complete by the end of next weekend. It's coming together!
I believe all the painting should be complete by the end of next weekend. It's coming together!