Spartan Mark VII [GEN 3] undersuit

Opherox

New Member
Hey there everyone.

I'm working on designing the under suit parts of the Spartan Mark VII [G E N 3] armor and would like some feedback. So, this design is foldable, so that it can be printed part by part without supports, and then soldered together (due also to my lack of a 3d model of my neck so that I can design over it on fusion 360 or wherever, I use fusion because I know how to use it better). I'm also planning to create the waist piece too, but one thing at a time, as that piece is much more difficult to design with this concept.

Spartan.png

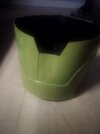
So, just finished my first iteration of the neckpiece, and the problem is that its quite stiff to the point it kind of hurts moving the neck around, so decreasing the thickness is a must. I'm going to try with 3mm max and see where it takes me. Also modified its shape so that it matches the original in the cosplay guide a bit more. The part below (which seems cutted) hasn't been added due to it being blocked by the chest piece, so it isn't necessary as it isn't visible.

IMG_20240819_183034.jpg

The main problem and where my question lies is, how do I add the details so that the extra thickness doesn't impede movement or hurt the neck while moving? Just in case reducing the thickness doesn't solve it. I cant reduce thickness much more because if not there's no space to leave joints for the pieces to later be soldered. These joints are below the 3 patterns on each side that can be seen in the image:
Test.png

Lastly, I'm aware moesizzlac has designed some pieces for the Halo Infinite under suit, but they are for the Master Chief, and mine is the regular Spartan one, so the shape is different. Also, they need to be printed with supports, and idk how well a one nozzle printer can handle that as TPU for what I know doesn't like to be used as a support material. Thought about trying to make all this with EVA foam, but I seem to be terrible on working with it, which causes it to have a horrible finish.

I´ll release the files whenever its finished and tested for anyone that is interested on them :)
 
Update:

Changed the design up a bit to be more identical to the reference, reduced the maximum thickness to 2.6mm while maintaining the details.

I've printed it and it is flexible enough to move the head from side to side and also front to back without causing too much discomfort. I'm wearing a balaclava under it, so that some edges don't scratch me. To strap the folded piece, I've added some velcro on the back.

Now the full neck can be printed in about 8h at 20mm/s and weights less than 80g I recall seeing, much more convenient this way. I'll post some pictures tomorrow with the suit on to test it out, as its getting late here to do so.
 
Last edited:
This could also come down print setting too and actual material. Which you seem to have a lot of knowledge in, so I won’t go into too much detail. But printing with like a single wall and like 2-5% gyroid infill. I’ve actually printed plenty of neckseals for others with these settings and they are super satisfied. I also printed in TPE versus TPU. TPE is 75a shore hardness and prints almost exactly the same. I printed SlenderDummy’s neck seal so I didn’t design it, because my skills in 3D design are super low. lol. I can do basics. But I do love the idea you’re going with. I would love to give your stuff a shot with my mk7 when you finish up. Love this and will keep an eye on this.
 
IMG_20240821_160312.jpg

So, its looking like this at the moment, it seems apparent that after testing it out, that the piece below must be extended so that no skin is on sight, good thing its modular! I can just design it and solder it up to the existing piece. I'll get to work with it.

Also, now that we are at it, any tricks to give the paintjob a more dirty/battle hardened look?
 
This could also come down print setting too and actual material. Which you seem to have a lot of knowledge in, so I won’t go into too much detail. But printing with like a single wall and like 2-5% gyroid infill. I’ve actually printed plenty of neckseals for others with these settings and they are super satisfied. I also printed in TPE versus TPU. TPE is 75a shore hardness and prints almost exactly the same. I printed SlenderDummy’s neck seal so I didn’t design it, because my skills in 3D design are super low. lol. I can do basics. But I do love the idea you’re going with. I would love to give your stuff a shot with my mk7 when you finish up. Love this and will keep an eye on this.
Never tried out TPE, but the reduced shore hardness value would definitely help, 3d giroid seems to be the best infill pattern out there to maintain flexibility. Ty for the info!

After I test some more prototypes and maybe get my hands onto a TPE roll, I'll make sure you can get your hands on the model to print it yourself, but just when everything is ok, so that no other people "waste" material on it.
I hear ya. I appreciate you and the work you’re doing. I wish I was more skilled at 3D designing so I could do stuff like that. lol.

View attachment 351425
So, its looking like this at the moment, it seems apparent that after testing it out, that the piece below must be extended so that no skin is on sight, good thing its modular! I can just design it and solder it up to the existing piece. I'll get to work with it.

Also, now that we are at it, any tricks to give the paintjob a more dirty/battle hardened look?
There are a couple ways. First the dirty, watered down black or dark brown house paint works fantastic. If you check out my omega post, I talk about it on my chest unit. It’s literally paint it on and dabbing crevices, let it sit in the crevices btw, then after a few seconds of drying, wiping it off in random patterns. Then for the chipping effect post paint job, a silver sharpie or paint pen work WONDERS. I again cover that in my my omega because it’s what I’ve been doing. But of course this is just a suggestion. You’ll find things that work better for you too.
 
1724293016789.png
1724293314420.png

A little bit more progress.

Designed the scales that go on the back of the neck (it was a pain in the ass, it might not be perfectly accurate, but its something), they will help hide the seam of the velcro!. The piece on the center is a separate piece now so that its easier to design the fold between the neck and torso pieces. Also, added some gaps below the central piece so that it flexes better when the chin hits it. Lastly, some minor visual tweaks so that it looks more alike.

As for future challenges, I'm trying to experiment with the lower piece, it will be much thinner I think, just to cover the neck visually and protect the neck from the chest piece if whoever uses this doesn't have padding in place.

The thickness remains at 2.6mm and printability should remain being easy, as long as you can manage to print a 3cm bridge (keeping speeds the same for all extruding operations should help), no supports!. In total, you can expect it to be printed in 13h at 20mm/s using 90g of filament. I don't expect it to take longer or be heavier than that.
 
I hear ya. I appreciate you and the work you’re doing. I wish I was more skilled at 3D designing so I could do stuff like that. lol.


There are a couple ways. First the dirty, watered down black or dark brown house paint works fantastic. If you check out my omega post, I talk about it on my chest unit. It’s literally paint it on and dabbing crevices, let it sit in the crevices btw, then after a few seconds of drying, wiping it off in random patterns. Then for the chipping effect post paint job, a silver sharpie or paint pen work WONDERS. I again cover that in my my omega because it’s what I’ve been doing. But of course this is just a suggestion. You’ll find things that work better for you too.
I'll make sure to give it a detailed look whenever I free time from designing to do some paintwork.

Btw, your build looks sick! The paintjob is just lovely! You even made scratches in black somehow. Truly a 10/10 build.
 
Updates: Finally finished modelling the waist piece (work kept me busy and couldn't find a while to finish it). The thicknesses might not be the most accurate, but it will be more comfortable, as well as cheap. Atm I'm going to print it in 5 pieces to test it, if I check that its ok, ill post both models for every1! :D
Waist.png

The current measures might not fit you, my waist is about 82-83 cm, so adjust it accordingly following this approximate rule: If you have a measure tape, measure your waist and give it 2-4 extra cm for tolerance, better to have extra than to be short of, as you can add some padding to make up for the extra space.
 
Updates: Finally finished modelling the waist piece (work kept me busy and couldn't find a while to finish it). The thicknesses might not be the most accurate, but it will be more comfortable, as well as cheap. Atm I'm going to print it in 5 pieces to test it, if I check that its ok, ill post both models for every1! :D
View attachment 351984
The current measures might not fit you, my waist is about 82-83 cm, so adjust it accordingly following this approximate rule: If you have a measure tape, measure your waist and give it 2-4 extra cm for tolerance, better to have extra than to be short of, as you can add some padding to make up for the extra space.
oh my literal god!!!!! yes yes YES all the YES!!!!! this is amazing!! Im super looking forward to trying this when its available. looking to have a zipper in the front or just velcro on this?

also, do you think itd be possible for you to do the same thing for the mk4 ab wrap? a solid print on my machine takes WAY too long, and i just did one, was printing for 4 days... then failed due to layer shift..... ugh. time to start over. if you cant, that is ok. I just love this concept A LOT!! good on you man. love the work.
Hi LordBert, I dont have much experience with sewing or zippers, so I'm thinking on adding a velcro on the back, as I'm not sure I can sew a zipper on it without breaking it (never tried so), or if glue will hold it in place. Velcro seems to be the easier solution to close the loop. If you have any tips on how the zipper could be installed succesfully itd be appreciated, its got me interested, as it is perhaps a more robust solution.

Regarding your request, If this prototype turns out well, I don't see a problem in trying to do the mk4 ab wrap also :), although it might take me some time to finish it (busy this two next weeks).

On the time and problem side, rest assured, as problems such as you cited will not be as time consuming. The longest print takes 14h, and that is for the back pieces that need to have more thickness to create the relief. The whole wrap would take 12*2(front)+14*2(back)+12(side thingies), totaling 64h (2,67 days). I'm thinking of giving it the final touch, designing the spinal shaped things on the back, so it might take a bit longer to finish the whole thing.

Finally, I would like to ask, does any one know about flexible paints I can use for the TPU? My TPU is black, and the pieces are of Grey and Navy Green color. If you know of any brand that sells this kind of product in Europe itd be very helpfull :).

Thank you every1 for your interest in the project. At this moment, the last back piece is being printed. Whenever I get it assembled, do some tests on it and am satisfied with the results, you can expect to have the files released.
 
Dude the time frame on that printing is nothing. That’s hella fast. And if the pieces fit on a Bambu p1s… it’ll be so much faster too. Oh and I’m in no hurry on the mk4 design. I really appreciate the consideration for the design. You do you man. Don’t worry about me. lol

Oh I was talking about gluing the zipper. With TPU/TPE, if you use E6000 premium on it… it’ll stick. The glue is flexible when dry and is industrial strength. I use it to hold my TPU boots together, on an arch seam. So I think it could work.

Painting tpu is actually quite easy. You just have to make sure you use a flexible paint. Like rustoleum 2x painters touch spray paint. That you won’t need any pre prep for either. But I personally prime the tpu with plasti dip to give a small texture of a “leather” look too. You can use flexseal for that as well. And then paint right over that.

Again, LOVE this. Great work. I’m looking forward to testing this myself
 

Your message may be considered spam for the following reasons:

If you wish to reply despite these issues, check the box below before replying.
Be aware that malicious compliance may result in more severe penalties.
Back
Top