ItsWonderWhyt
New Member
Last summer I started to 3d print my first ODST build. I originally printed ODST leg armor but decided I preferred the look of Rakshasa armor.
I carefully sized all my armor using ArmorSmith and got to printing in PLA+.

The chest base is a foam pattern I found in the Armory. I altered it to be a little less complex (I’m no foam smith).


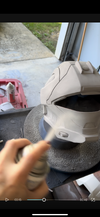
And then it was time to start finishing my prints. I have several methods that I have found work. Typically I work with thinned modeling paste, given its non-toxicity, but was showing the best way to tackle prints with toxic red goo.
I thin bondo glaze with just a bit of acetone to a melted chocolate consistency. It easily paints on and sands off. I sand with 400 grit before I prime.

With most major print artifacts gone, I do 3 light coats of Rustoleum sandable filler primer. Duplicolor cures faster, but is a thinner consistency. I recommend Duplicolor for higher detail pieces.

I like to use Duplicolor automotive paints as my base. They tend to be more scratch and wear resistant, cure fast, and look better than other brands I’ve used. Montana Gold is my other go to.
This color is charcoal metallic gray.
I went with my favorite Destiny 2 shader as my color inspo Added touches of white and deep purple. Weathering was the final touch.

Finally, I was on to mounting my armor! For my Mandalorians, I typically use a lot of Velcro and pins, but Chicago screws were a simple solution for an ODST kit that still fit in with the aesthetic. This mounting optional is very secure.

I love to see the progression.

Close up of my Recon helmet. Still need to mount some foam and fans inside for comfort. This purple visor is from EnforceProps. Though I sized my helmet for my body, I was able to make a full sized visor work with finagling. I am debating boring out the front to add lights.

Close up of my chest. The left shoulder has my blood type on it. Still need to weather the Chicago screws.

My boot armor still needs to be sanded, but at this point I was so sick of sanding — I just wanted to finally see everything on.

I still need to:
-finish the boot armor
-print some attachments for my helmet (haven’t settled on which ones )
-add some sort of waist items, pouches, etc
-paint my kukri knife
- pooooossibly build a backpack

I carefully sized all my armor using ArmorSmith and got to printing in PLA+.
The chest base is a foam pattern I found in the Armory. I altered it to be a little less complex (I’m no foam smith).
And then it was time to start finishing my prints. I have several methods that I have found work. Typically I work with thinned modeling paste, given its non-toxicity, but was showing the best way to tackle prints with toxic red goo.
I thin bondo glaze with just a bit of acetone to a melted chocolate consistency. It easily paints on and sands off. I sand with 400 grit before I prime.
With most major print artifacts gone, I do 3 light coats of Rustoleum sandable filler primer. Duplicolor cures faster, but is a thinner consistency. I recommend Duplicolor for higher detail pieces.
I like to use Duplicolor automotive paints as my base. They tend to be more scratch and wear resistant, cure fast, and look better than other brands I’ve used. Montana Gold is my other go to.
This color is charcoal metallic gray.
I went with my favorite Destiny 2 shader as my color inspo Added touches of white and deep purple. Weathering was the final touch.
Finally, I was on to mounting my armor! For my Mandalorians, I typically use a lot of Velcro and pins, but Chicago screws were a simple solution for an ODST kit that still fit in with the aesthetic. This mounting optional is very secure.
I love to see the progression.
Close up of my Recon helmet. Still need to mount some foam and fans inside for comfort. This purple visor is from EnforceProps. Though I sized my helmet for my body, I was able to make a full sized visor work with finagling. I am debating boring out the front to add lights.
Close up of my chest. The left shoulder has my blood type on it. Still need to weather the Chicago screws.
My boot armor still needs to be sanded, but at this point I was so sick of sanding — I just wanted to finally see everything on.
I still need to:
-finish the boot armor
-print some attachments for my helmet (haven’t settled on which ones )
-add some sort of waist items, pouches, etc
-paint my kukri knife
- pooooossibly build a backpack
Attachments
Last edited: