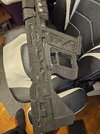
Props Another One - CMA VK78 Commando

Negativecacti

Active Member
Member DIN
S126
So I've been really getting into make props to increase my arsenal and this time I've decided to make the commando. I always liked the Reach concept for the L73 LMG and now that it's sort of in Infinite with the CMA commando and seeing BlazingForge model his I knew it was time to make it. So now here's another guide on how I did it so you can make your own if you so choose, this is how I did mine and by no means do you have to do it exactly like this. Do what's easiest for you and your abilities.

Things you'll need: 2, 3, 5, 10mm foam, 5/8 wooden dowle, sheet of plastic (like a funko box protector), craft knife and adhesive (super glue or contact cement)

CMA_VK78_85p.png
CMA-VK75-85-2.png


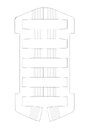
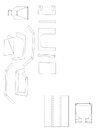
I choose to keep with the 85% scale which fits me perfectly (36" long for this one). To print this correctly from Paint > Print Preview > Page setup > Adjust to 100% normal size. which should give you 8 pages in total but only using 6 for the template.


20241124_143813.jpg
20241228_113047.jpg


20241228_113130.jpg
20241228_112755.jpg
20241229_002457.jpg

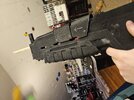
(Commando compared to the foam MA40 I made)

Now that you have everything printed out and taped together for your template, you'll need 3 pieces of 10mm foam 2 going one way and 1 going the other way for correct orientation. The middle one is where you'll want to place a wooden dowel for the barrel and to add rigidity to structure to the prop and Dremel out the inside face of the other the the barrel can sit relatively flat in-between all three layers. When choosing a dowel for the barrel I try to keep in mind what would look rather realistic. I guessed on 5/8 and seemed to look rather nice which I also wrapped in 2 & 3mm the muzzle and consistency.

20250108_223337.jpg
20241228_155213.jpg


I had to make it so it could magnetize to my back like the AR and BR so here is what I did and what I used. I got them from amazon and if it's your first time doing this, you'll need 4 magnets and they come in a pack of 2. --> 2pk 1" neodymium cubes <--

I'm going to leave this here for now so I can think of how to word and structure the rest of this guide.
 
Last edited:
CMA_VK78-85p.png

I thought that it'd be helpful to make a legend on what foam I used where and what thickness so here is that.

20250101_213902 - Copy.jpg
20250101_213902.jpg
20250111_130050.jpg
20250102_205508.jpg

This part can be a bit tricky so be careful. I started with the front and while I forgot to take some pictures while doing this section it, I'll try to explain it the best I can.

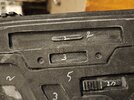
The upper shroud and going all the way back, the hand guard and front of the mag well. I beveled and sanded about 1/4" to get a rough round shape to wrap with foam. The hand guard is 3mm based with 2mm over to give it the slots. The upper shroud has a 2mm base and 5mm over it to give it some bulk to mimic the overhang on the model its self, with a 2mm strips in-between the shroud sections. Now for the "floating" section where the picatinny rail is, I used 2mm pvc board like sintra. The barrel is also wrapped in 2mm foam with 2 & 3 mm to build it up for the muzzle device. The front should end up looking somewhat like this once it's all done. I've added some templates for the hand guard, sight, and ammo counter

20250111_143933.jpg
20250102_215646.jpg
 

Attachments

  • CMA VK78_002.jpeg
    CMA VK78_002.jpeg
    29.5 KB · Views: 18
  • CMA VK78_001.jpeg
    CMA VK78_001.jpeg
    25.5 KB · Views: 19
  • 20250101_213902.jpg
    20250101_213902.jpg
    3.5 MB · Views: 19
Ok so its been a minuet since I've had a chance to update and continue with this guide.

One thing I forgot to mention as you're going along. It's a good idea when you are tracing out the pieces to build the layers, also trace said part on to the prop it's self so you can glue it in the right spot. You also MAY need to do some shorting and trimming on pieces to get them to fit properly. What I try to do is cut on the inside of the trace line for a tighter fit. Anyway on with the guide, the middle and rear parts are a little bit easier since I didn't wrap any foam around it.

20250102_231632.jpg
20250102_231558.jpg

What I did with the back portion before I did anything is thing of what thickness of foam would make sense where (refer to the legend I put together) and make sure your blades are sharp because you'll be doing some precision cutting.

20250118_210636.jpg
20250118_154914.jpg
20250118_154917.jpg
20250118_175703.jpg

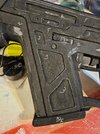
With the main part of the receiver I used 5mm for the upper and lower sections that went all the way back to the buttstock and with a somewhat steady hand dremeled a line of separation between the two, it doesn't need to go that deep just enough to distinguish them as separate pieces. and I used 2mm for the section down by the handle and trigger. Another thing I try do as when I'm going along is to line out where I'm going to bevel. when I cut out the main piece for the this part I also cut out the sections where I inserted thinner foam to get the depth in detail. The magazine does not remove (maybe I'll try with the next prop) I put some 10mm on the front and on either side to build its base and then cover the bottom with 2mm foam. The 3mm inlaid detail on the end is done the same way as the others and the othered is just layered on.

20250118_170853.jpg
I also used these parts to trace the inserts for the best fit, which seemed to work out just fine
20250104_181556.jpg
The end product some look something like that with the base layers all together.

Once you got the base layers down and the inserts on, now we can move on to the the smaller detail pieces EXCITING....

20250118_162121.jpg
20250118_162131.jpg
20250118_162114.jpg
20250118_163930.jpg
20250118_210407.jpg
20250118_213220.jpg


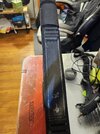
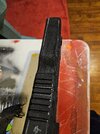
This was my least favorite part to do because of the small pieces to put on. The bolt release is 2mm on 2mm and to get the ridges on that, mag release, and handle I marked them out and used a soldering iron on the lowest temp and scored the lines in, the mag release does wrap through the trigger well and out the other side. The selector switch was simple with 3mm over 2mm along with the bolt cover, make sure to pay attention on the bolt cover with them being different on either side (I noticed that at this part of the guide). The end of the buttstock was fairly done easily, took the template and traced them on both sides then connected them and dremeled out the ridges.

20250118_154928.jpg
20250118_154937.jpg
20250118_220018.jpg

Picatinny rail I made was kind of an after thought that I kind of tossed together, the front on the barrel shroud is 5mm on 3mm with 3mm strips and the rail on the main body is 3mm with 3mm strips.


20250118_222538.jpg
20250118_222523.jpg

And now all the hard work should bring you something like this. I'll try to get to the ammo counter and sight when I'm able to do so.
 

Attachments

  • 20250118_180843.jpg
    20250118_180843.jpg
    4.6 MB · Views: 3
  • 20250105_003549.jpg
    20250105_003549.jpg
    2.4 MB · Views: 2
  • 1000023581.jpg
    1000023581.jpg
    2.8 MB · Views: 4
  • 20250118_154937.jpg
    20250118_154937.jpg
    1.8 MB · Views: 3
  • 20250118_154928.jpg
    20250118_154928.jpg
    2.5 MB · Views: 3

Your message may be considered spam for the following reasons:

If you wish to reply despite these issues, check the box below before replying.
Be aware that malicious compliance may result in more severe penalties.
Back
Top