Aztlan's Halo 4 Rogue + Binary Rifle + M6H + Exo-suit WIP, PIC HEAVY!

Status
Not open for further replies.
You are doing some really good work here dude keep it up

Thanks :)

Nice work mate...I kind of have a thing for helmets, and while I've not yet delved into the pepp world myself, builds like this motivate me to try. I really look forward to seeing how the helmet comes out for you in the end.

As to Aztlan's build, great job on the file, and again, gives me hope that I might be able to do some of this myself some day in the not too distant future.

Subscribing.

Thank you. I too have a thing for helmets, and that is what got me started in this... I just decided to finally go all the way! Aztlan's work is impeccable, and I look forward to more of his files... like a binary sniper rifle (hint, hint!!)

Looking awesome, judging by your other parts I'm gonna guess that the torso is gonna be great

Thanks! So far, it is lookin' sweet. I will post update photos a bit later today. As of right now, I have 3.5 portions of it completed :)

Now for a question before I get back to work so that I can post some pics for later today.

What other pep armor pieces are the ones used to complete this armor set?!?! Is it the MOLJNIR Mark VI pieces? I am referring to the hand plates, forearm, shins, COD, boots, etc. Thanks for any feedback in advance. I really want to get this all planned out. I am in no hurry and have no deadline, but just want to get a good plan going.

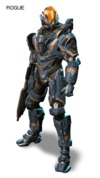
Most of the armor sets from Halo 4 aren't really complete sets per se; most of the armor sets like the Rogue only have the chestpiece, shoulder, and helmets named "Rogue". Some exceptions include the Recruit, Mk VI, and some of the armors from the DLC. As far as what you want your pieces to be it's totally up to you.

468px-Rogue_zps6cc53db1.png

Here's a reference pic of the Rogue that has it wearing Recruit forearms, and legs. Which I know Aztlan has also made on his website if you're looking to keep with the theme of using his files. But yeah, as I said before what you use for the rest of the armor is completely up to you. Keep up the good work man.
 

Attachments

  • 468px-Rogue_zps6cc53db1.png
    468px-Rogue_zps6cc53db1.png
    344.1 KB · Views: 325
Thank you very much S323. That info helps a lot... and if I can keep to Aztlan's pep file, the better :)

As promised, it's pic update time. I know some of the pieces are not all that exciting, but I am putting them up here just the same. Who knows, someone may need them for reference someday!

I did my best to highlight the part I made by showing it on my laptop's screen. Go figure though, I forgot on one of them!

SAM_0826_zps1b0cd98f.jpg

SAM_0825_zpsad455382.jpg

The pic below shows the two pieces that go in front of the chest piece. Since they are hollow, I did not connect the last piece at the time of the photo. I am currently experimenting with ideas on how to solidify them for strength... but more on that later.

SAM_0824_zps5fd39f7a.jpg

SAM_0823_zps8134b8a7.jpg

SAM_0822_zps56ded769.jpg

I think tomorrow will be the day I start on a larger piece. The epoxying has been going smoothly and a lot of progress has been made. I took my time with the helmet and separated it into four stages for epoxy. Tomorrow will be the last stage!

I think now that it is 3:45am, I should probably think about going to sleep! Remember, comments always welcome!
 

Attachments

  • SAM_0822_zps56ded769.jpg
    SAM_0822_zps56ded769.jpg
    186.9 KB · Views: 255
  • SAM_0823_zps8134b8a7.jpg
    SAM_0823_zps8134b8a7.jpg
    162.8 KB · Views: 269
  • SAM_0824_zps5fd39f7a.jpg
    SAM_0824_zps5fd39f7a.jpg
    154.9 KB · Views: 250
  • SAM_0825_zpsad455382.jpg
    SAM_0825_zpsad455382.jpg
    171.6 KB · Views: 275
  • SAM_0826_zps1b0cd98f.jpg
    SAM_0826_zps1b0cd98f.jpg
    165.5 KB · Views: 255
One of the things that most impresses me about this build is how you can be so efficient and move so quickly and it still comes out looking really good! I, personally am an extremely slow pep-er. Props to you for the dedication :D
 
Incredible! Am I correct when I think that you will actually be using the laser-print colors as your paint scheme, while reinforcing the pieces internally?
 
One of the things that most impresses me about this build is how you can be so efficient and move so quickly and it still comes out looking really good! I, personally am an extremely slow pep-er. Props to you for the dedication :D

Thank you! It may seem like I am going fast, but what you may not know is that I pre-score all the pages first (that took a lot of time) and the fact that since I am retired, I spend about 8-10 hours a day, every day, on this build. :)

Incredible! Am I correct when I think that you will actually be using the laser-print colors as your paint scheme, while reinforcing the pieces internally?

I still have not decided on a paint scheme yet, and since that is my only lacking skill, I may commission out that task to a professional or two (main painter and then an airbrush finisher). I must admit that I really like the color scheme it has with the laser printer color too (and the visor will be orange for sure), but it has provided me with a negative effect. Apparently, the toner is liquid resistant. This makes it difficult for the epoxy to wick into the cardstock. It takes a few more brush strokes, and I basically have to massage it in.
 
Awesome build so far. im loving this. Im also working on this build but taking it slowly due to the holidays and the fact my wives cats keep eatting the small part i cut out. so a few reprint parts here and there.
 
Awesome build so far. im loving this. Im also working on this build but taking it slowly due to the holidays and the fact my wives cats keep eatting the small part i cut out. so a few reprint parts here and there.

DOH! I can just imagine... You: "Merry Christmas hun! Your wife: "Ooh, a puppy! But will he get along with my cats?" You: "What cats?" :)

Evakura incredible! Very good progress.
gives me great excitement to see these photos of the armor.
porsierto, the other pieces of armor. as mentioned S323. are parts of the recruit armor. and I have the missing files. you can visit my blog and download
link: http://transformenelpapel.blogspot.mx/p/armadura-recruit-halo-4.html

I will be very attentive to new developments!! :D

Well my friend, get ready for a picture of yet another piece! This one was a big one for me.. the center of the chest. Tomorrow I will tackle the upper connecting pieces and the back center as well as start the epoxy process on the pieces I have waiting. Then it will be the long task of the two rear portions (argh!). Thanks for the link, as I will definitely be staying with your pep files... they are awesome and user friendly :)

SAM_0828_zps0bfabe68.jpg

Thanks to all of you for all of your support!

EDIT: I couldn't sleep so I went ahead and finished the upper connecting pieces a bit earlier than expected. Hey, when you are in the groove, you take advantage of it! :)

SAM_0829_zpsbea51f70.jpg
 

Attachments

  • SAM_0829_zpsbea51f70.jpg
    SAM_0829_zpsbea51f70.jpg
    162.3 KB · Views: 256
  • SAM_0828_zps0bfabe68.jpg
    SAM_0828_zps0bfabe68.jpg
    164.7 KB · Views: 261
Happy holidays everyone!

I was busy all day working on the center of the back and just now finished pepping the lil' bugger! Only two pieces left for the torso, and go figure, I left the most difficult ones for last! :) As soon as I wake and have had my coffee, I will start epoxying the parts I need to, and then start on those last two pieces... so I may have an update tomorrow, but no promises!

Here is a quick shot of what I accomplished today.

SAM_0830_zps1d7af181.jpg

Enjoy!
 

Attachments

  • SAM_0830_zps1d7af181.jpg
    SAM_0830_zps1d7af181.jpg
    182.9 KB · Views: 270
I like how this is going its very clean and neat

Thanks!

Much amazingness! How are you going to get the chest piece on when it's all attached?

Thank you! As far as getting it on, I am going to be permanently attaching most the pieces together, and as show in my nifty diagram below, the upper parts will be a hook lock design while the lower will utilize an embedded ski boot buckle similar to the one show.

hook_zps2e79a0ee.png
 

Attachments

  • hook_zps2e79a0ee.png
    hook_zps2e79a0ee.png
    133.7 KB · Views: 242


I had planned on doing something similar on my build (the strap would come from an inline skate boot) so I'll be looking forward to this part for sure. The strap kits a relatively cheap and I'm surprised I haven't seen more people use them. These are the kind I will be using.

So far the build is looking great. Keep up the good work!
 

Attachments

  • hook_zps2e79a0ee.png
    hook_zps2e79a0ee.png
    133.7 KB · Views: 248
Aztlan's Halo 4 Rogue files a completely pepped!!!! WOOHOO! Now to download the rest of the pieces to complete the armor set. :)

I have been epoxying the set as I go, so I have another 2-3 days of that until it is completed for that phase. In the meantime, I will be twiddling my thumbs until the 1st so I can head back to the print shop to run off the next part of the pep process.

With that, here is the completed back. I was very happy that everything lined up perfectly and with the help of wooden craft sticks, there is virtually zero off-alignment.

SAM_0831_zps5f222c2e.jpg

Now, off to get the rest of the files!
 

Attachments

  • SAM_0831_zps5f222c2e.jpg
    SAM_0831_zps5f222c2e.jpg
    177.7 KB · Views: 248
I am really loving this design by Aztaln ( BIG shout out to him) and to you my friend.. awesome job on the pep work .. like you i print the files with no tab edge ID numbers. even tho Aztal dosent show them when you first look at it .. i always love the no number prints. gives a better ,IMHO, cleaner look . ive started the and finished the resin and rondo stage on my helmet but dont want to hijack your thread.. if its okay would it be fine to post a pic up to this stage of mine here so we can take notes from each other?
 
I am really loving this design by Aztaln ( BIG shout out to him) and to you my friend.. awesome job on the pep work .. like you i print the files with no tab edge ID numbers. even tho Aztal dosent show them when you first look at it .. i always love the no number prints. gives a better ,IMHO, cleaner look . ive started the and finished the resin and rondo stage on my helmet but dont want to hijack your thread.. if its okay would it be fine to post a pic up to this stage of mine here so we can take notes from each other?

YES! Please do! It would be nice to see something I can compare my work with. So far, I have yet to see a single image of someone else's projects using Aztlan's Rogue files. All I ask is that you (or anyone else for that matter) does something in their post to distinguish their work from mine (watermark perhaps?) so it would be less confusing for others reading this thread. :)
 
Wow! Great work EVAkura! I've been looking around for a new project and your's will surely be a great guide to follow if I start on this permutation.
I keep going back and forth between something from 343/H4 or H3 ODST armor #_# Or building stilts and going Sanghelli! :p
I'm on vacation right now but Boston seems to have the same amount of cold and humidity that prevents most of my fun work, but that you seem to have overcome quite well! hehe.
 
Aztlan's Halo 4 Rogue files a completely pepped!!!! WOOHOO! Now to download the rest of the pieces to complete the armor set. :)

I have been epoxying the set as I go, so I have another 2-3 days of that until it is completed for that phase. In the meantime, I will be twiddling my thumbs until the 1st so I can head back to the print shop to run off the next part of the pep process.

With that, here is the completed back. I was very happy that everything lined up perfectly and with the help of wooden craft sticks, there is virtually zero off-alignment.

SAM_0831_zps5f222c2e.jpg

Now, off to get the rest of the files!

Maaaannnn I am so green with jelly. that is looking great. I like your idea about the snaps for the sides
 

Attachments

  • SAM_0831_zps5f222c2e.jpg
    SAM_0831_zps5f222c2e.jpg
    177.7 KB · Views: 241
Status
Not open for further replies.
Back
Top