- Member DIN
- S128
I had these made a while ago, but I wanted to do the first post justice so I have held off. (*disclaimer* I am not the printer or the modeler, I am just assembling)
I wanted to show members what they should expect from 3d printed props. I've seen threads on here of people who spent a lot of money on a 3d prop only to find they needed to sand and glue and tweak it. Some work is needed to finish a 3d prop, but you shouldn't have to bondo the whole thing like I have seen before.
This is what the level of detail should look like:

More on this prop to come.
First up I got a "failed print" to play with. Something the printer thought didn't deserve to be completed, but since I was new to the medium he thought that I would like something to practice on. And I did! First thing that I had to learn was how to glue the pieces together. You want something strong enough to not break from a short fall which means it needs to be semi flexible.

I used interior/exterior construction adhesive from a reputable brand. I provide a picture lower in this post.
Then I had to sand the glue seam down. For this you want to be sure that your glue is labeled as sandable. I used 100 grit and finished with 180 grit. A knife may be useful as well.

You can see in this picture visible lines in the print. This is what I would assume resulted in the failed print. It looks as if the piece shifted during printing. The line of plastic is indented on one side and protruding on the other. Since this test piece was free I wanted to see if I could revive it. I was able to get it pretty good looking just from sanding. Again pretty high grits. I think that if I were to do it again I would sand after the first coat of primer hoping that the primer is a little easier to sand. Regardless, I now have a magnum and I am still undecided as how I'd like to paint it.
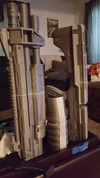
Now for the real deal, the piece that I requested was the Halo Reach M45 Tactical Shotgun and I am very pleased with the result. Mine was the first print of the file so it does have some flaws, but definitely not enough to take away from it's beauty.
Here is how it came to me and the glue I will be using to connect the pieces (purchased separately).

The pump action slide was made separate so the I can attempt to create the pump action. Still not positive how I will do that.
When requesting a 3d print you should ask if they can include a peg and hole (in woodworking a "plug") system to help align and sturdy the glue joints.
I love the detail in this print!! Some spots extra plastic gets left behind and in some spots the support pieces are still there. You should not be "de-shelling" the piece, but some work to remove this stuff should be expected. Here's an example, this hard to reach support in the middle of the gun was still there. I took a screw driver and a knife and knocked it out easy.

Here's an example of where the plastic left behind some build up in between the "teeth" on top of the barrel.

With a few minutes and a sturdy all-purpose file I was able to get them pretty clean.

The bottom of the stock and the back of the grip came in pretty rough so I will need to bondo these sides.

I was told that it took about 2-1/2 spools of PLA to print this and for an average PLA spool you shouldn't pay more than $25. So $75 for materials and I would assume a good starting point would be to double that for the printer's time. I would expect this piece to go for $150 plus shipping, at least that is what I would be willing to pay for it, maybe less because it is a first print. Thanks to the kaween initiated PrintPool I was able to get it for less than that. I've also been told that the model has improved since then including the peg and hole system for assembly. Also that the preferred plastic has switched to ABS+ due on both price and quality of print. I hope that someone in the US might help set up a PrintPool over here because it seems like a very cool idea both for creators to learn and costumers to costume.
I was even able to get some personalization!


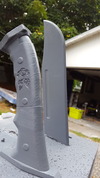
Along with a couple other things including a grenade prop and a Reach knife. I was able to use the orbital sander on the reach blade finishing with 220 grit and I love how it smoothed up.

Overall I am very happy with how these props came out and I hope I was able to help others see what a good 3D print looks like. I'm also hoping that by posting this it will help get me to complete them with the shotgun slide and a little paint.
Here are some extra pictures.


I wanted to show members what they should expect from 3d printed props. I've seen threads on here of people who spent a lot of money on a 3d prop only to find they needed to sand and glue and tweak it. Some work is needed to finish a 3d prop, but you shouldn't have to bondo the whole thing like I have seen before.
This is what the level of detail should look like:
More on this prop to come.
First up I got a "failed print" to play with. Something the printer thought didn't deserve to be completed, but since I was new to the medium he thought that I would like something to practice on. And I did! First thing that I had to learn was how to glue the pieces together. You want something strong enough to not break from a short fall which means it needs to be semi flexible.
I used interior/exterior construction adhesive from a reputable brand. I provide a picture lower in this post.
Then I had to sand the glue seam down. For this you want to be sure that your glue is labeled as sandable. I used 100 grit and finished with 180 grit. A knife may be useful as well.
You can see in this picture visible lines in the print. This is what I would assume resulted in the failed print. It looks as if the piece shifted during printing. The line of plastic is indented on one side and protruding on the other. Since this test piece was free I wanted to see if I could revive it. I was able to get it pretty good looking just from sanding. Again pretty high grits. I think that if I were to do it again I would sand after the first coat of primer hoping that the primer is a little easier to sand. Regardless, I now have a magnum and I am still undecided as how I'd like to paint it.
Now for the real deal, the piece that I requested was the Halo Reach M45 Tactical Shotgun and I am very pleased with the result. Mine was the first print of the file so it does have some flaws, but definitely not enough to take away from it's beauty.
Here is how it came to me and the glue I will be using to connect the pieces (purchased separately).
The pump action slide was made separate so the I can attempt to create the pump action. Still not positive how I will do that.
When requesting a 3d print you should ask if they can include a peg and hole (in woodworking a "plug") system to help align and sturdy the glue joints.
I love the detail in this print!! Some spots extra plastic gets left behind and in some spots the support pieces are still there. You should not be "de-shelling" the piece, but some work to remove this stuff should be expected. Here's an example, this hard to reach support in the middle of the gun was still there. I took a screw driver and a knife and knocked it out easy.
Here's an example of where the plastic left behind some build up in between the "teeth" on top of the barrel.
With a few minutes and a sturdy all-purpose file I was able to get them pretty clean.
The bottom of the stock and the back of the grip came in pretty rough so I will need to bondo these sides.
I was told that it took about 2-1/2 spools of PLA to print this and for an average PLA spool you shouldn't pay more than $25. So $75 for materials and I would assume a good starting point would be to double that for the printer's time. I would expect this piece to go for $150 plus shipping, at least that is what I would be willing to pay for it, maybe less because it is a first print. Thanks to the kaween initiated PrintPool I was able to get it for less than that. I've also been told that the model has improved since then including the peg and hole system for assembly. Also that the preferred plastic has switched to ABS+ due on both price and quality of print. I hope that someone in the US might help set up a PrintPool over here because it seems like a very cool idea both for creators to learn and costumers to costume.
I was even able to get some personalization!


Along with a couple other things including a grenade prop and a Reach knife. I was able to use the orbital sander on the reach blade finishing with 220 grit and I love how it smoothed up.
Overall I am very happy with how these props came out and I hope I was able to help others see what a good 3D print looks like. I'm also hoping that by posting this it will help get me to complete them with the shotgun slide and a little paint.
Here are some extra pictures.

Attachments
-
 20160802_181022_zpsds9wbyea.jpg154.5 KB · Views: 366
 -
 20160803_181654_zpsya4blyys.jpg113.1 KB · Views: 380
 -
 20160802_181108_zpsppo5ds9q.jpg144.5 KB · Views: 427
 -
 20160802_180941_zpsbrfax99h.jpg312.2 KB · Views: 398
 -
 20160802_102208_zpsvb2aphob.jpg141.7 KB · Views: 418
 -
 20160802_102252_zpscikam0jg.jpg157 KB · Views: 393
 -
 20160803_200434_zps3m3j0jjf.jpg143.2 KB · Views: 408
 -
 20160806_084356_zpsi4ot2dcn.jpg122.2 KB · Views: 401
 -
 20160806_095513_zpskhzywnoj.jpg153.7 KB · Views: 396
 -
 20160806_084259_001_zpslzbmn7p4.jpg174.9 KB · Views: 391
 -
 20160803_185136_zpszfli9xbf.jpg129.2 KB · Views: 395
Last edited:

